CloudRADIUS RadSec Latency Testing with EAPoL

Introduction

RadSec enhances RADIUS security by enabling encrypted RADIUS communication over TLS. It functions as an intermediary, forwarding standard RADIUS messages from clients to the RadSec proxy, which then encrypts and transmits them to a remote RadSec AAA (Authentication, Authorization, and Accounting) server via TLS over TCP.

This document outlines the procedure for measuring RadSec latency for a connection using Ubuntu.

NOTE: If you already have a RadSec proxy set up for your organization, navigate to the Verifying RadSec Connection Time with eapol_test section to test the RadSec connection latency parameters.

Installing OpenSSL

An OpenSSL client is a versatile tool used primarily for testing and debugging SSL/TLS connections to remote servers. The OpenSSL client helps establish a secure connection and allows interaction with the RadSec server.

To use OpenSSL on Linux, check if it’s already installed with openssl version, and if not, install it using your distribution’s package manager (e.g., sudo apt update && sudo apt install openssl for Ubuntu/Debian or sudo yum install openssl for RHEL/CentOS)

Exporting the SecureW2 CloudRADIUS Root CA

To integrate with any Controller/AP, the SecureW2 RadSec Server Root CA must be installed on the AP. Similarly, the Root CA from the AP needs to be uploaded to the JoinNow Management Portal. This establishes a trusted chain of certificates and helps create a TLS tunnel to pass RADIUS messages.

To export the CloudRADIUS Root CA from the JoinNow Management Portal, perform the following steps:

  1. Log in to the JoinNow Management Portal.
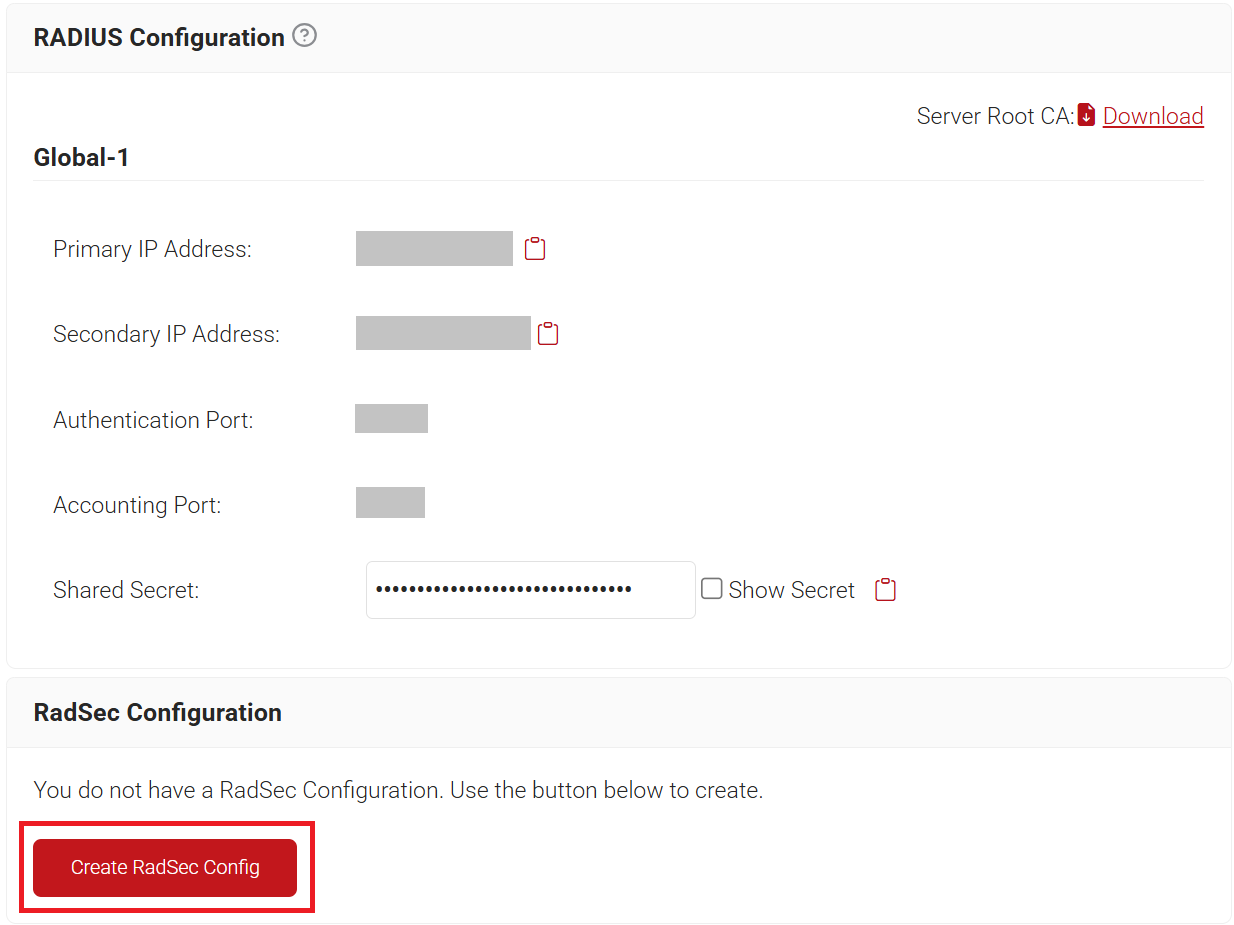
  2. Navigate to RADIUS > RADIUS Configuration.
  3. Scroll to the RadSec Configuration section and click the Create RadSec Config button.
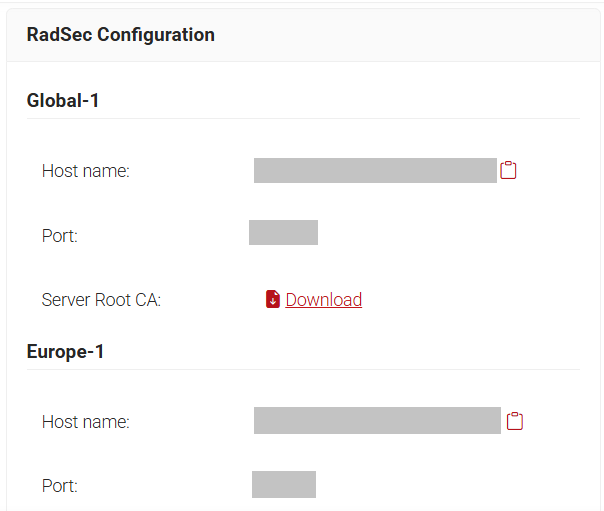
  4. In the RadSec Configuration section, click the Download link to obtain the RadSec Root CA.
  5. Copy the Host name and Port values. These values are required to configure the RadSec Proxy Server on Linux.


    NOTE: RadSec CA in JoinNow will be created after generating RadSec CA in JoinNow. Refer to 3. Exporting the SecureW2 CloudRADIUS Root CA section above to determine the name of the RadSec CA.
Configuring a Certificate for RadSec Authentication

A RadSec server certificate must be exported from JoinNow to establish a chain of trust between the organization’s Access Points and the SecureW2 PKI for a successful TLS handshake.

To create a certificate in P12 format, follow the configurations below:

  1. Configuring Certificate Template
  2. Downloading Client Certificate

Configuring Certificate Template

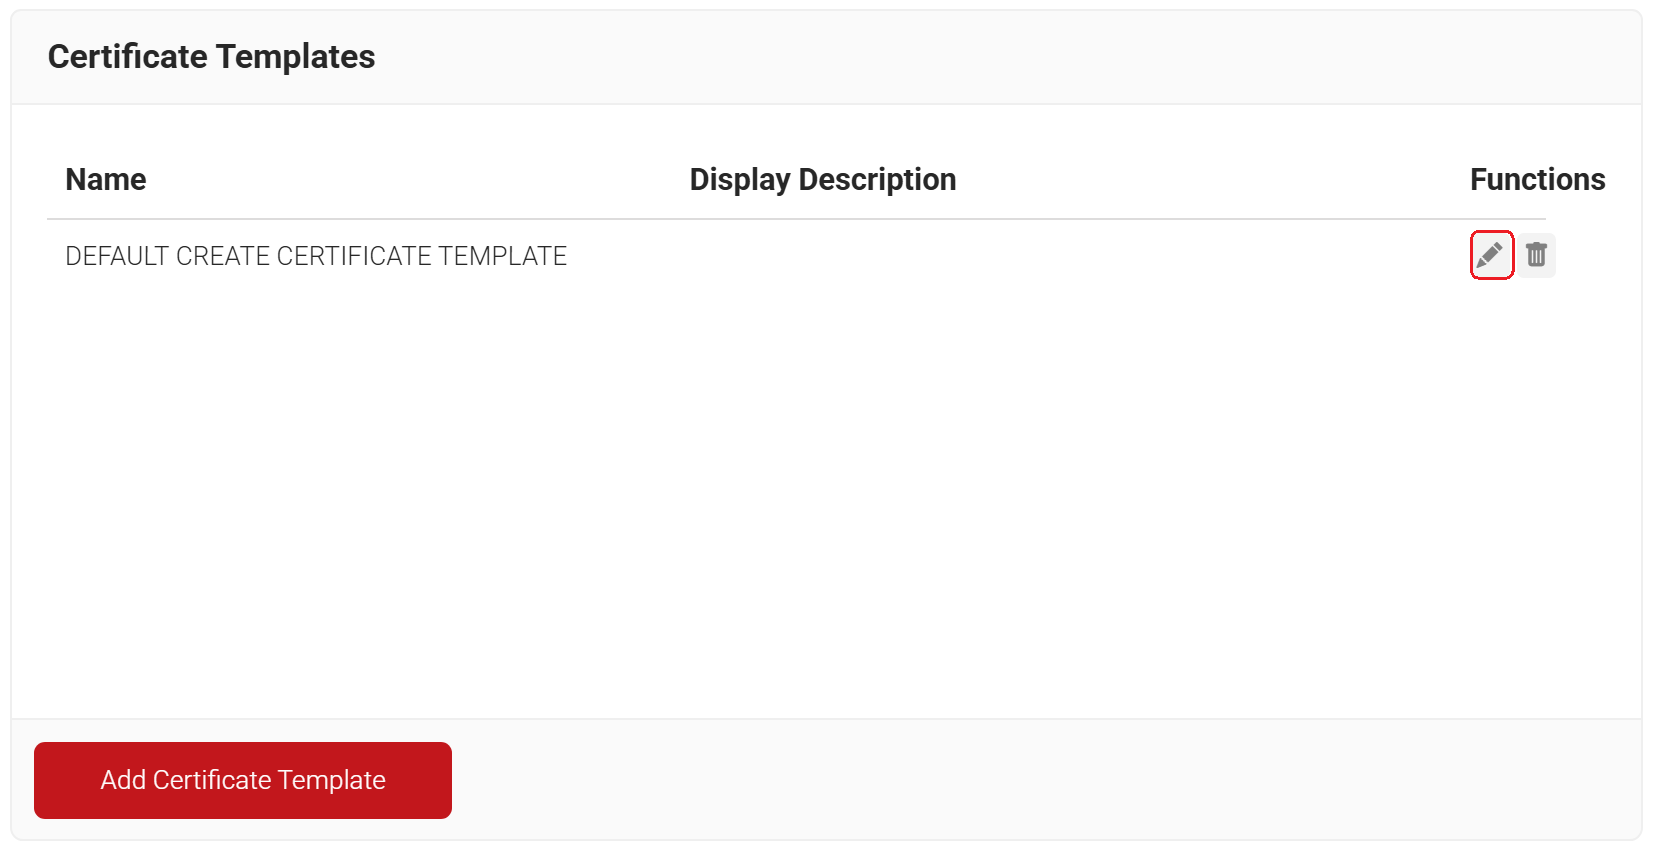
The DEFAULT CREATE CERTIFICATE TEMPLATE is used to generate a certificate via the Create Certificate section.

  1. Navigate to Dynamic PKI > Certificate Authorities.
  2. Under the Certificate Templates section, click Edit for DEFAULT CREATE CERTIFICATE TEMPLATE.
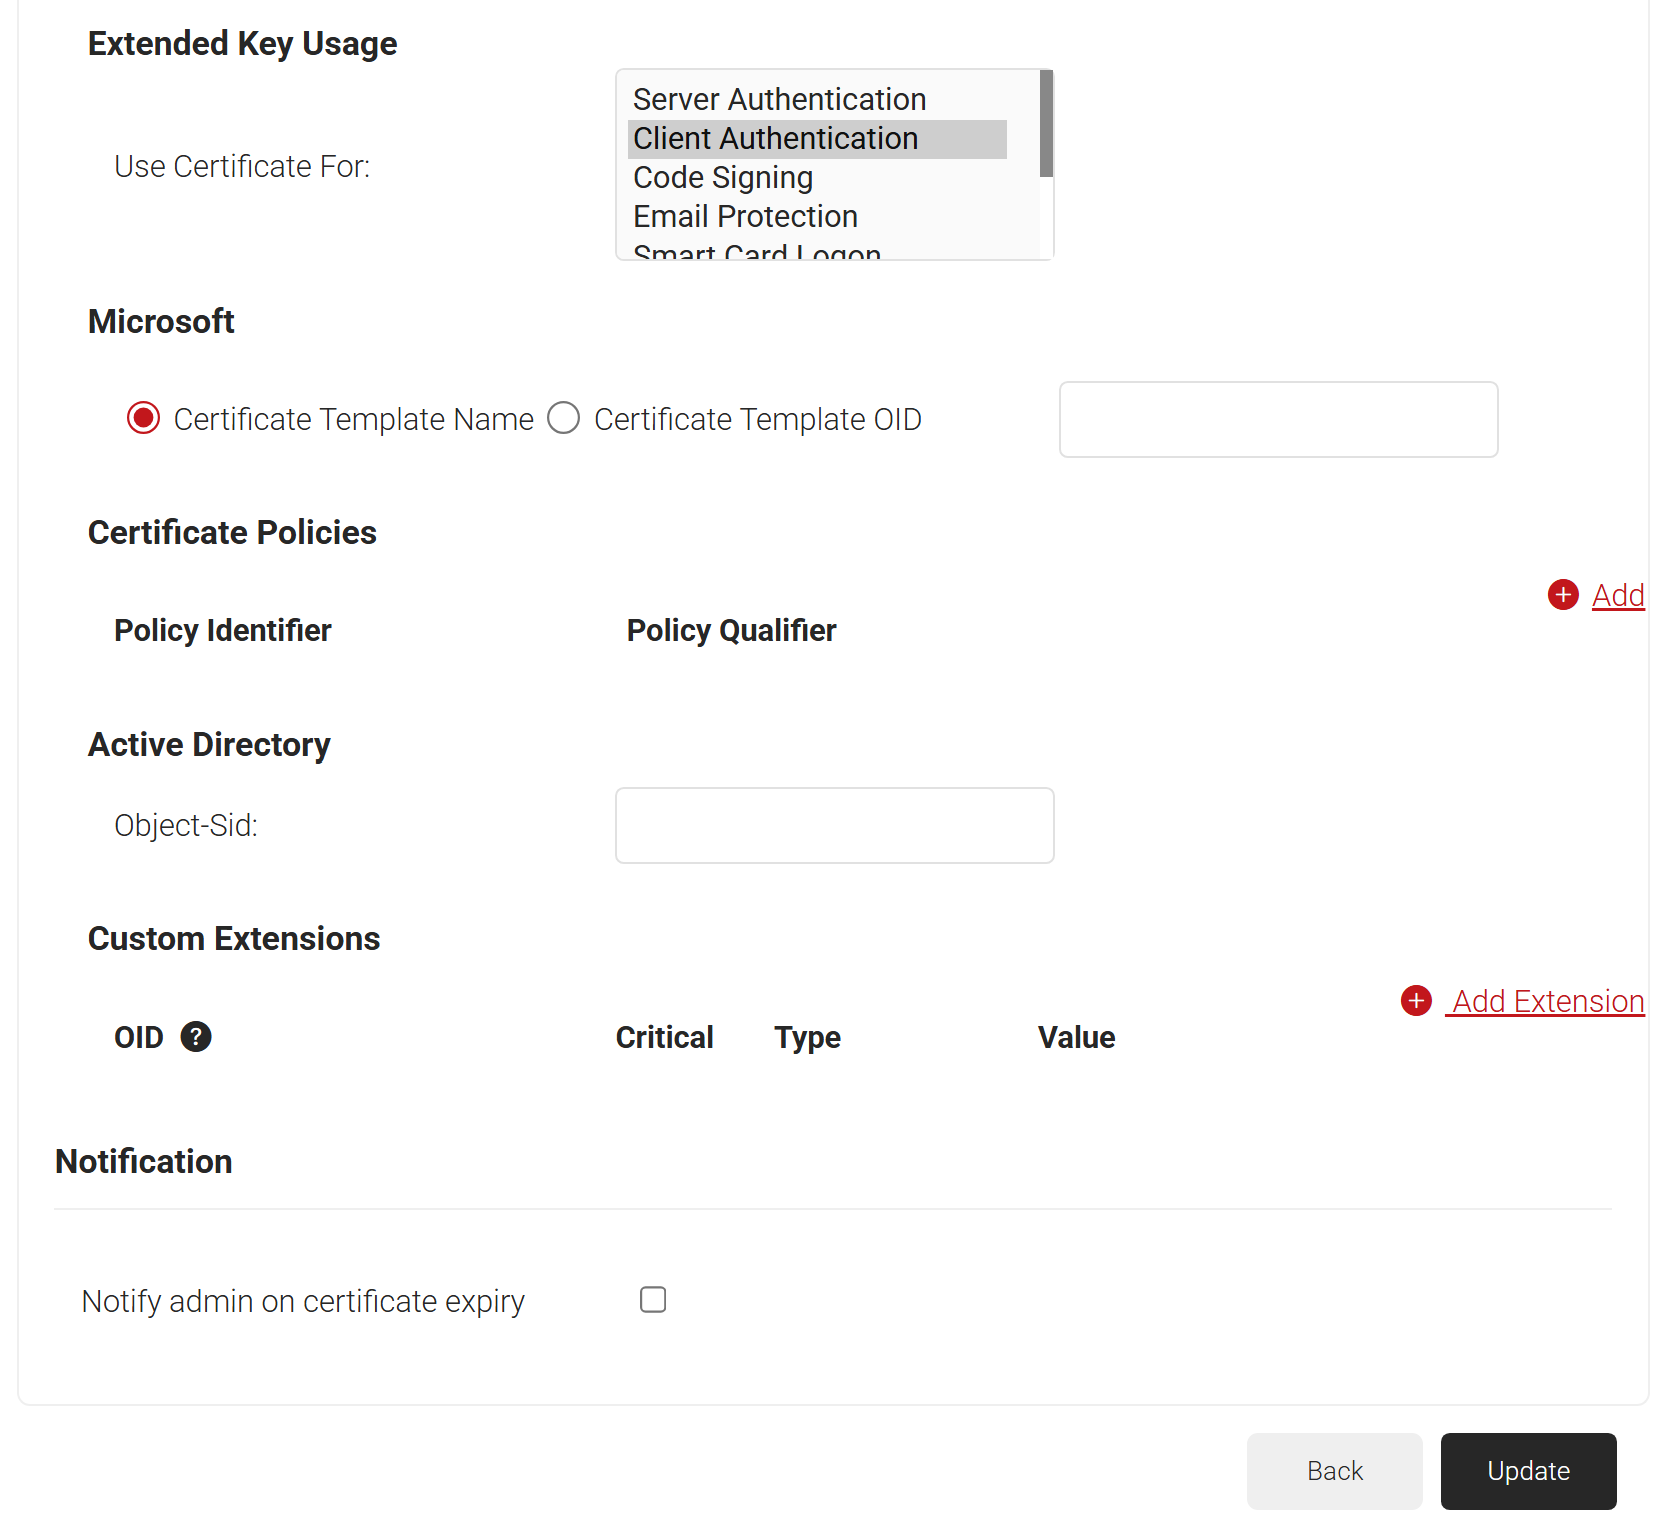
  3. Ensure Client Authentication is selected under the Extended Key Usage section.
  4. Click Update after making the necessary changes.
Downloading Client Certificate

The client certificate can be generated from the JoinNow Management Portal using the Create Certificate option. 

To create a client certificate:

  1. Navigate to Dynamic PKI > Create Certificate.
  2. In the Device Info section, from the Operating System drop-down list, select an operating system.
  3. For User Description, enter a suitable description.
  4. For MAC Address, enter a unique MAC address. 
  5. In the Certificate Signing Request section, select the Generate Keypair and CSR option to generate a keypair and CSR file and create client certificates.
  6. From the Algorithm drop-down list, select RSA.
  7. From the Key Size drop-down, select 2048.
  8. For the Subject field, enter the common name 
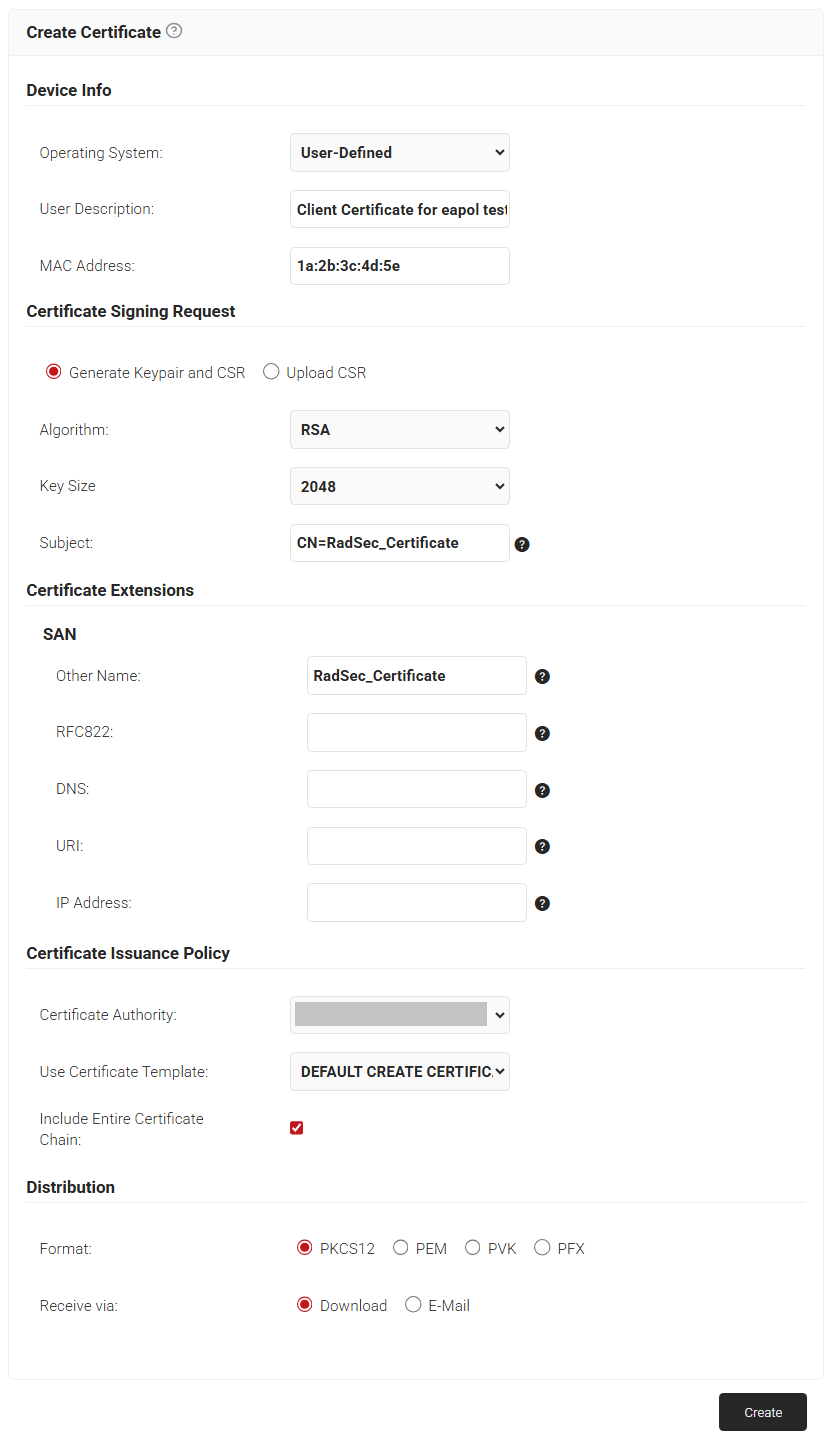
  9. In the Other Name field, enter the same value as in the Subject field(without “CN=”). Please ensure no spaces between words for effective testing. Refer to the screenshot below for an example:
  10. In the Certificate Issuance Policy section, from the Certificate Authority drop-down list, select the RadSec Intermediate CA of your organization.

    NOTE: The RadSec CA is created with the RadSec RADIUS creation in 3. Exporting the SecureW2 CloudRADIUS Root CA. To find the RadSec CA of your organization, navigate to Dynamic PKI > Certificate Authorities.
  11. From the Use Certificate Template drop-down list, select DEFAULT CREATE CERTIFICATE TEMPLATE. This template is configured with Client Authentication as the default Extended Key Usage use case. 
  12. Select the Include Entire Certificate Chain checkbox. This is mandatory. 
  13. In the Distribution section, for the Format field, select PKCS12.
  14. In the Receive via field, select Download.
  15. Click Create.

Configuring RadSec Proxy in Linux Machine

Setting up a RadSec Proxy is essential when an organization’s network infrastructure does not natively support RadSec.

To configure the RadSec proxy on a Linux machine:

Minimum System Requirements

  1. Hardware – 4 GB RAM; 20GB Hard Disk
  2. Operating System – Ubuntu 24.04.1 LTS

Installing RadSec Proxy in Ubuntu

  1. Install radsecproxy using “sudo apt install radsecproxy”. Refer to https://radsecproxy.github.io/ for installation commands based on the OS.
  2. Create a folder to store RadSec Proxy Configurations.
  3. Navigate to the <user home> folder.
  4. Use the “mkdir RadSecProxyConfig” command to create a new folder named “RadSecProxyConfig”.
  5. Copy the P12 Client Certificate to the RadSecProxyConfig folder generated earlier in the 4.1 Creating a Client Certificate for RadSec Proxy section.
  6. Navigate to the created  RadSecProxyConfig folder path from the Linux terminal.

    Use the OpenSSL commands below to extract the private key and certificate from the P12:

    To extract the certificate:
    openssl pkcs12 -in <yourcert.p12> -clcerts -nokeys -out Cert.crt

    To extract the private key:
    openssl pkcs12 -in <yourcert.p12> -out Key.key -nodes -nocerts


  7. Copy and paste the RadSec Server Root CA to the RadSecProxyConfig folder. For the RadSec Root CA, refer to the 4.2 Downloading RadSec Root CA from JoinNow Management Portal section.
  8. Create the radsecproxy_global1.conf file in the RadSecProxyConfig folder.
    Update the configuration below in radsecproxy_global1.conf as per your requirements:

Key Testing Parameters

  1. ListenUDP: Authentication port 
  2. Client: Source IP of the client server used for testing
  3. Secret: Shared secret for client authentication
				
					# Mention RadSec Proxy port to listen for UDP traffic
ListenUDP *:32775

# To get logs of configuration and connection, 3 is default, 1 is less and 5 is more

LogLevel 3

# Configuration for TLS Clients
tls default {

CACertificateFile

/home/securew2/RadSecProxyConfig/radsecRoot.cer
 #[Replace with RadSec Root CA filepath]

CertificateFile 
/home/securew2/RadSecProxyConfig/Cert.crt 
#[Replace with CRT certificate file path]

CertificateKeyFile
/home/securew2/RadSecProxyConfig/Key.key 
#[Replace with KEY private key file path]

TLSVersion TLS1_2 
#[ Require TLS1.2, overriding system defaults]
}

# Radius Client Configuration(Source IP Address from which UDP packet will be sent)
client 127.0.0.1 {
type udp
secret changeit
}

# RadSec Server Configuration  
server global1-radius.securew2.com {
	type            	tls
	port            	2083
	tls             	default
}
 
# RadSec Server Validation
realm * {
	server              global1-radius.securew2.com
}


Use the following command to run RadSec Proxy:

				
					/usr/sbin/radsecproxy -c 
/home/securew2/RadSecProxyConfig/radsecproxy_global1.conf


RadSec Proxy will now be started to handle UDP Packets from port 32775.

Verifying Device Authentication Connection Time with eapol_test for RadSec

After setting up RadSec Proxy, the connection time required to make the RadSec connection can be determined using the eapol_test command.

To download eapol_test, use one of the following commands:

  1. tar xzf wpa_supplicant-*.tar.gz
  2. cd wpa_supplicant-*/wpa_supplicant
  3. sed ‘s/^.*CONFIG_EAPOL_TEST.*/CONFIG_EAPOL_TEST=y/’ < defconfig > .config
  4. CFLAGS=”-Wno-deprecated-declarations” make eapol_test
  5. sudo install -m 0755 eapol_test /usr/local/bin

The following are the configurations to be made to test the time taken for the RadSec connection:

Downloading Client Certificate

A client certificate must be created and exported from JoinNow to test RadSec latency with eapol_test. The client certificate can be generated from the JoinNow Management Portal using the Create Certificate option.

To create a client certificate:

  1. Navigate to Dynamic PKI > Create Certificate.
  2. In the Device Info section, from the Operating System drop-down list, select an operating system.
  3. For User Description, enter a suitable description.
  4. For MAC Address, enter a unique MAC address.
  5. In the Certificate Signing Request section, select the Generate Keypair and CSR option to generate a keypair and CSR file, and create client certificates.
  6. From the Algorithm drop-down list, select RSA.
  7. From the Key Size drop-down, select 2048.
  8. For the Subject field, enter the common name 
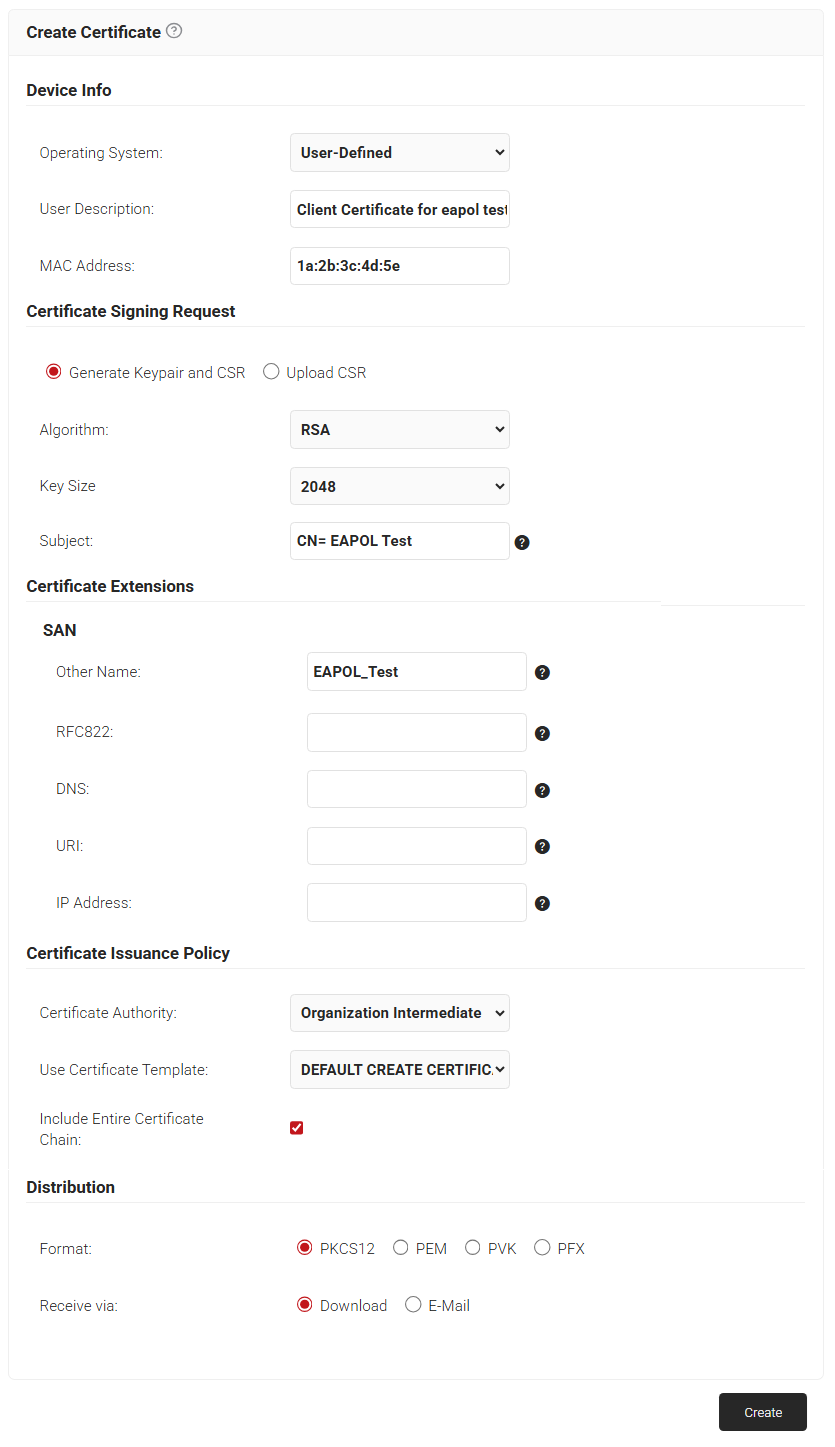
  9. In the Other Name field, enter the same value as in the Subject field(without “CN=”). Please ensure no spaces between words for effective testing. Refer to the screenshot below for an example:
  10. In the Certificate Issuance Policy section, from the Certificate Authority drop-down list, select the Intermediate CA of your organization.
  11. From the Use Certificate Template drop-down list, select DEFAULT CREATE CERTIFICATE TEMPLATE. This template is configured with Client Authentication as the default Extended Key Usage use case. 
  12. Select the Include Entire Certificate Chain checkbox. This is mandatory. 
  13. In the Distribution section, for the Format field, select PKCS12.
  14. In the Receive via field, select Download.
  15. Click Create.

Extracting the Private Key and Certificate

The downloaded client certificate is in P12 format. Follow the steps below to extract the certificate and the key. This segregation is necessary to create the eapol_test configuration file.

    1. Navigate to the Linux terminal
    2. Use OpenSSL commands to extract the private key and certificate in PEM format:
      1. To extract the certificate:
        openssl pkcs12 -in <yourcert.p12> -clcerts -nokeys -out Cert.pem
      2. To extract the private key:
        openssl pkcs12 -in <yourcert.p12> -out Key.pem -nodes -nocerts

Creating the eapol_test Configuration File

Prepare an eapol_test.conf file for certificate-based authentication. Below is a sample configuration:

				
					network={
    ssid="example"
    key_mgmt=WPA-EAP
    eap=TLS
    identity="test"
    client_cert="Cert.pem" (Replace with the PEM certificate file path)
    private_key="Key.pem" (Replace with the PEM private key file path)
    private_key_passwd="" (Replace with the private key password, if any)
}


Running the Authentication Test

To run the authentication test:

  1. Transfer the PEM files (Cert.pem and Key.pem) and the eapol_test.conf file to the directory where eapol_test is installed. 
  2. Use the following command to send a RadSec authentication request:

    eapol_test -c <configFile> -a <RadSec Proxy IP> -s <SharedSecret> -p <Port> 

NOTE: Refer to the 5.2.1 Key Testing Parameters section for the shared secret and Port. For RadSec Proxy IP, enter the proxy server IP address used by the organization.

This should return the complete logs of the authentication requests, including the handshakes. Capturing the time before and after the command should help calculate the response time, including the internet latency.

Response Time Calculation

				
					“date +%s%3”


The command above returns the time in milliseconds. This can be executed before and after the eapol_test script. The total time taken for the response can be calculated by calculating the difference between these values. This includes internet latency.

Sample Snippet
				
					startTime=$(date +%s%3)
        eapol_test -c <configfile> -p <portnumber> -s <shared secret> -a <RadSec IP Address>
        result=$?
        endTime=$(date +%s%3)
        responseTime = $endTime - $startTime
        echo($result)
				
			
Sample Output:
				
					{
  "appName": "radsec",
  "status": "success",
  "statusCode": 0,
  "statusMessage": "[ip: 35.82.194.60, port: 32769]",
  "detailedMessage": "Radius Atrributes Present In The Response",
  "callingStationId": "02-00-00-00-00-40",
  "userName": "healthcheck-nolookup",
  "totalTime": 152
}


Note: To check the status(accept/reject), you may need to run a cron script at intervals.