To configure a Network Profile for wireless, perform the following steps:
- Log in to the JoinNow Management Portal.
- Navigate to Device Onboarding > Getting Started.
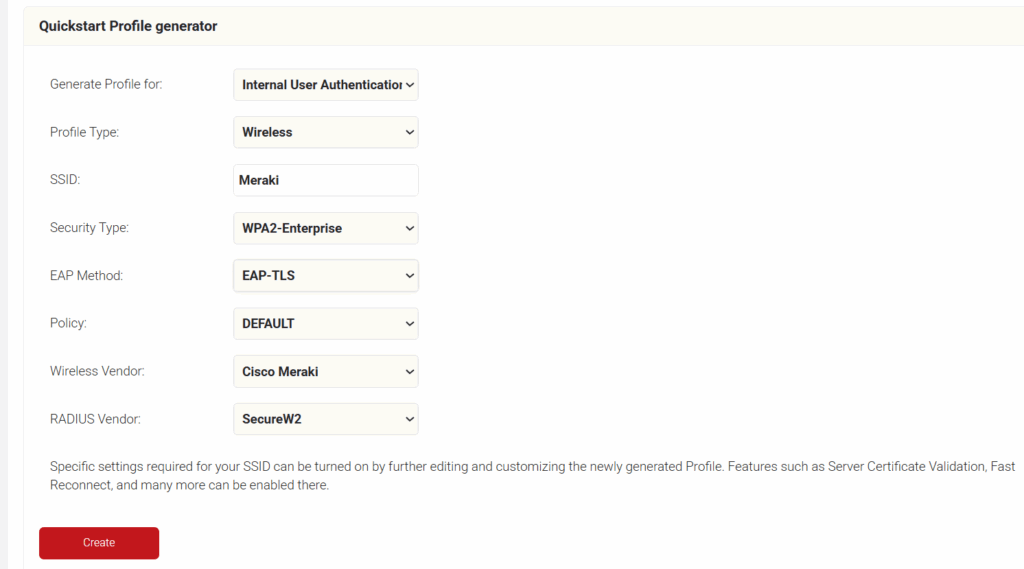
- On the Quickstart Network Profile generator page, from the Profile Type drop-down list, select Wireless.
- In the SSID field, type the name of a profile.
- From the Security Type drop-down list, select WPA2-Enterprise.
- From the EAP Method drop-down list, select EAP-TLS.
- From the Policy drop-down field, retain DEFAULT.
- From the Wireless Vendor drop-down list, select Cisco Meraki.
- From the RADIUS Vendor drop-down list, select a RADIUS vendor.

- Click Create.
Follow these steps to configure the Secure SSID:
- Log in to the Meraki Dashboard.
- Navigate to Wireless > SSIDs.

- Select an unconfigured SSID and switch it from disabled to enabled.
- Click the rename link to change the SSID name (make sure it is the same name as the SSID in the Network Profile).

- Click Save Changes.


Follow these steps to configure the RADIUS server in Cisco Meraki.
- Log in to the Meraki Dashboard.
- Navigate to Wireless > Access control.

- Under Network access > Association requirements select my RADIUS server from the enterprise drop-down list.
- Select WPA2 only from the WPA encryption mode drop-down list (recommended for most deployments).

- Under Splash page, select None (direct access).
- In the RADIUS servers section, click Add a server.

- From the JoinNow Management Portal (navigate to RADIUS > RADIUS Configuration), copy the Primary IP Address, Authentication Port, and Shared Secret and paste them in the Host, Port, and Secret fields in the Meraki.
- In the RADIUS servers section, click Add a server again.

- From the JoinNow Management Portal (navigate to RADIUS > RADIUS Configuration), copy the Secondary IP Address, Authentication Port, and Shared Secret and paste them in the Host, Port, and Secret fields in the Meraki.
- Click Save Changes.


Follow these steps to configure the Access point:
- Log in to the Meraki Dashboard.
- Navigate to Wireless > Access Control.

- Under Network access, in the Association requirements section, select Open (no encryption).

- Under Splash page, select Click-through.


This process redirects to the SecureW2 landing page.
- Navigate to Wireless > Splash page.

- Verify that the SSID field matches the SSID that you configured earlier (refer to the Configuring Secure SSID section).
- Under Custom splash URL, enter your network profile URL where the user will be redirected.

- Click Save changes.


To configure the walled garden:
- Navigate to Wireless > Firewall & traffic shaping.

- Verify that the SSID field matches the SSID that you configured earlier (refer to the Configuring Secure SSID section).
- Under Block IPs and ports, in the Layer 3 firewall rules section, click the Add a layer 3 firewall rule link and add a rule that Allow the firewall through to SecureW2 resources.

NOTE: To get the list of URLs, download the SecureW2 JoinNow Deployment Guide from the JoinNow Management Portal. To download the guide, navigate to General > Documentation. The SecureW2 JoinNow Deployment Guide is available under the JoinNow MultiOS tab. Scroll to the Firewall Rules section for the list of IPs that need to be added under the Layer 3 firewall rules. The SecureW2 JoinNow Deployment Guide also lists additional DNS and ALCs for Android Playstore, Apple CNAs, Microsoft SmartScreen, and so on. - Under the Layer 3 firewall rules, enter an additional rule with Deny as the Policy on the 0.0.0.0 IP address. This allows you to prevent abuse of the open SSID to access the Internet.

- Click Save Changes.


Verifying Your Setup and Basic Troubleshooting
After configuration:
- Test a client device by enrolling via SecureW2 JoinNow and connecting to the SSID.
- Check the Meraki Dashboard > Wireless > Event log (filter for 802.1X events) and look for Access-Accept (success) or failures.
- In Access control > RADIUS servers, run the built-in test. Success confirms reachability and secret match. If it fails, here are some common issues and their fixes:
- RADIUS test fails or is unreachable: Verify IPs/ports/secrets exactly match SecureW2 configuration; check firewall rules; test from AP uplink via packet capture.
- Intermittent client failures: Often due to certificate chain issues or expired certificates. Review SecureW2 logs and ensure devices have the root CA trusted.
- “Recent 802.1X Failure” alert: Persistent alerts can indicate RADIUS latency, roaming interruptions, or client certificate issues. Review the Meraki event log and verify RADIUS response times.
- CNA/splash interference: Confirm walled garden allows required connectivity-check and certificate validation endpoints listed in the SecureW2 deployment guide.
If issues persist, check SecureW2 support or Meraki event logs for details
Next Steps / Related Guides
- If you’re using Meraki Systems Manager (MDM) to manage corporate devices, see our guide on Issuing SCEP Certificates with Meraki MDM. It explains how to push certificates automatically via SCEP for seamless EAP-TLS authentication at scale.
- Our How to integrate RADIUS and MAC Authentication with Cisco Meraki guide gives step-by-step instructions to set up a MAC authentication bypass with Meraki to enable 801.2X network access for printers and IoT devices.
- The SecureW2 JoinNow Connector PKI can issue certificates via SAML with Meraki’s AnyConnect VPN. See our guide here: Configuring Certificate and SAML Based Authentication with Meraki AnyConnect VPN