Configuring Radiator for EAP-TLS using SecureW2 Cloud PKI
Introduction
The value of certificate-based networks far outweighs that of credential-based networks. Passwords are no longer secure enough to protect organizations’ networks and data. Password-related disconnects can also strain the IT department. Many organizations are hesitant to employ digital certificates because of perceived difficulty, but that’s simply not the case.
Integrating SecureW2 Cloud PKI with Radiator will simplify not only certificate enrollment but also device onboarding. Our cloud-based software can easily integrate with your current Radiator infrastructure, so you won’t need to change anything drastically. Our robust managed PKI services enable the generation of Root and Intermediate CAs, industry-exclusive certificate management technology, auto-generated Base and Delta CRLs, and more.
The following sections provide the information and steps to set up a Radiator Software RADIUS Server, with SecureW2 PKI services to deploy certificate-based authentication. If you have any questions, please don’t hesitate to contact us here.
Integration Process Overview
Configure SecureW2 PKI Services:
Our PKI services are fully turnkey, as all the necessary tools for PKI implementation are set up through our Getting Started wizard.
Integrate SecureW2 PKI with Radiator:
Our PKI services can integrate with any major RADIUS vendor and be implemented without changing your current infrastructure.
Configure the Identity Provider:
SecureW2 can integrate with any major IDP. Once set up, devices will be able to self-enroll in certificates linked to the user’s identity. These certificates cannot be removed and will expire on a predetermined date.
Enrolling User Devices for Certificates:
Set up Onboarding SSID for BYOD:
Our JoinNow Suite allows end users to quickly and easily configure their devices to authenticate and enroll in a certificate automatically. After a few button clicks, their device will be set up with a certificate and gain access to the network.
Use Gateway APIs for Managed Devices:
Using SecureW2’s Management Portal, Gateway APIs can be configured to automate certificate enrollment for all managed devices. You no longer need to enroll every managed device manually.
Configuring JoinNow
Creating a Network Profile
The Getting Started wizard creates everything you need for 802.1x. It generates a RADIUS Server, Network Profiles, a Landing Page for Device Onboarding, and all the default network settings you will need.
To do so, perform the following steps:
Log in to the JoinNow Management Portal.
Navigate to Device Onboarding > Getting Started.
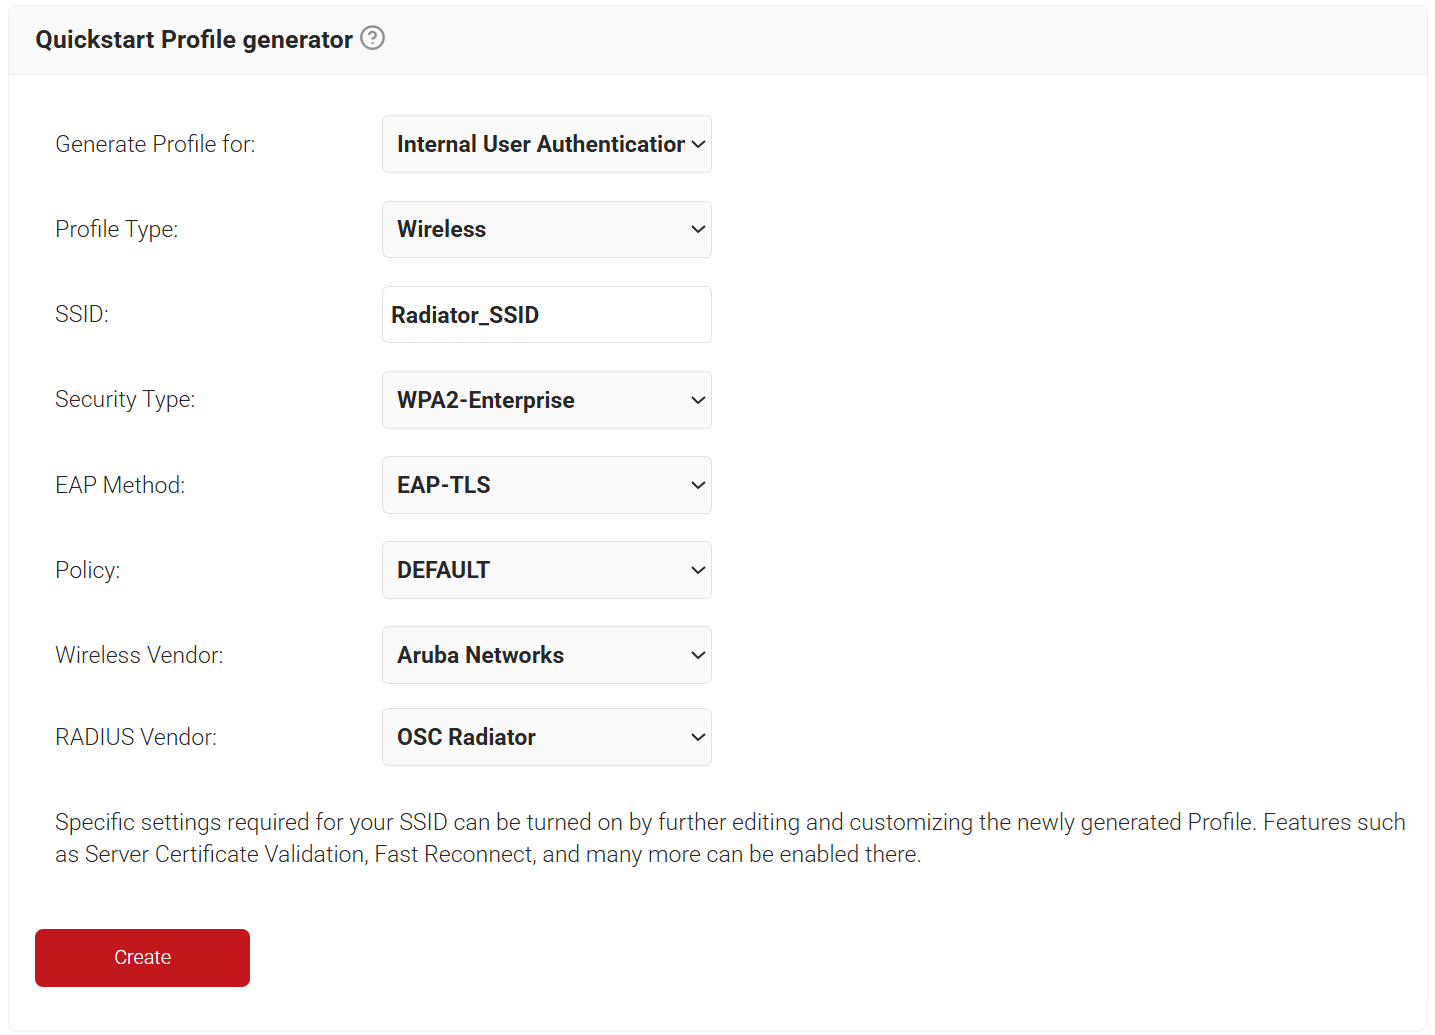
On the Quickstart Profile generator page, from the Generate Profile for drop-down list, select Internal User Authentication.
From the Profile Type drop-down list, select Wireless.
In the SSID field, type the name of a profile.
From the Security Type drop-down list, select WPA2-Enterprise.
From the EAP Method drop-down list, select EAP-TLS.
From the Policy drop-down field, retain DEFAULT.
From the Wireless Vendor drop-down list, select the required wireless controller vendor.
From the RADIUS Vendor drop-down list, select the OSC Radiator vendor.
Click Create. The Getting Started wizard typically takes 60-90 seconds to create the profile.
Downloading the Root and Intermediate CAs and Links to the CRL
Download the root and intermediate CA certificates and save the Certificate Revocation List (CRL) by performing the following steps:
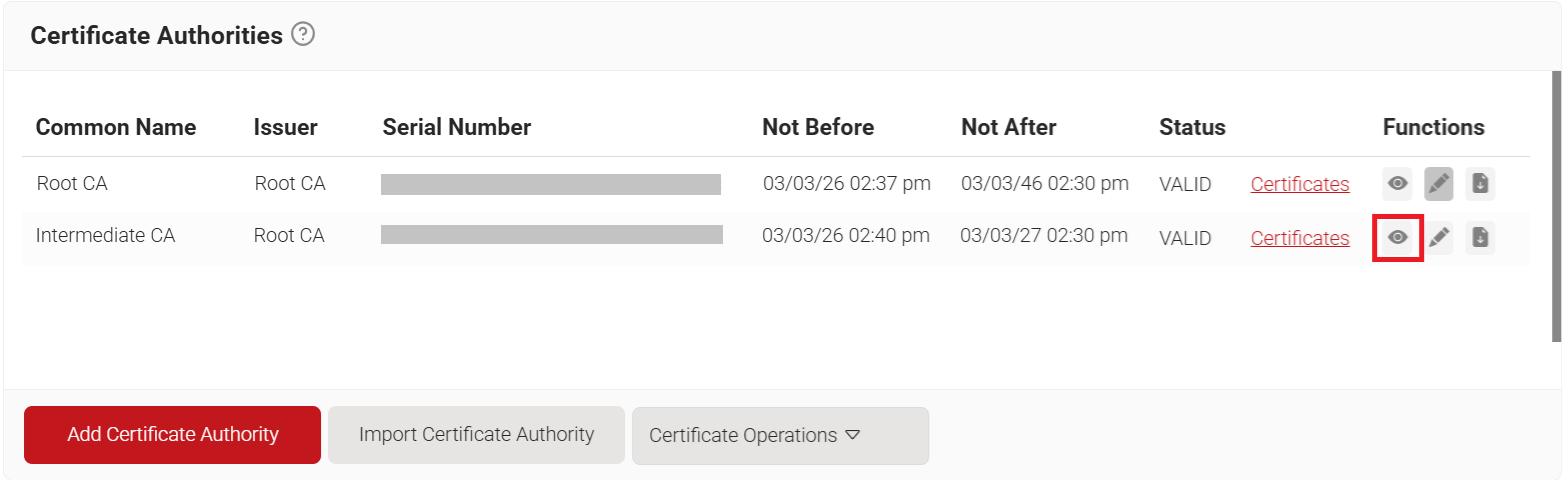
Navigate to Dynamic PKI > Certificate Authorities.
Download the root and intermediate CA certificates.
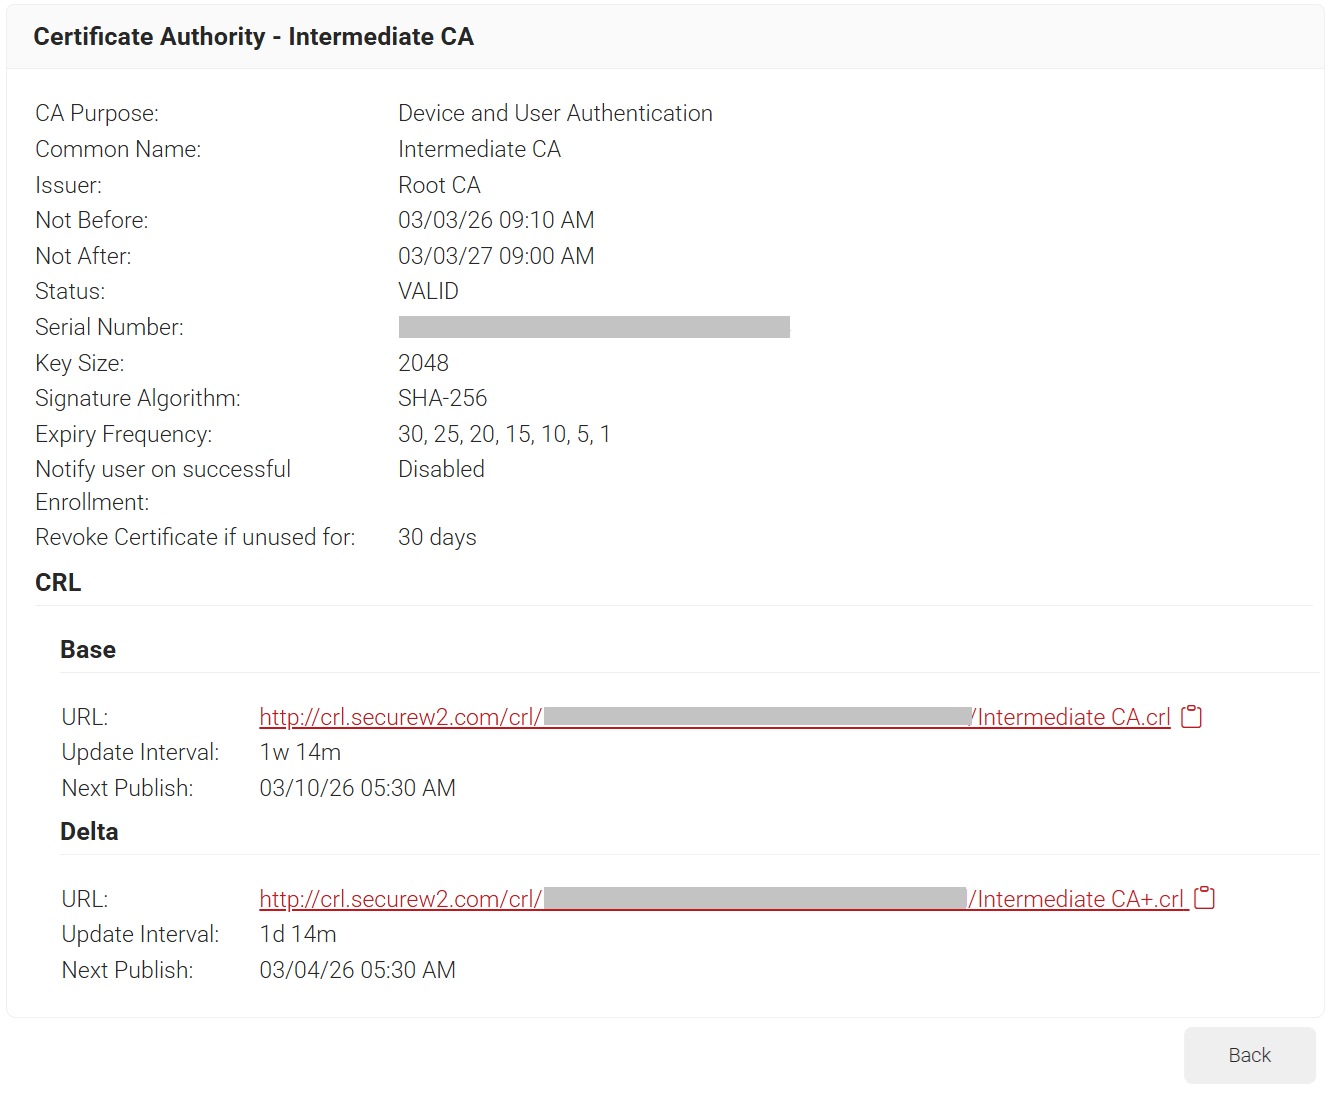
Click View on the Intermediate CA.
Scroll down to the CRL section and copy the Base and Delta URLs into a text editor.
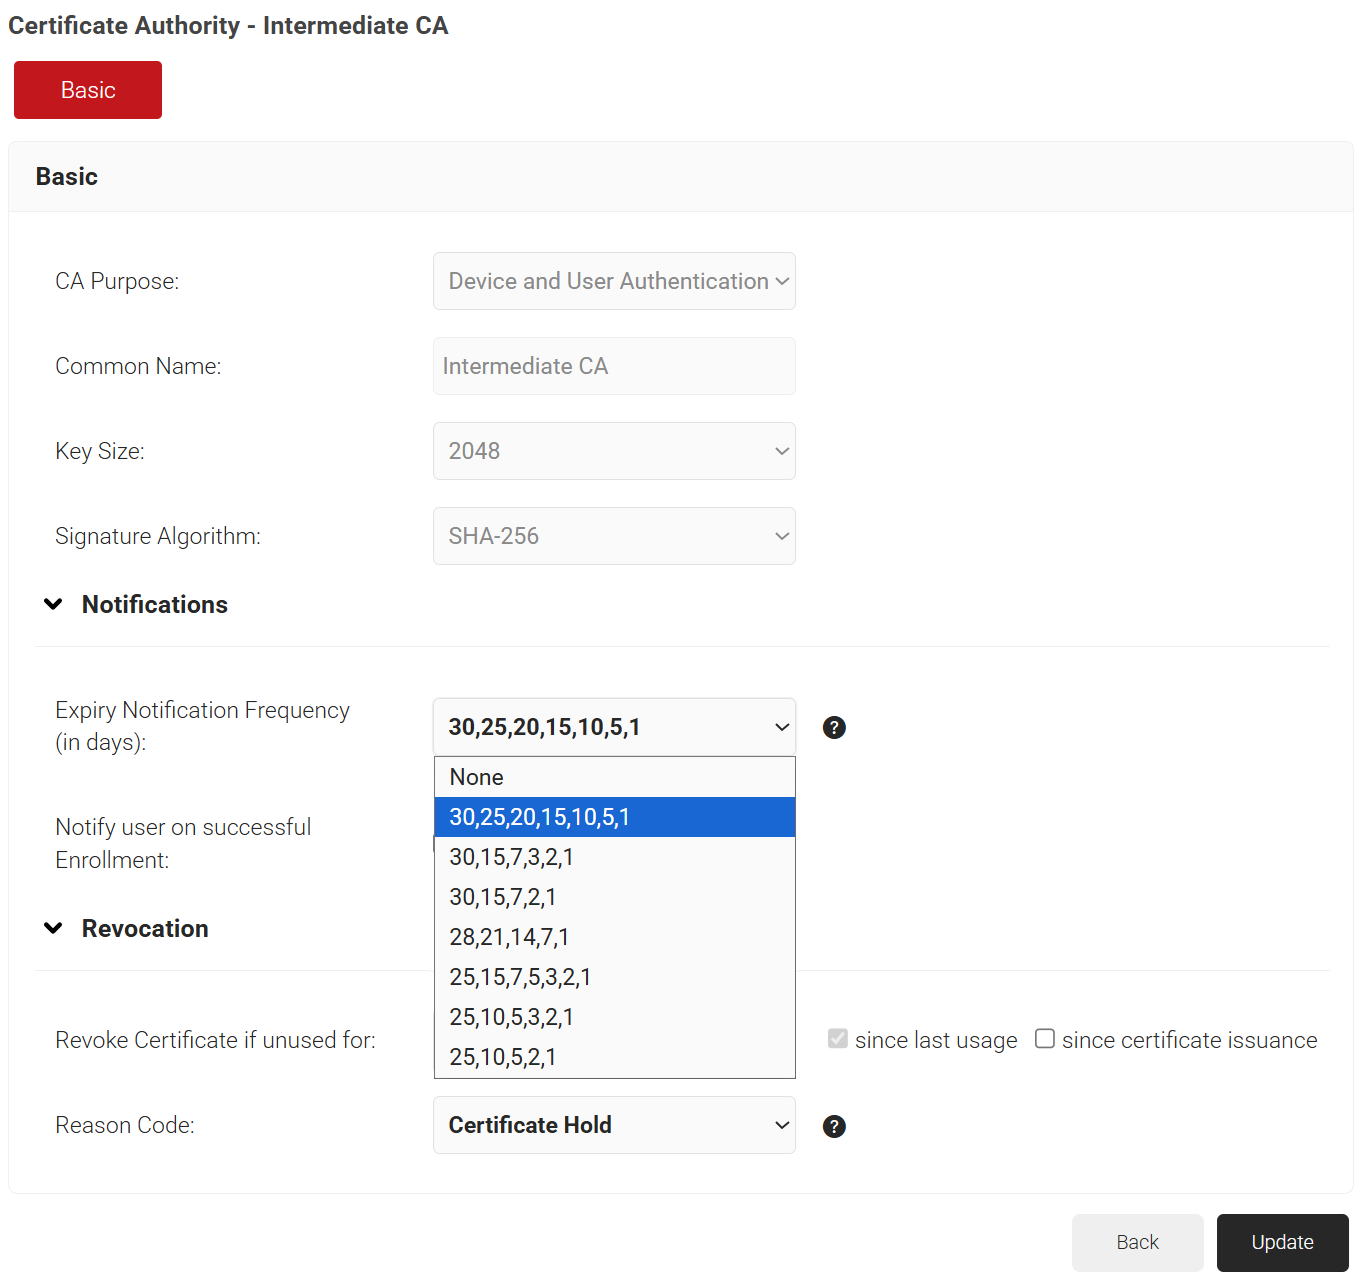
Configuring Certificate Notifications
With SecureW2, you can configure email notifications to be sent to end users upon certificate enrollment and when certificates are pending expiration.
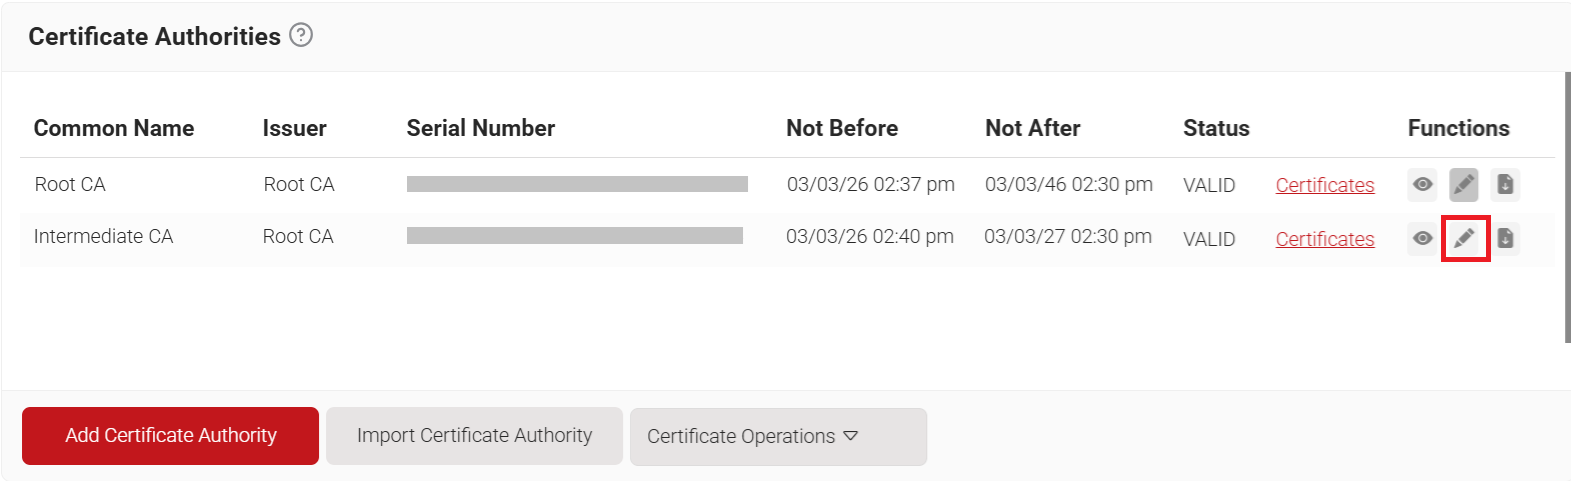
Navigate to Dynamic PKI > Certificate Authorities and click Edit on your organization’s Intermediate CA.
Here you can configure the intervals at which certificate expiration notifications are sent.
Select the required frequency from the Expiry Notification Frequency (in days) drop-down list.
Configuring Radiator Software
Configuring Radiator Software for EAP-TLS
To configure Radiator Software for EAP-TLS, perform the following steps:
Install Radiator Software with the required Perl modules. The perl-LDAP module is mandatory.
Create the following directory: /etc/radiator/certificates/
In /etc/radiator/certificates/, create an empty file “securew2.pem” and insert the downloaded Root and Intermediate certificates from SecureW2 into the securew2.pem file.
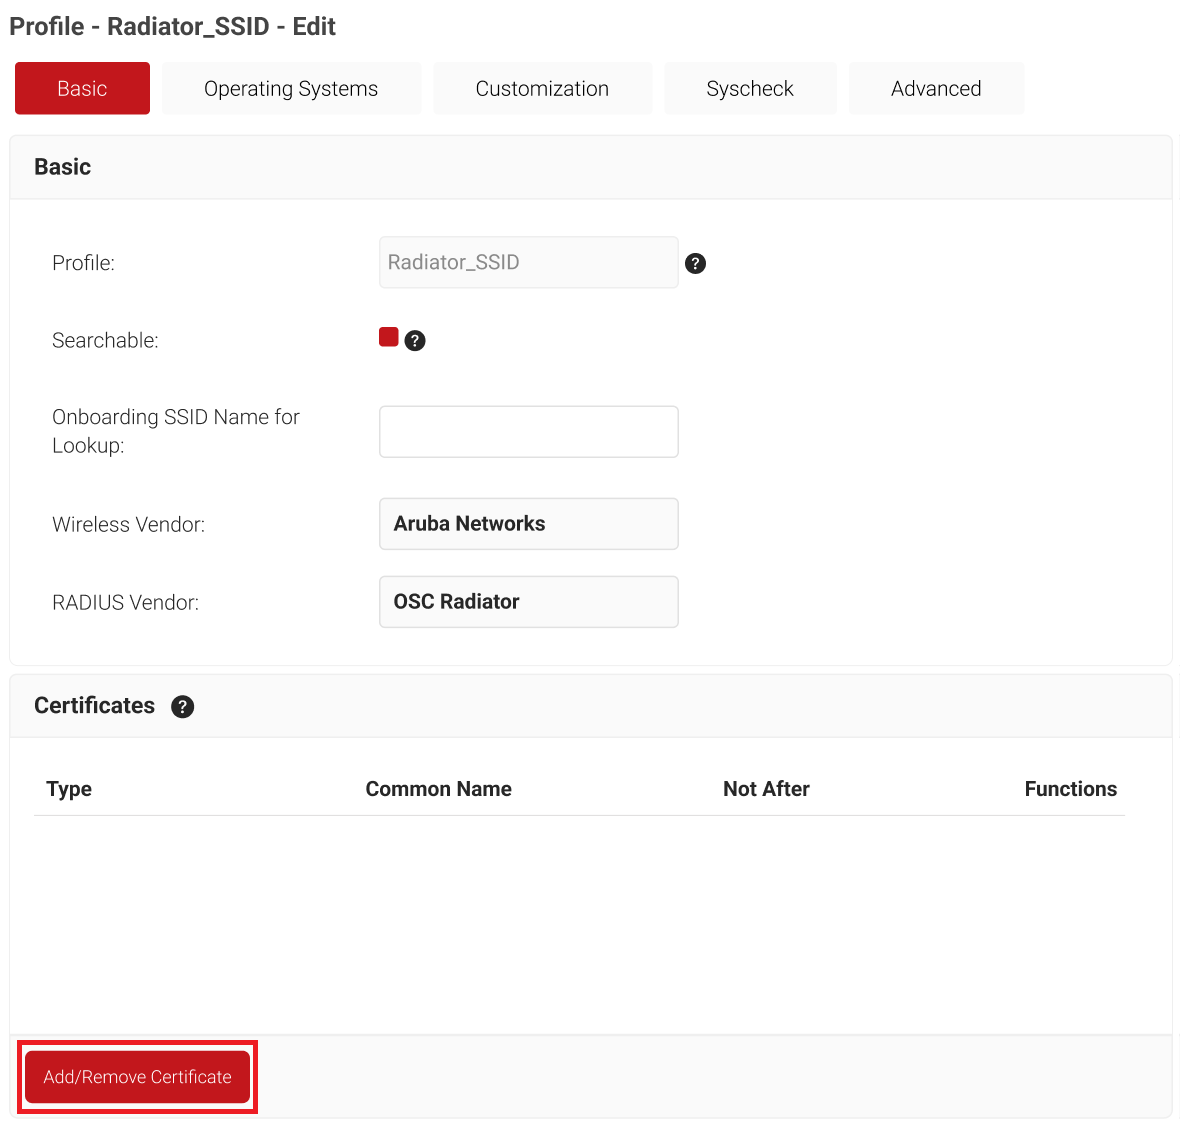
Get your RADIUS server CA and upload it to the Network Profile to enable server certificate validation. To do so, perform the following steps:
Navigate to Device Onboarding > Profiles.
Click Edit on the Network Profile created earlier using Getting Started.
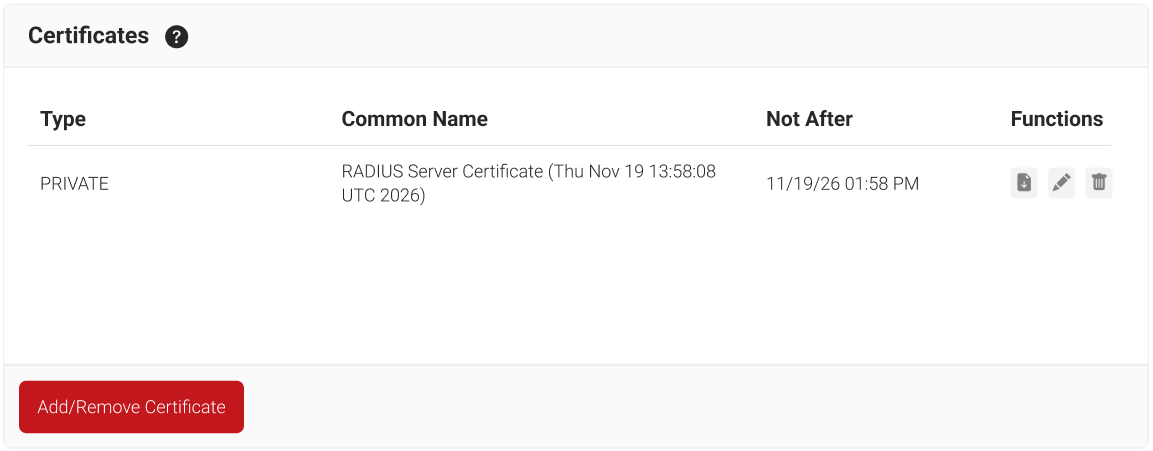
Scroll down to the Certificates section:
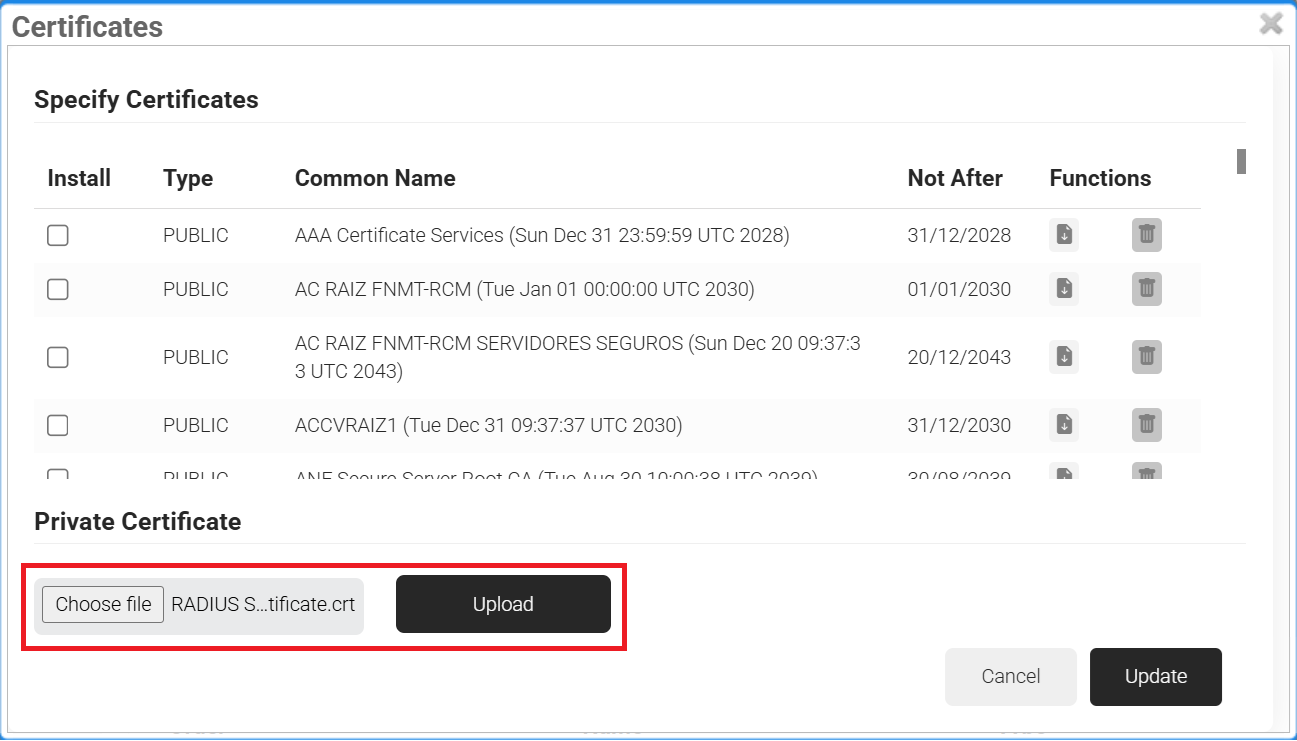
Click Add/Remove Certificate and upload your RADIUS server certificate.
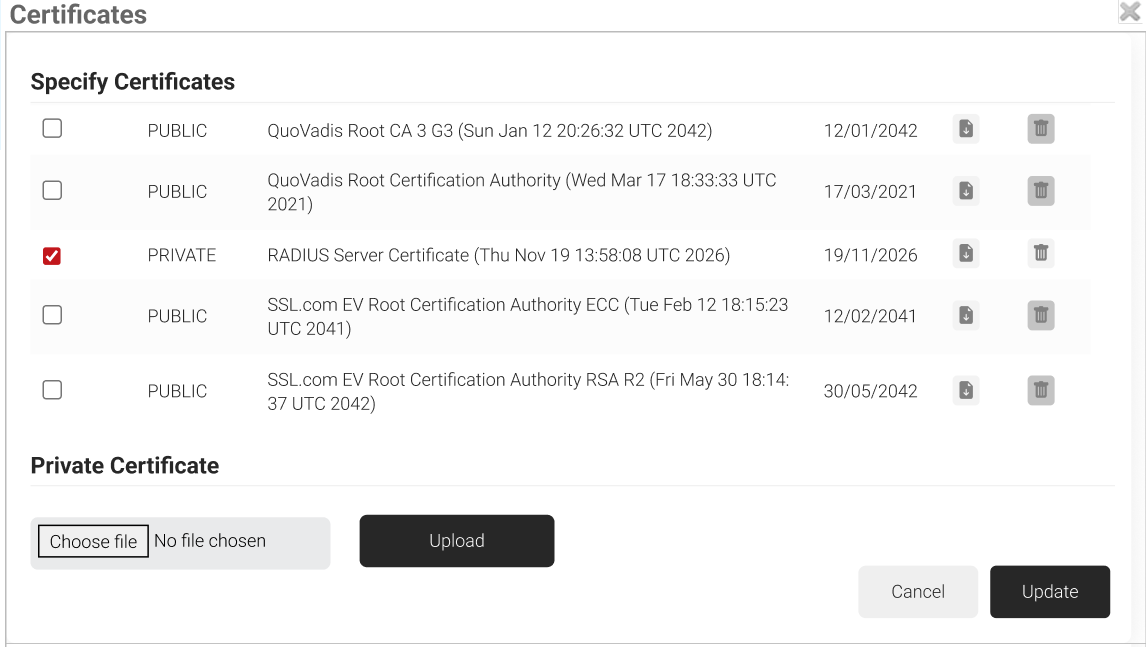
Scroll through the list until you find the uploaded certificate and select the checkbox.
Click Update.
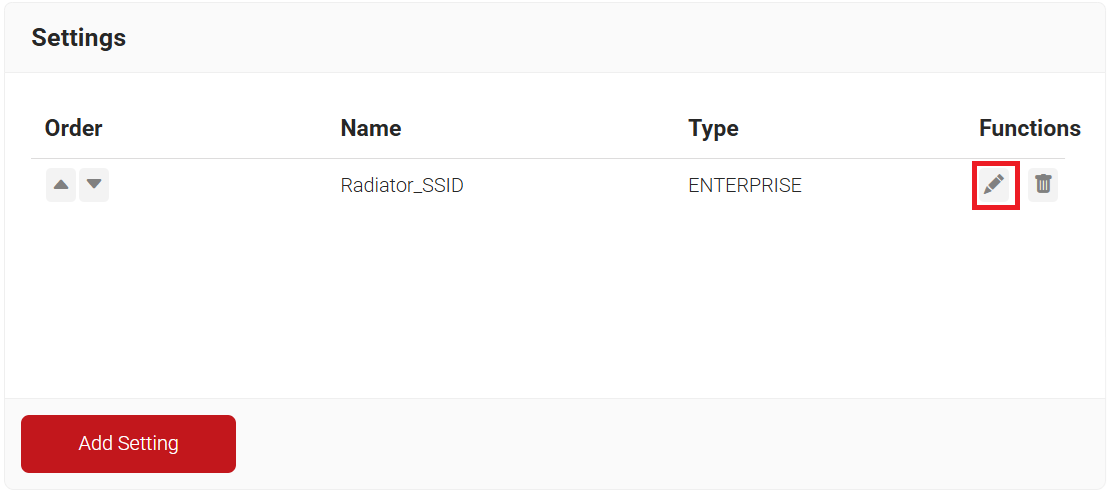
Navigate to the Settings section and click Edit.
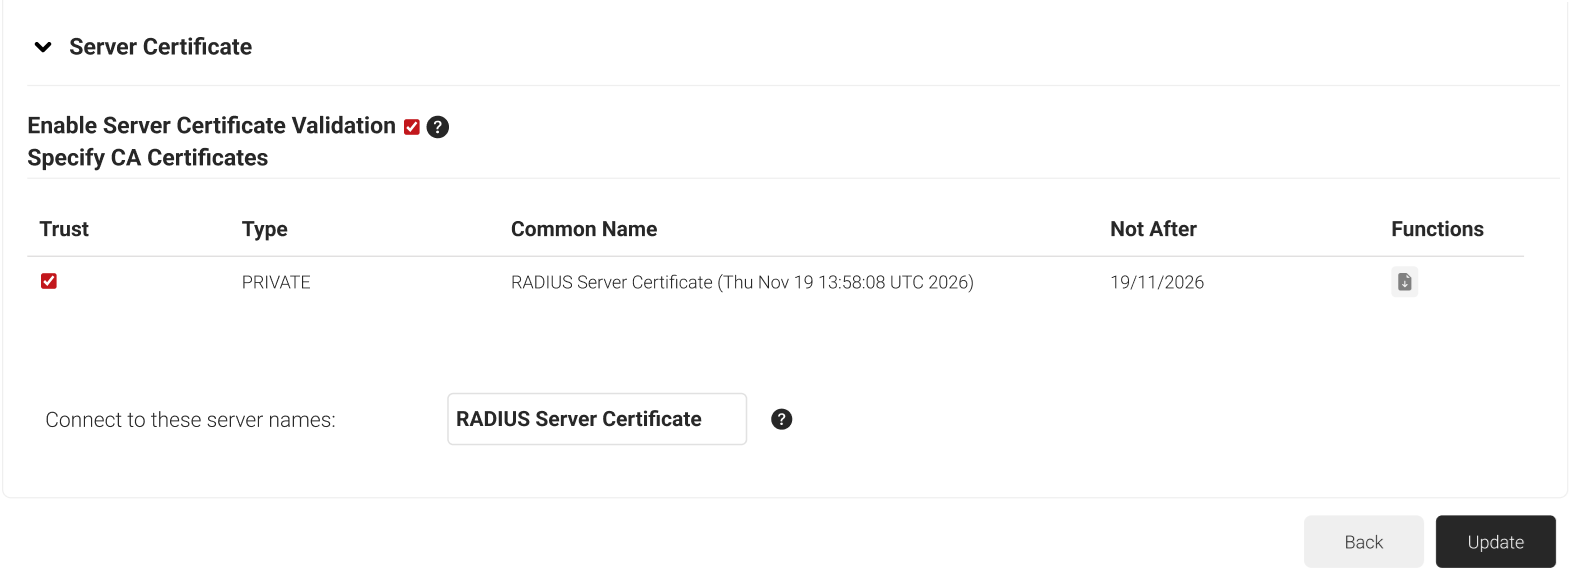
Scroll down and select the Enable Server Certificate Validation checkbox.
Select the CA (RADIUS Server CA) that you just uploaded.
Add the common name of your RADIUS Server CA in the Connect to these server names field.
Click Update.
Scroll to the bottom of the page and click Update.
Setting up Identity Lookup with Active Directory
Configure Radiator Software to perform an Identity lookup with Active Directory and check if the user account is disabled. If the user account is disabled, the RADIUS authentication will fail.
To do so, include the following configuration file in the radiator.conf file for this check.
NOTE: You can find a sample configuration file that contains the code discussed in this section under the Radiator Software installation location. The “securew2_configuration_example.cfg” can be found in the goodies folder.
# LDAP settings
Host WIN-5CCF8CPJR8R.securew2-india-dev.com
Port 389
# Reuse existing LDAP connection
HoldServerConnection
# Service account
AuthDN securew2
AuthPassword ***********
# LDAP path and attributes
BaseDN CN=Users,DC=securew2-india-dev,DC=com
UsernameAttr userPrincipalName
# Match UsernameAttr with EAP-TLS CN or subjectAltName
SearchFilter (%0=%1)
# No password authentication
PasswordAttr
NoCheckPassword
# Additional LDAP attribute(s)
AuthAttrDef userAccountControl
# Check whether the account is disabled and reject
# Ref: https://support.microsoft.com/en-gb/help/305144/how-to-use-theuseraccountcontrol-flags-to-manipulate-user-account-pro
PostSearchHook sub {\
# Get LDAP entry userAccountControl attribute\
# and check for ACCOUNTDISABLE (0x0002) flag\
my $uac = $_[4]->get_value('userAccountControl');\
if ($uac && ($uac & 2)) {\
# Reject authentication\
$_[3]->get_check->add_attr('Auth-Type','Account disabled');\
}\
}
NOTE: This sample configuration is for reference only. Do not use it directly in a production environment.
Setting up Radiator Software to Return VLAN Attributes Based on LDAP Groups
Setting up Radiator to return different VLAN IDs based on the user groups we need to have a separate file (vlan-groups.txt) created in /etc/radiator. We can configure the VLAN Id’s for the necessary AD groups.
NOTE: You can find a sample configuration file that contains the code discussed in this section under the Radiator Software installation. The “securew2_vlan_groups_example.txt” file can be found in the goodies folder.
# Start of file vlan-groups.txt
#
## DEFAULT entries are evaluated from the top to the bottom with the first to
match
#
# Group ‘user_group1’ is mapped to VLAN 100 DEFAULT Group-Authorization=AD,Group="CN=testgroup1,CN=Users,DC=securew2-
india-dev,DC=com"
Tunnel-Type=1:VLAN,
Tunnel-Medium-Type=1:Ether_802,
Tunnel-Private-Group-ID=1:11
#
# Group ‘user_group2’ is mapped to VLAN 200
#DEFAULT Group-Authorization=AD,Group="CN=2ndgroup,CN=Users,DC=securew2-indiadev,DC=com"
# Tunnel-Type=1:VLAN,
# Tunnel-Medium-Type=1:Ether_802,
# Tunnel-Private-Group-ID=1:1
#
## Uncomment the following DEFAULT entry if access should be allowed
## when no authorisation group matches. This entry does not have any
## check items and therefore matches the rest of the users. No reply
## attributes are added here.
#DEFAULT
# End of file
This file needs to be included in the radiator.conf
# VLAN group mappings
<AuthBy FILE>
Identifier Group-VLANs
# File to contain VLAN group mappings
Filename %D/vlan-groups.txt
# Do not try to authenticate
NoEAP
NoCheckPassword
</AuthBy FILE>
Since the configuration now requires AD to provide group membership values in LDAP requests, the following configuration is needed to store and restore user group details.
PostAuthHook sub {\
     # Store LDAP user groups in EAP context\
if (${$_[2]} == $main::CHALLENGE) {\
     my $int_vars = ${$_[0]}->{internal_vars};\
     return unless $int_vars->{user_is_in_group};\
     my $ctx = ${$_[0]}->{EAPContext};\
     return unless $ctx;\
     $ctx->{piv_user_groups} = $int_vars->{user_groups};\
     $ctx->{piv_user_is_in_group} = $int_vars->{user_is_in_group};\
}\
# Restore LDAP user groups from EAP context\
elsif (${$_[2]} == $main::ACCEPT) {\
     my $int_vars = ${$_[0]}->{internal_vars};\
     my $ctx = ${$_[0]}->{EAPContext};\
     return unless $ctx;\
     # Full TLS handshake done\
     if ($ctx->{eaptls_session_reuse_method} == 0) {\
        $int_vars->{user_groups} = $ctx->{piv_user_groups};\
        $int_vars->{user_is_in_group} = $ctx->{piv_user_is_in_group};\
        # TLS session resumed\
}\
     elsif ($ctx->{eaptls_session_reuse_method} == 1) {\
        return 1;\
}\
}\
}
Setting up the Certificate Revocation Lists in the RADIUS Server
A Certificate Revocation List (CRL) is a file containing revoked certificates. The following are the forms of CRLs:
BaseCRL: A CRL that contains all non-expired revoked certificates
DeltaCRL: A CRL that contains all non-expired certificates that have been revoked since the last base CRL was published.
The BaseCRLs are updated weekly, and the DeltaCRLs are updated daily. For testing purposes, we have set up an hourly cron for DeltaCRL and a daily cron for BaseCRL. Set up a new directory, crl, in the following path: /etc/radiator/certificates/
NOTE: Make sure your directory name contains ‘crl’ in lowercase.
Create a cron job to retrieve the DeltaCRL using the CRL links you obtained earlier from the JoinNow Management Portal.
/etc/cron.hourly
#vi delta.sh //creating a file called delta
#!/bin/sh
wget -O /etc/radiator/certificates/crl/delta.pem
http://crl.securew2.com/crl/12345/Intermediate%20CA+.crl
Save the file and run the following command:
chmod +x delta.sh
Similarly, run the BaseCRL cron daily.
/etc/cron.daily
#vi base.sh //creating a file called base
#!/bin/sh
wget -O /etc/radiator/certificates/crl/base.pem
http://crl.securew2.com/crl/12345/Intermediate%20CA.crl
Save the file and run the following command:
chmod +x base.sh
After creating these files in the cron directory, update the radiator.conf file to include the following checks for the Base and Delta CRLs.
Now that SecureW2 Cloud PKI solutions have been integrated with your Radiator, you can deploy EAP-TLS authentication and safely onboard new users. The benefits of using certificate-based authentication include eliminating password-related disconnects and MITM attacks, tying users and devices to network connections, improving network performance, and many more.
Deploying certificate-based solutions used to take weeks, but SecureW2 software can help you get it done in just a few hours. Our solutions can adapt to any vendor and are very affordable.