It is recommended to have a new intermediate CA for enrolling devices using SCEP Gateway integration with Jamf for easy management.
To create a new intermediate CA:
- From your JoinNow Management Portal, go to PKI > Certificate Authorities.
- Click Add Certificate Authority.
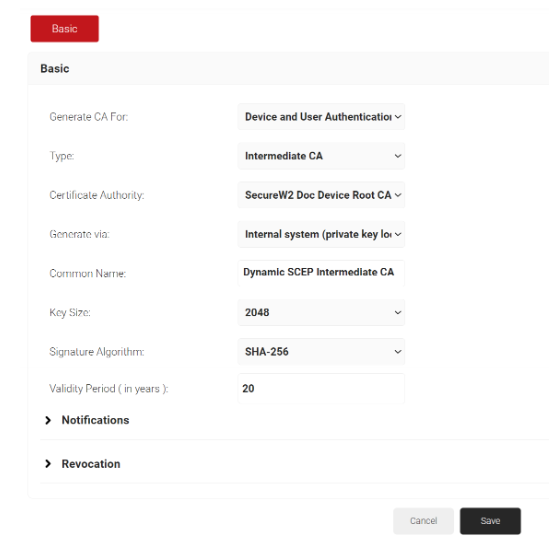
- In the Basic section, from the Generate CA For drop-down list, select the Device and User Authentication option to authenticate devices and users.
- From the Type drop-down list, select Intermediate CA.
- From the Certificate Authority drop-down, select the default Root CA that comes with your organization.
- For the Common Name field, enter a name.

- Click Save
A certificate template determines the information to be encoded in the certificate issued by the Certificate Authority.
To create a Jamf Certificate Template for account lookup:
- Navigate to PKI > Certificate Authorities.
- Click Add Certificate Template.
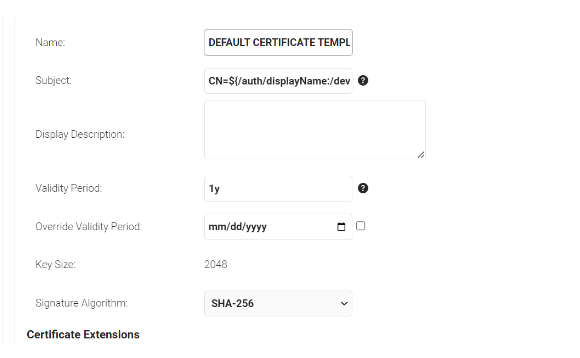
- In the Basic section, for the Name field, enter the name of the certificate template.
- Subject field can be configured to source values from the Jamf.
- To use the attributes sent from Jamf, enter CN=${/auth/displayName:/device/identity:/csr/subject/commonname:/device/clientId}
- In the Display Description field, enter a suitable description for the certificate template.
- In the Validity Period field, type the validity period of the certificate (based on the requirement).
- From the Signature Algorithm drop-down list, select the signature algorithm for the certificate signing request. The option available is SHA-256.

- In the SAN section:
- In the Other Name field, enter ${/auth/upn:/device/identity:/csr/san/othername:/device/clientId}
- In the RFC822 field, enter ${/auth/email:/device/identity:/csr/san/rfc822name}
- In the DNS field, enter ${/device/computerIdentity:/device/buildModel:/csr/san/dnsname}
- In the URI field, enter ${/csr/san/uniformresourceidentifier}
- In the Extended Key Usage section, from the Use Certificate For list, select Client Authentication.
- Click Save.
Jamf requires a signing certificate to sign custom configuration profiles and packages. These profiles are then automatically trusted when installed on managed devices.
The signing certificate can be created from the JoinNow Management Portal using the Create Certificate option.
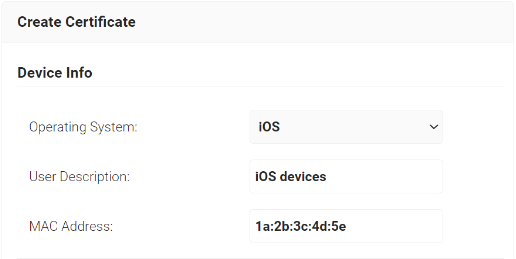
- Navigate to PKI > Create Certificate.
- In the Device Info section, from the Operating System drop-down list, select an operating system.
- For User Description, enter a suitable description.
- For MAC Address, enter a unique MAC address.

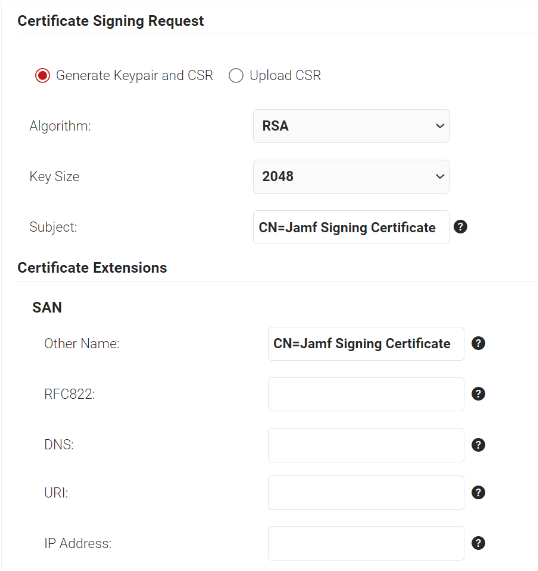
- In the Certificate Signing Request section, select the Generate Keypair and CSR option to generate a keypair and CSR file, and create client certificates.
- From the Algorithm drop-down list, select RSA.
- From the Key Size drop-down, select 2048.
- For the Subject field, enter the common name (the recommended name format for the certificate is “Jamf Signing Certificate.” This helps to easily identify the CA).
- In the Other Name field, enter the same value as in the Subject field.
- Ignore the other fields.

- In the Certificate Issuance Policy section, from the Certificate Authority drop-down list, select the intermediate CA created earlier for issuing certificates to clients using SCEP
- From the Use Certificate Template drop-down list, select the certificate template created
- Select the Include Entire Certificate Chain checkbox. This is mandatory.
- In the Distribution section, for the Format field, select PKCS12.
- In the Receive via field, select Download.

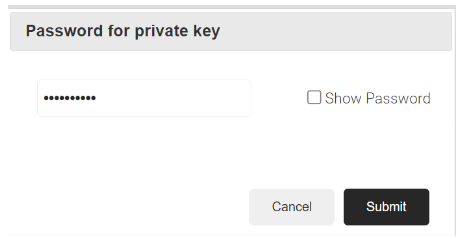
- Click the Create button, and a Password for private key pop-up window opens. Enter the password for the certificate file and click Submit.


After enrolling your devices in Jamf for management (you can use any of the methods for this), create a compliance group in Jamf with your set of requirements.
- Goto Devices -> Smart Device Groups -> Create New
- Give appropriate name for the group and set Criteria (a sample is given below)
- Click Save.

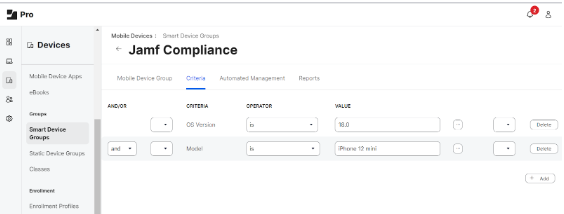
This configuration means all mobile devices with iPhone 12 mini model and iOS version 18.0 can be part of this Compliance group.
To create an Identity Lookup Provider for Jamf SCEP based enrollment:
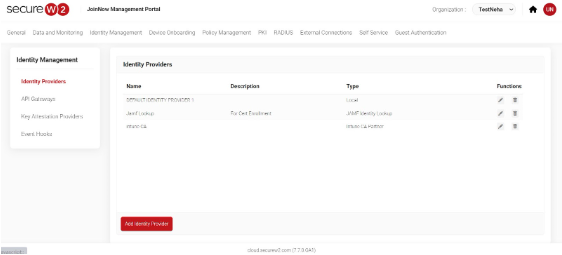
- Navigate to Identity Management > Identity Providers.
- Click Add Identity Provider.
- Enter a Name and Description for the IDP in the respective fields.
- From the Type drop-down list, select Jamf Identity Lookup.
- Click Save. The page refreshes and opens the Configuration, Attribute Mapping, and Groups tab.
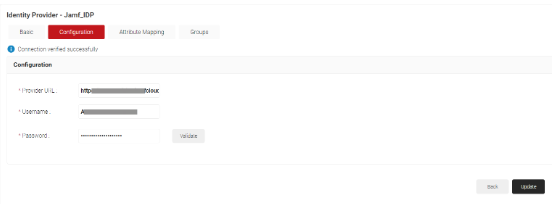
- Click on the Configuration tab.
- In the Provider URL field, enter the Jamf URL of your organization.
- In the Username field, enter your (Admin’s) Jamf username.
- In the Password field, enter your (Admin’s) Jamf Password.
- Click Validate to validate your connection with Jamf.

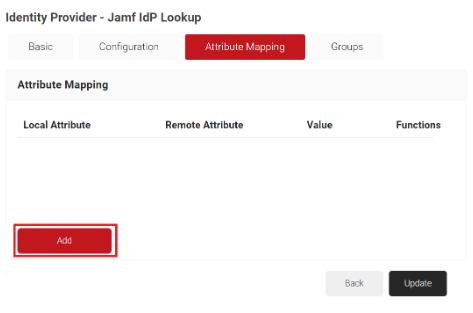
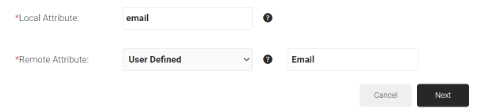
- Under the Attribute Mapping section, click Add.

- In the Local Attribute field, enter email.
- From the Remote Attribute drop-down list, select the User Defined. Enter the Email in the field that appears next to the Remote Attribute field.

- Click Next.
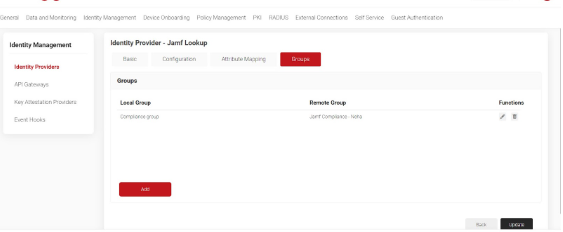
- Create groups in the Groups tab. This is the Compliance group which you created in previous step that has all your compliant devices.

- Click Update.

The SCEP URL serves as an endpoint using which managed devices can connect with the SCEP server and enroll for certificates. The secret is also passed to Jamf’s external CA to authenticate these certificate requests.
A SCEP URL and secret can be generated by creating an API Gateway in the JoinNow Management Portal.
Additionally, the tokens created for SCEP Enrollment can be used in Policy Management to assign a user/device role based on the token in the incoming request.
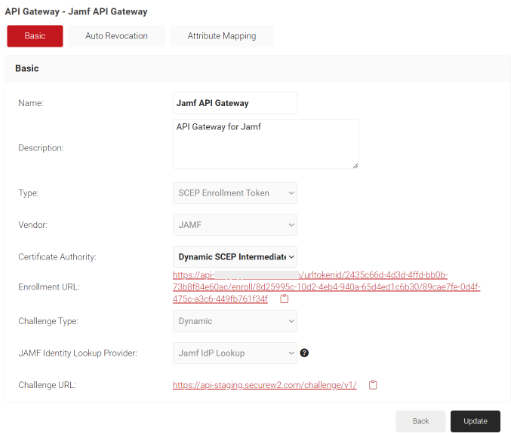
To create an API Gateway, perform the following steps:
- Navigate to Identity Management > API Gateways.
- Click Add API Gateway.

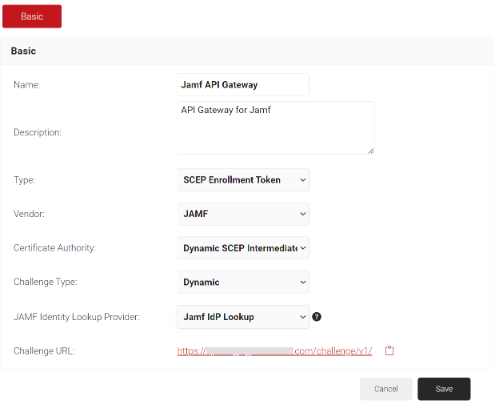
- In the Basic section, in the Name field, enter the name of the API Gateway.
- In the Description field, enter the description for the API Gateway.
- From the Type drop-down list, select SCEP Enrollment Token.
- From the Vendor drop-down list, select JAMF.
- From the Certificate Authority drop-down list, select the Intermediate CA created previously. If you do not select a CA, by default, the organization CA is chosen.
- From the Challenge Type drop-down list, select the Dynamic option. The Dynamic Challenge Type generates a unique challenge for each enrollment request internally, providing an additional layer of security.
- From the JAMF Identity Lookup Provider drop-down list, select the JAMF Identity Lookup Provider created.
- The URL used for authentication is displayed in the Challenge URL field.

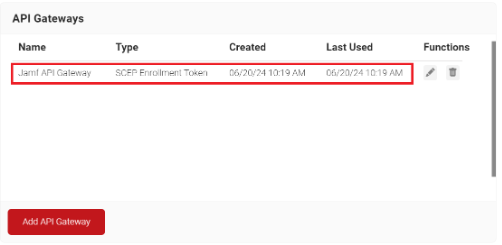
- Click Save. A .csv file containing the API secret and Enrollment URL is downloaded, and the Enrollment URL is displayed on the screen.

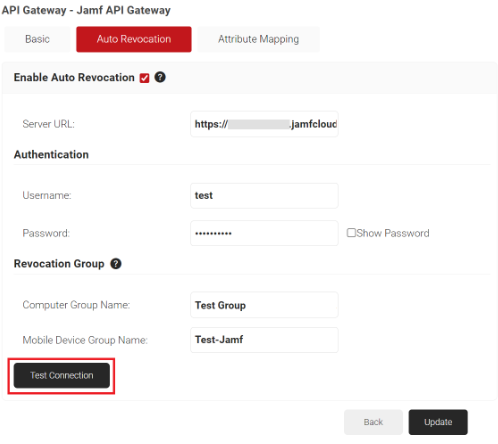
NOTE: Save this file securely. It is downloaded only once during token creation. If you lose it, you can not retrieve the secret. - The page refreshes and displays the Auto Revocation and Attribute Mapping tabs.
- Click the Auto Revocation tab.
- Select the Enable Auto Revocation checkbox for certificate auto-revocation.
- In the Server URL field, enter the JAMF server URL.
- In the Authentication section, enter the credentials of a user.
- In the Revocation Group section, if required enter the name of the mobile device groups that contain devices to be revoked. These groups are created in the Jamf Portal to identify and group the devices based on configurable criteria like non-compliance or old devices that need to be deleted. JoinNow Management Portal revokes the certificates of these devices as soon as Jamf identifies and moves them to these groups.

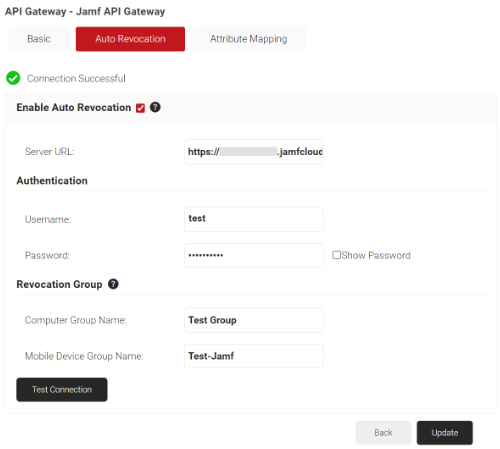
- Click the Test Connection button to verify that the connection works.

- Click Update.


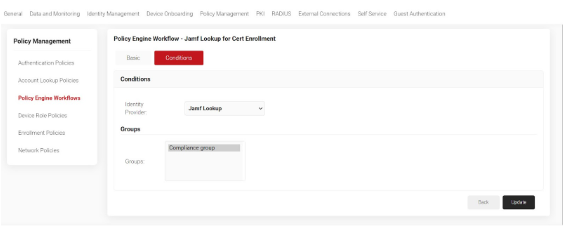
- Go to Policy Management > Policy Engine Workflows.
- Click Add Policy Engine Workflows.
- In the Basic section,
- In Name field, enter a name for the policy.
- In the Description field, enter a description for the policy.
- Click Save.
- On the displayed page, click the Conditions tab.
- Click Save.The page refreshes and automatically selects the Conditions tab.
- In the Conditions section, click the Identity Provider drop-down and select the Identity Lookup Provider you created in the earlier section. See that the Group you mentioned while creating Identity Lookup Provider automatically appears as a condition here.

This means when a Certificate Issuance request is sent to SecureW2 from a Jamf managed device, its serial number is looked up in the Jamf tenant mentioned in the Identity Lookup Provider. If it exists there, then a certificate is issued.
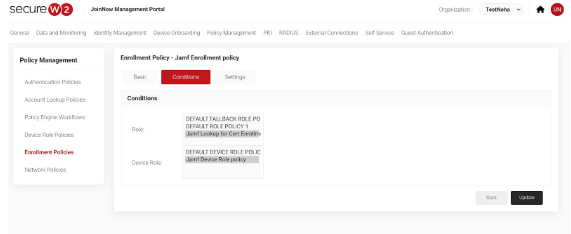
This policy adds Polilicy Engine Workflow for certificate enrollment as well as decides the CA and certificate template for the same.
- From the JoinNow Management Portal, go to Policy Management > Enrollment Policies.
- Click Add Enrollment Policy.
- In the Basic tab, for Name, enter a name.
- For Description, enter a description.
- Click Save. The page refreshes and displays the Conditions and Settings tab.
- In the Conditions section, for Role, select the user role policy you created in the Policy Engine Workflow section.
- For Device Role, retain the default one.
- From the Use Certificate Template drop-down, choose the certificate template created for this Jamf SCEP enrollment.
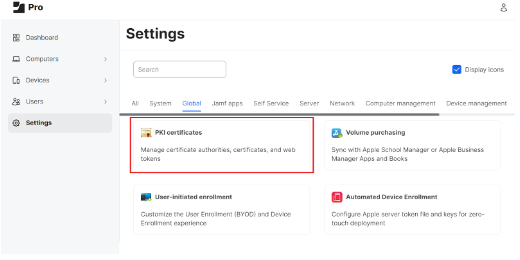
Setting up SCEP in Jamf requires configuring SecureW2’s Certificate Authority as an External Certificate Authority in Jamf. To configure external CA in Jamf:
- Log in to the Jamf Pro console.
- Navigate to Settings > Global.
- Click PKI certificates.

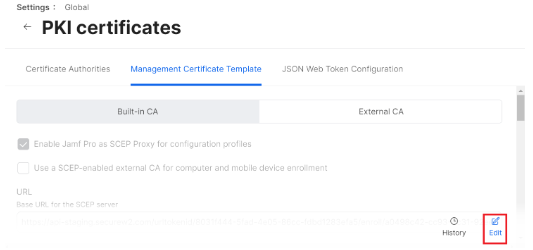
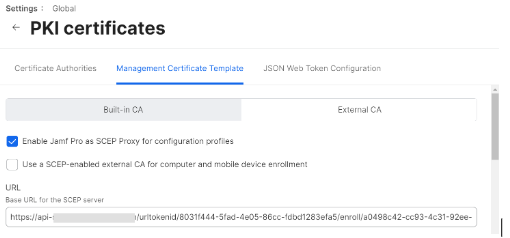
- Select the Management Certificate Template tab, select External CA, and click Edit.

- Select the Enable Jamf Pro as SCEP Proxy for configuration profiles checkbox.
- In the URL field, enter the new SCEP URL you saved in the CSV file.

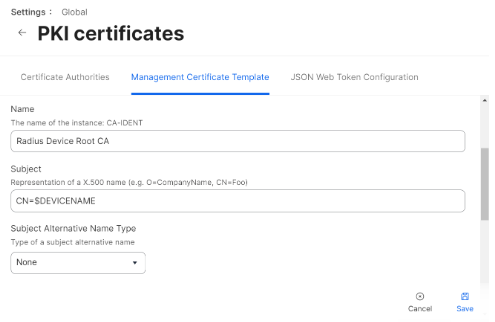
- In the Name field, enter the name of the certificate
- In the Subject field, enter “CN=$DEVICENAME.”
- From the Subject Alternative Name Type drop-down list, select None.

- From the Challenge Type drop-down list, select Dynamic.
- From the Key Size drop-down list, select 2048. SecureW2 does not recommend selecting 1024.

- Click Save
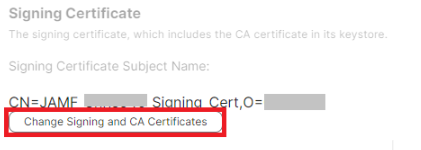
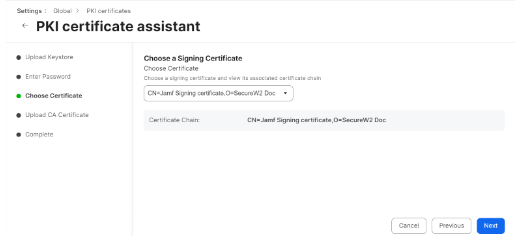
- Under the Signing Certificate section, click Change Signing and CA Certificates to upload the signing certificate you created in Creating a Signing Certificate for Jamf section

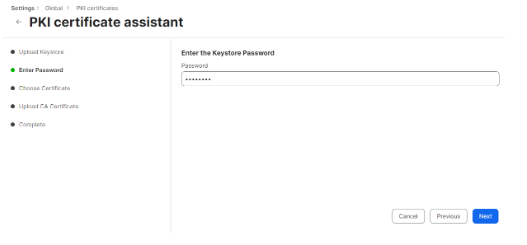
- On the Upload Keystore step, click Choose File and upload the PKCS12 file you downloaded
- Click Next.
- On the Enter Password step, enter the password you entered in the Password for private key prompt in which you created

- Click Next.
- On the Choose Certificate step, verify that the correct CA certificate is selected from the Choose Certificate drop-down list and that the correct certificate chain is displayed.

- Click Next.
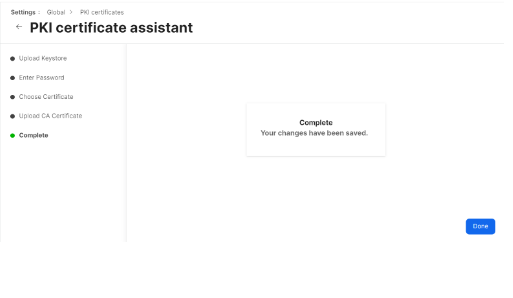
- On the Upload CA Certificate step, click Next to skip the upload. The CA certificate is already present in PKCS12.
- On the Complete step, click Done.


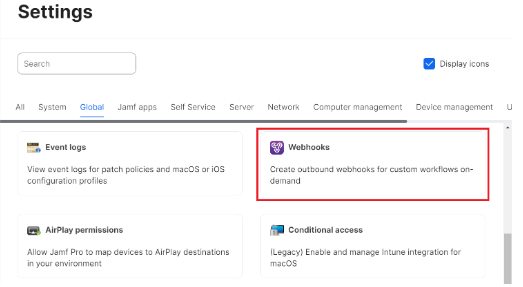
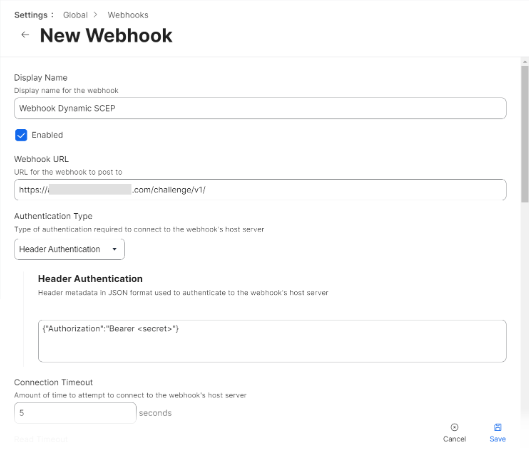
Configuring Webhooks in Jamf is an important step for creating a dynamic challenge. The webhook setting in Jamf sends a request to JoinNow CloudConnector for a dynamic challenge. The JoinNow CloudConnector validates the user in Jamf by performing a lookup, and upon successful validation, a dynamic challenge is issued to Jamf.
To configure a webhook, perform the following steps:
- Log in to the Jamf Pro console.
- Navigate to Settings > Global.
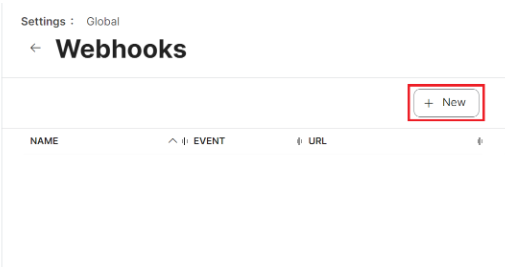
- Click Webhooks.

- Click New.

- In the Name field, enter the display name of the webhook.
- In the Webhook URL field, enter the Challenge URL obtained from the Creating an API Gateway section.
- From the Authentication Type drop-down list, select the Header Authentication option.
- In the Header Authentication field, enter {“Authorization”:”Bearer <secret>”}

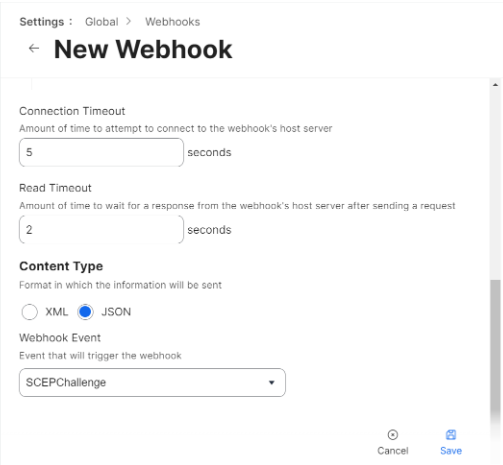
- In the Content Type field, select any one of the options for sending the webhook information:
- JSON
- XML
- From the Webhook Event drop-down list, select SCEPChallenge to trigger the Webhook event.

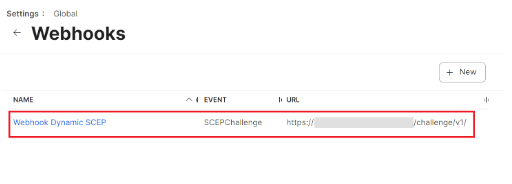
- Click Save.

Configuration profiles are XML files that are pushed to end-user devices along with certificates. These configuration files help Jamf MDM effectively manage mobile devices, computers, and users.
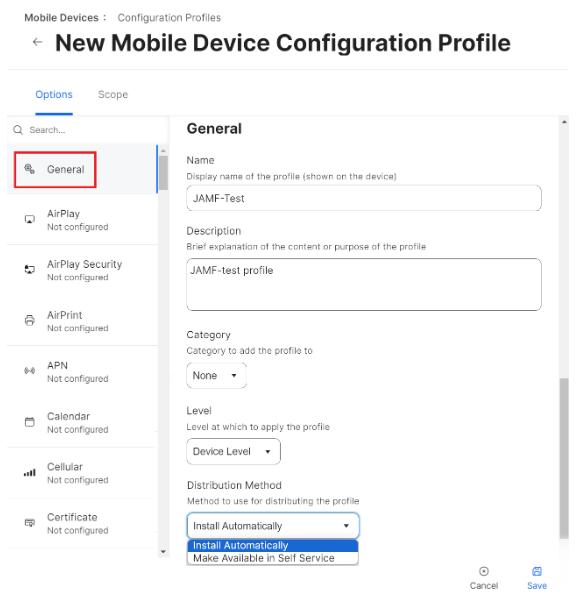
This section explains how to set up Jamf configuration profiles for iOS
- From your Jamf Pro console, go to Devices > Configuration Profiles.

- Click New. To update an existing configuration profile, click Edit for the profile.
- Select Options > General.
- In the Name field, enter a name that can reflect the profile for the specific OS.
- In the Description field, enter a descriptive text explaining the purpose of this configuration.
- From the Distribution Method drop-down list, select Install Automatically or Make Available in Self-Service.


Jamf can deploy configuration profiles that install user certificates in endpoints. By setting up Jamf as the SCEP proxy in the configuration profile, Jamf communicates with the SCEP server to download and install the certificate directly on macOS or iOS devices.
This section explains how to set up Jamf as a SCEP proxy for the iOS configuration profiles.
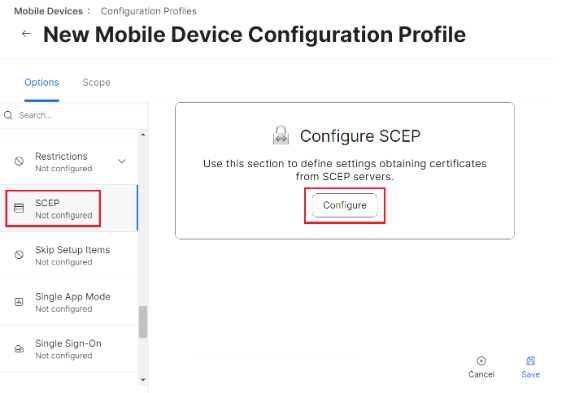
To set up Jamf as a SCEP proxy, perform the following steps:
- From your Jamf Pro console, go to Options > SCEP.
- Click Configure.

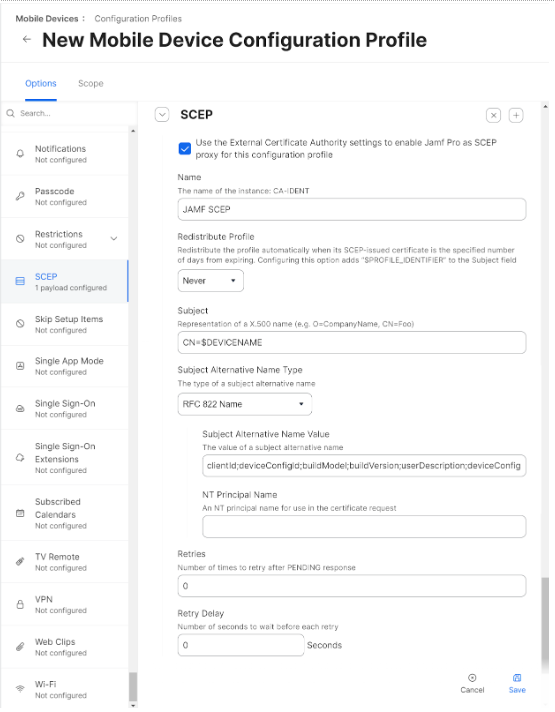
- Select the Use the External Certificate Authority settings to enable Jamf Pro as SCEP proxy for this configuration profile checkbox.
- In the Name field, enter the common name of the intermediate CA that will issue the certificate for the client. The common name can be found in the JoinNow Management Portal.
- From the Redistribute Profile drop-down list, select the desired number of days.
- In the Subject field, enter a value to help administrators identify the device. You can make this a static value if you wish.
Examples:
- CN=$DEVICENAME
- CN=$UDID
- CN=$SERIALNUMBER
- From the Subject Alternative Name Type drop-down list, select the RFC 822 Name option.
- In the Subject Alternative Name Value field, use the appropriate variables from the list below according to the business requirements.
clientId;deviceConfigId;buildModel;buildVersion;userDescription;deviceConfigName;enrollmentPolicyId;organizationId;language;profileId;operatingSystem;osVersion
The values returned by these variables will be encoded as the Subject Alternative Name Value attributes on issued certificates.
- Click Save.
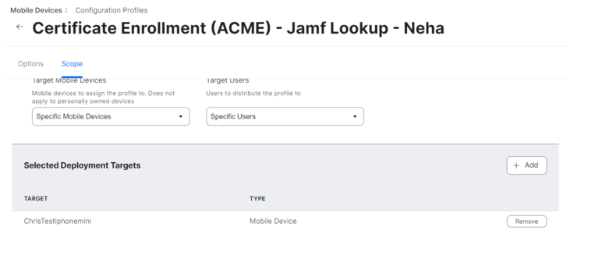
- Navigate to the Scope section and update the scope for the devices to the ones in the Compliance Policy group created previously.

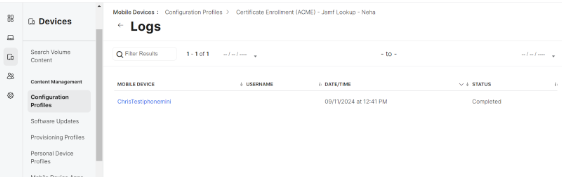
After completing the steps above, the device now connects with the Jamf. The organization’s SCEP profile is pushed and device is looked up which triggers enrollment.
Jamf Configuration profile log:
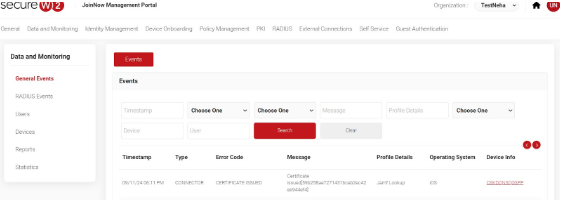
SecureW2 JoinNow portal General Events:
Now that you’ve completed this configuration you can protect your organization from any potential hackers who try and compromise your Certificate Authorities and issue themselves certificates.