How to Set Up LDAP For Certificate-Based WPA2-Enterprise

Utilizing certificate-based authentication provides stronger security, easier authentication, and an improved user experience when compared to credential-based authentication – but only when it is supported by an efficient onboarding method. Integrating LDAP as your IDP with SecureW2’s certificate onboarding solutions allows users to provision their devices with certificates in only a few steps.

By connecting LDAP with effective certificate onboarding, your network can accurately distribute certificates to network users and ensure that no unapproved users can gain access. Since certificates from SecureW2 cannot be removed or transferred from the device, only those with valid LDAP credentials will be able to receive a certificate.

The following demonstrates the steps involved to configure the integration:

  1. Configure the Identity Provider
    • Begin by configuring the attribute mapping of the IDP. Here you will customize the fields that are populated by the attributes of your network users and will be used to define different user groups within your network.
  2. Configure the Network Policies
    • Nearly all organizations have different user groups that require varying levels of access to networks, servers, data, etc. By onboarding with SecureW2, you can automatically separate users into groups by configuring their attributes to identify and segment users. For example, a university would configure the onboarding software to segment users based on their status as a student or a professor.

NOTE:Β You will perform all of these procedures in the SecureW2 Management Portal.

Configure the Identity Provider

To configure the identity provider (IDP):

  1. From yourΒ SecureW2 Management Portal, go toΒ Identity ManagementΒ >Β Identity Providers
  2. ClickΒ Add Identity Provider
    • ForΒ Name, enter a name
    • Click theΒ TypeΒ dropdown and selectΒ LDAP
    • ClickΒ Save
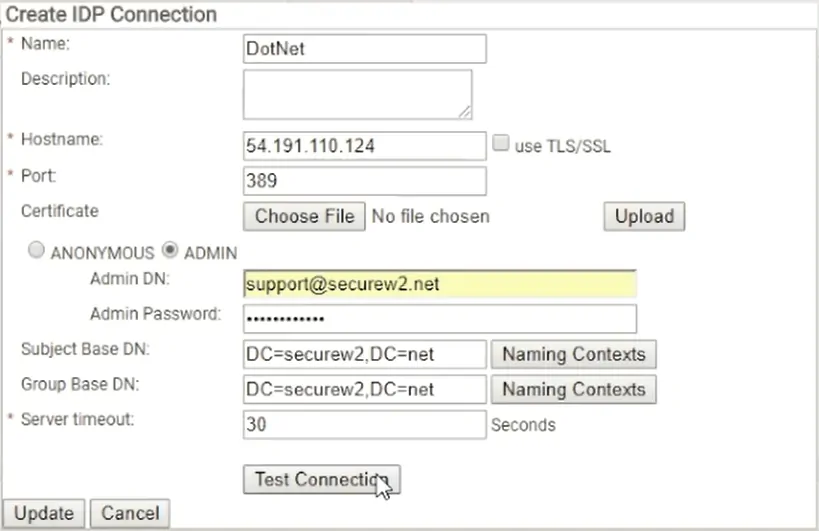
  3. Select theΒ ConnectionsΒ tab and clickΒ Add Connection
    • ForΒ Name, enter a name
    • ForΒ Hostname, enter β€˜54.191.110.124β€˜
    • ForΒ Port, enter β€˜389β€˜
    • ForΒ Admin DN, enter β€˜support.securew2.comβ€˜
    • ForΒ Admin Password, enter the password
    • ForΒ Subject Base DN, enter β€˜DC=securew2,DC=netβ€˜
    • ForΒ Group Base DN, enter β€˜DC=securew2,DC=netβ€˜
    • ForΒ Server timeout, enter β€˜30β€˜
  4. ClickΒ Test Connection

  5. After the connection is successfully tested, clickΒ Update
  6. Select theΒ BasicΒ tab
  7. ForΒ Subject Name Attribute, enter:
    • β€˜sAMAccountNameβ€˜ (users log in with only their username), orΒ β€˜userPrincipalNamesβ€˜ (users log in with their username and realm)
  8. ClickΒ Update
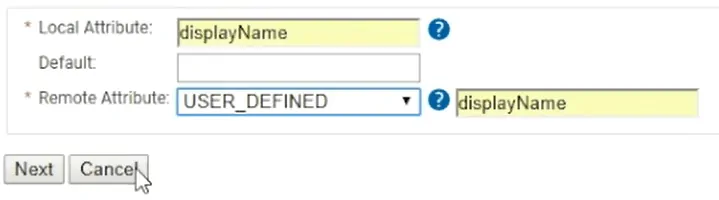
  9. Select theΒ Attribute MappingΒ tab and clickΒ Add
    • ForΒ Local Attribute, enter β€˜displayNameβ€˜
    • Click theΒ Remote AttributeΒ dropdown and selectΒ USER_DEFINED
    • In the field that appears, enter β€˜displayNameβ€˜
  10. ClickΒ NextΒ ->Β Add
    • ForΒ Local Attribute, enter β€˜upnβ€˜
    • Click theΒ Remote AttributeΒ dropdown and selectΒ USER_DEFINED
    • In the field that appears, enter β€˜upnβ€˜
  11. ClickΒ NextΒ ->Β Add
    • ForΒ Local Attribute, enter β€˜emailβ€˜
    • Click theΒ Remote AttributeΒ dropdown and selectΒ USER_DEFINED
    • In the field that appears, enter β€˜emailβ€˜
  12. ClickΒ Next
  13. Select theΒ GroupsΒ tab and clickΒ Add
    • ForΒ Local Group, enter a name
    • ForΒ Remote Group, enter β€˜CN=SECUREW2-STAFF,CN=Users,DC=securew2,DC=netβ€˜
      • NOTE: The value for Remote Group is case sensitive
  14. ClickΒ NextΒ ->Β Update
    • To ensure that everything is working properly, select the Connections tab and test the connection again
Configure LDAP IDP Profile Policy

To configure the profile policy:

  1. From yourΒ SecureW2 Management Portal, go toΒ Policy ManagementΒ >Β Profile
  2. ClickΒ Add Profile Policy
  3. ForΒ Name, enter a name
  4. ClickΒ Save
  5. Select theΒ ConditionsΒ tab
  6. Click theΒ ProfileΒ dropdown and select the profile you created in the previous section
  7. Select theΒ SettingsΒ tab
  8. Click theΒ Identity ProviderΒ dropdown and select the IDP you created in the previous section
  9. ClickΒ Update

Configure LDAP IDP User Role Policy

To configure the user role policy:

  1. From yourΒ SecureW2 Management Portal, go toΒ Policy ManagementΒ >Β User Roles
  2. ClickΒ Add Role
  3. ForΒ Name, enter a name
  4. ClickΒ Save
  5. Select theΒ ConditionsΒ tab
  6. Click theΒ Identity ProviderΒ dropdown and select the IDP you created in the section β€œConfigure the Identity Provider”
  7. ClickΒ Update

Configure the Enrollment Policy

To configure the enrollment policy:

  1. From yourΒ SecureW2 Management Portal, go toΒ Policy ManagementΒ >Β Enrollment
  2. ClickΒ Add Enrollment Policy
  3. ForΒ Name, enter a name
  4. ClickΒ Save
  5. Select theΒ ConditionsΒ tab
  6. In theΒ User RoleΒ list, select the user role you created in the previous section
  7. In theΒ Device Role list, selectΒ DEFAULT DEVICE ROLE POLICY 1
  8. ClickΒ Update
Β 

SecureW2 offers a cost-effective solution to streamline device onboarding and strengthen network security. Head over to ourΒ pricing pageΒ to learn more.