Key Points
- To obtain digital certificates, you must submit a certificate signing request (CSR), which includes your public key and identifying information.
- The CSR process generates a public-private key pair and packages the public key with identity information for verification by a certificate authority (CA).
- A managed PKI solution, such as SecureW2 JoinNow Dynamic PKI, can manage the whole certificate lifecycle for internal use cases, from initial CSR certificate generation to issuance and revocation.
Before a certificate authority (CA) can issue a digital certificate, it must first receive a certificate signing request (CSR).
Whether you’re securing a website with a Secure Sockets Layer/Transport Layer Security (SSL/TLS) certificate, issuing client certificates for Wi-Fi authentication, or protecting a virtual private network (VPN), a CSR is the formal message sent to a certificate authority (CA) to issue a digital certificate.
In this guide, you’ll learn:
- What a certificate signing request (CSR) is
- What information it contains
- How the CSR generation process works across manual and automated methods
- Common mistakes that delay issuance
- How modern protocols like SCEP and ACME eliminate manual CSR handling entirely
What Is a Certificate Signing Request (CSR)?
A certificate signing request is a block of structured, encoded text that an applicant submits to a certificate authority (CA). Despite the common shorthand “CSR certificate,” a CSR is not the certificate itself. It is the application that requests one.
A CSR contains two categories of information:
- Identity data: The Distinguished Name (DN) fields that identify the organization or device requesting the certificate
- A public key: The cryptographic key that will be bound to the issued X.509 certificate
The private key never leaves the applicant’s device. Only the public key travels inside the CSR. Once the CA validates the request, it signs and returns a certificate that pairs the public key with the verified identity information.
CSRs follow the PKCS #10 standard (RFC 2986) and are typically encoded in Base64 PEM format — the familiar block of text wrapped in —–BEGIN CERTIFICATE REQUEST—– and —–END CERTIFICATE REQUEST—– headers.
What Information Is in a CSR?
The CSR bundles several fields into a standardized format. The table below shows the key fields included in a CSR, along with their descriptions and examples:
| Field | Description | Example |
| Common Name (CN) or Subject Alternative Names (SANs) | Fully qualified domain name(s) or device identifier | www.example.com |
| Organization (O) | Legal entity name | Acme Corp |
| Organizational Unit (OU) | Department (optional, deprecated by some CAs) | IT Security |
| Locality (L) | City | Seattle |
| State (ST) | State or province, unabbreviated | Washington |
| Country (C) | Two-letter ISO code | US |
| Email Address | Contact email | admin@example.com |
| Public Key | RSA or ECC key embedded in the request | 2048-bit RSA or P-256 ECC |
CSR Structure and Format: Inside PKCS #10
At a technical level, a CSR is encoded using PKCS #10 (ASN.1 notation). PKCS stands for Public Key Cryptography Standards, and it defines how CSRs are formatted and used. A CSR consists of three parts:
- CertificationRequest Info: Version number, subject DN, public key (algorithm identifier plus bit string), and optional attributes
- SignatureAlgorithm: The algorithm used to sign the request (e.g., SHA-256 with RSA)
- Signature: The digital signature created by signing the CertificationRequestInfo with the applicant’s private key
The signature proves the applicant holds the private key that corresponds to the public key inside the request. If someone tampers with any field after signing, the CA will reject the CSR because the signature will not be verified.
Optional attributes can include certificate extensions (key usage, extended key usage), challenge passwords for revocation, and additional subject information.
What Does a CSR Look Like?
A certificate signing request (CSR) is typically saved as a text file with a .csr extension and encoded in Base64 PEM format. When you open it in any text editor, it appears as a block of encoded data wrapped between header and footer lines.
Here’s a simplified example of what a CSR looks like:
—–BEGIN CERTIFICATE REQUEST—–
MIIC8DCCAdgCAQAwazELMAkGA1UEBhMCVVMxEzARBgNVBAgMCldhc2hpbmd0b24x
EDAOBgNVBAcMB1NlYXR0bGUxETAPBgNVBAoMCFNlY3VyZVcyMQswCQYDVQQLDAJJ
VDEVMBMGA1UEAwwMc2VjdXJldzIuY29tMIIBIjANBgkqhkiG9w0BAQEFAAOCAQ8A
MIIBCgKCAQEAosqspEiJ3PZ9anweaJJUBFQHFYJPsXNOxvBdRP6WfQdsPqxdQDif
buEIGQSFWmga0XXVSVBUt4M5482ZDLMJefkglXixHVLpxYCg90Yud0x9KHxlRQk5
pADfuyVEqNOhyYiTRLRUmTZEeFn9/jy+4ASB4O05+9dhfAx2XvUqVtVBO3voz6rA
Mybj1mdi44qWC/O2goOzwZVLOIdbPAvYrpwTYF+4LNsWctc92Dhm1JE3wJieab+u
3UXT1H14lAFkTVn26dc2ecqcMcNAZUeJ1ZPWPev1ho3L9l49MEZftfmD/LIeM/cx
TK5iS+JYnh6+j0I6+USpd4esGU9oAaNcKwIDAQABoEAwPgYJKoZIhvcNAQkOMTEw
LzAtBgNVHREEJjAkggxzZWN1cmV3Mi5jb22CFGh0dHBzOi8vc2VjdXJldzIuY29t
MA0GCSqGSIb3DQEBCwUAA4IBAQCeKFjAOIgNORDdZM4GpqDPxTvtueTrQ26PAeCU
MxEcyf5H94WXy9I1xwxg8lpEvyfyhpDm7K/aLPkagydvOtoFsUYaNLaOWp6ITU1N
OB0Tx9ImbLiZTmqsTUaoVNIdC2JbF/tmb8sVRZXnbVkIpI7wo6SdKJGNSF42v15o
8h6PAmF2cZGfX21Qt8zD7CzzNx62f10mGknG7+ZevCg1AV6LPHCxm7r8iQZW/Of8
OCgpXgtCMVDjgyGNdFSkQGk9okSAXBzM783/PDt2cq2qzWiW5UMUpHzjL85HtpTn
MpITWY+sY2uD+3xCXdHDGxZq4sFHjy8IWRAZX+RQaciUIwZk
—–END CERTIFICATE REQUEST—–
Key visual characteristics of a CSR are:
- Header: —–BEGIN CERTIFICATE REQUEST—–
- Footer: —–END CERTIFICATE REQUEST—–
- Content: A long, continuous string of Base64-encoded characters (letters, numbers, +, /, and = for padding).
- Line length: Usually wrapped at about 64 characters per line for readability.
- File size: A typical 2048-bit RSA CSR is a few kilobytes when saved as text.
Some tools and older systems may use —–BEGIN NEW CERTIFICATE REQUEST—– as the header instead. Both formats are widely accepted by certificate authorities.
How to Read a CSR
As you can see, the Base64 block of data is encoded and illegible as written. But if you want to read the data, for example to check an existing CSR or make sure the CSR generated correctly, you can paste it into a decoder such as the ones from GoDaddy or SSLShopper.
Make sure to copy and paste the entire block of text, including the BEGIN CERTIFICATE REQUEST and END CERTIFICATE REQUEST portions. The decoder will translate the CSR into human-readable components and check the formatting of the CSR.
If you’re working in a terminal, you can use OpenSSL commands:
openssl req -in your-csr-file.csr -noout -text but replace your-csr-file with the actual file name.
If your CSR is stored in text, you can use this command:
openssl req -noout -text -in <(cat <<EOF
—–BEGIN CERTIFICATE REQUEST—–
… paste full CSR here …
—–END CERTIFICATE REQUEST—–
EOF
)
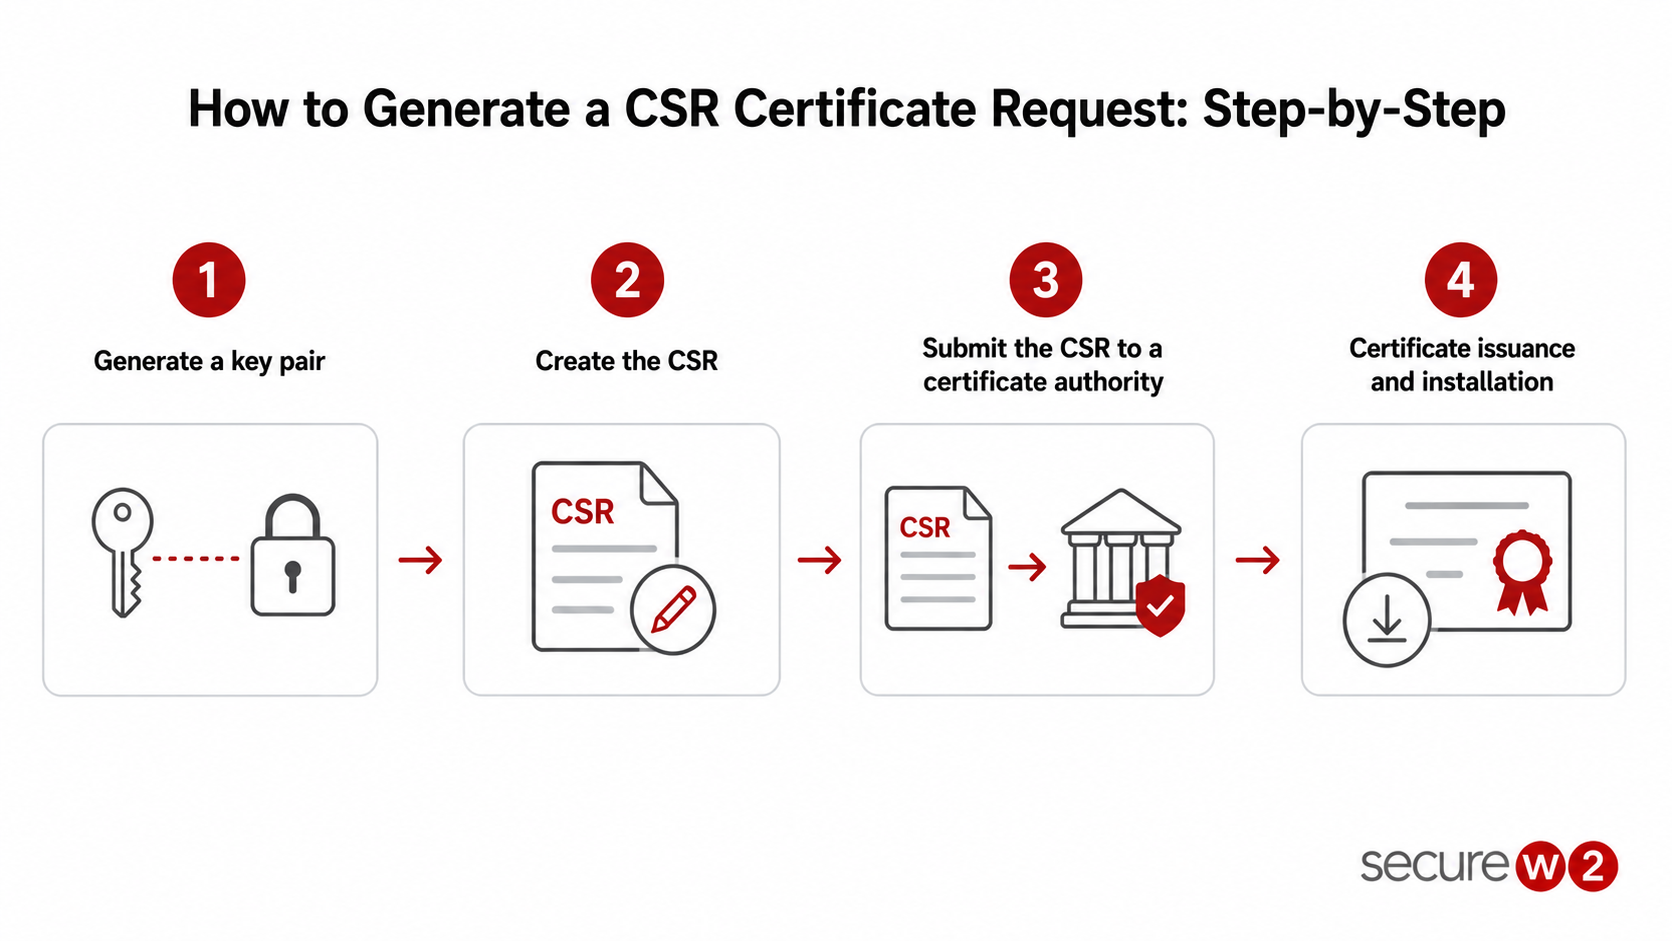
How to Generate a CSR Certificate Request: Step-by-Step
Most SSL/TLS, client, code signing and device certificates follow the same general CSR workflow. The steps below apply whether you are using a public CA for a web server or a private CA for internal network authentication:
- Generate a key pair
- Create the CSR
- Submit the CSR to a certificate authority
- Certificate issuance and installation
The image below gives you an overview of the generation process.
Step 1: Generate a Key Pair
Before creating the CSR, the system needs a cryptographic key pair:
- Private key: Stored securely on the server or device, never shared
- Public key: Included in the CSR and eventually bound to the certificate
Your public key is the mailbox. This is where anyone can drop mail in. Anyone knows what your public key is. The private key is what’s needed to open the mailbox. – Micah Spady, Director of Product Marketing at SecureW2
Most deployments use RSA keys with a minimum of 2048 bits. Elliptic curve cryptography (ECC) keys (P-256 or P-384) are increasingly common because they offer equivalent security at smaller key sizes, which reduces TLS handshake overhead.
With OpenSSL, generating a 2048-bit RSA key pair and CSR in a single command looks like this:
“`bash openssl req -new -newkey rsa:2048 -nodes -keyout server.key -out server.csr “`
OpenSSL prompts for the DN fields (Common Name, Organization, Locality, etc.) and encodes the output in Base64 PEM.
Step 2: Create the CSR
The CSR is built on the same system that holds the private key. Whether you use OpenSSL, IIS Manager, a Java Keytool command, or a platform-specific wizard, the tool will:
- Collect the DN fields and any SANs
- Package them with the public key into a PKCS #10 structure
- Sign the structure with the private key
- Output the Base64-encoded CSR file
Before submitting, decode and inspect the CSR to confirm the CN, SANs, key algorithm and key size are correct. Catching errors here avoids rejected requests and resubmissions.
Step 3: Submit the CSR to a Certificate Authority
For public TLS certificates, submission usually means pasting the Base64 block into the CA’s web portal or uploading through an API. The CA parses the CSR, extracts the public key and subject fields, and begins validation.
Validation depth depends on the certificate type:
- Domain Validation (DV): The CA confirms you control the domain (DNS record or HTTP challenge)
- Organization Validation (OV): The CA verifies the legal entity exists
- Extended Validation (EV): The CA performs thorough identity and legal checks
Core fields like the Common Name cannot be edited after submission. If the CSR contains errors, you must generate a new key pair and CSR.
Step 4: Certificate Issuance and Installation
After validation, the CA signs the certificate with its own private key and returns the signed end-entity certificate and any intermediate CA certificates needed to complete the certificate chain.
Once the signed certificate is returned, install it on the server or device that generated the original key pair. The private key stored locally and the public key inside the certificate must match, or the TLS handshake will fail. Platform-specific steps bind the certificate to web servers (Apache, Nginx, IIS), VPN gateways, Wi-Fi controllers, or application proxies.
After installation, verify the full certificate chain resolves back to a trusted root CA in the client’s trust store.
| Find the network security plan built for your environment. |
| SecureW2 certificate-based authentication scales from mid-market teams to global enterprise deployments. Compare options and see how our solution can protect you from costly breaches. |
| Compare Plans → |
CSR Best Practices and Security Checklist
Mistakes during CSR creation can introduce security risks, deployment issues or unnecessary certificate reissuance. The image below gives you an overview of the CSR best practices and checklist.
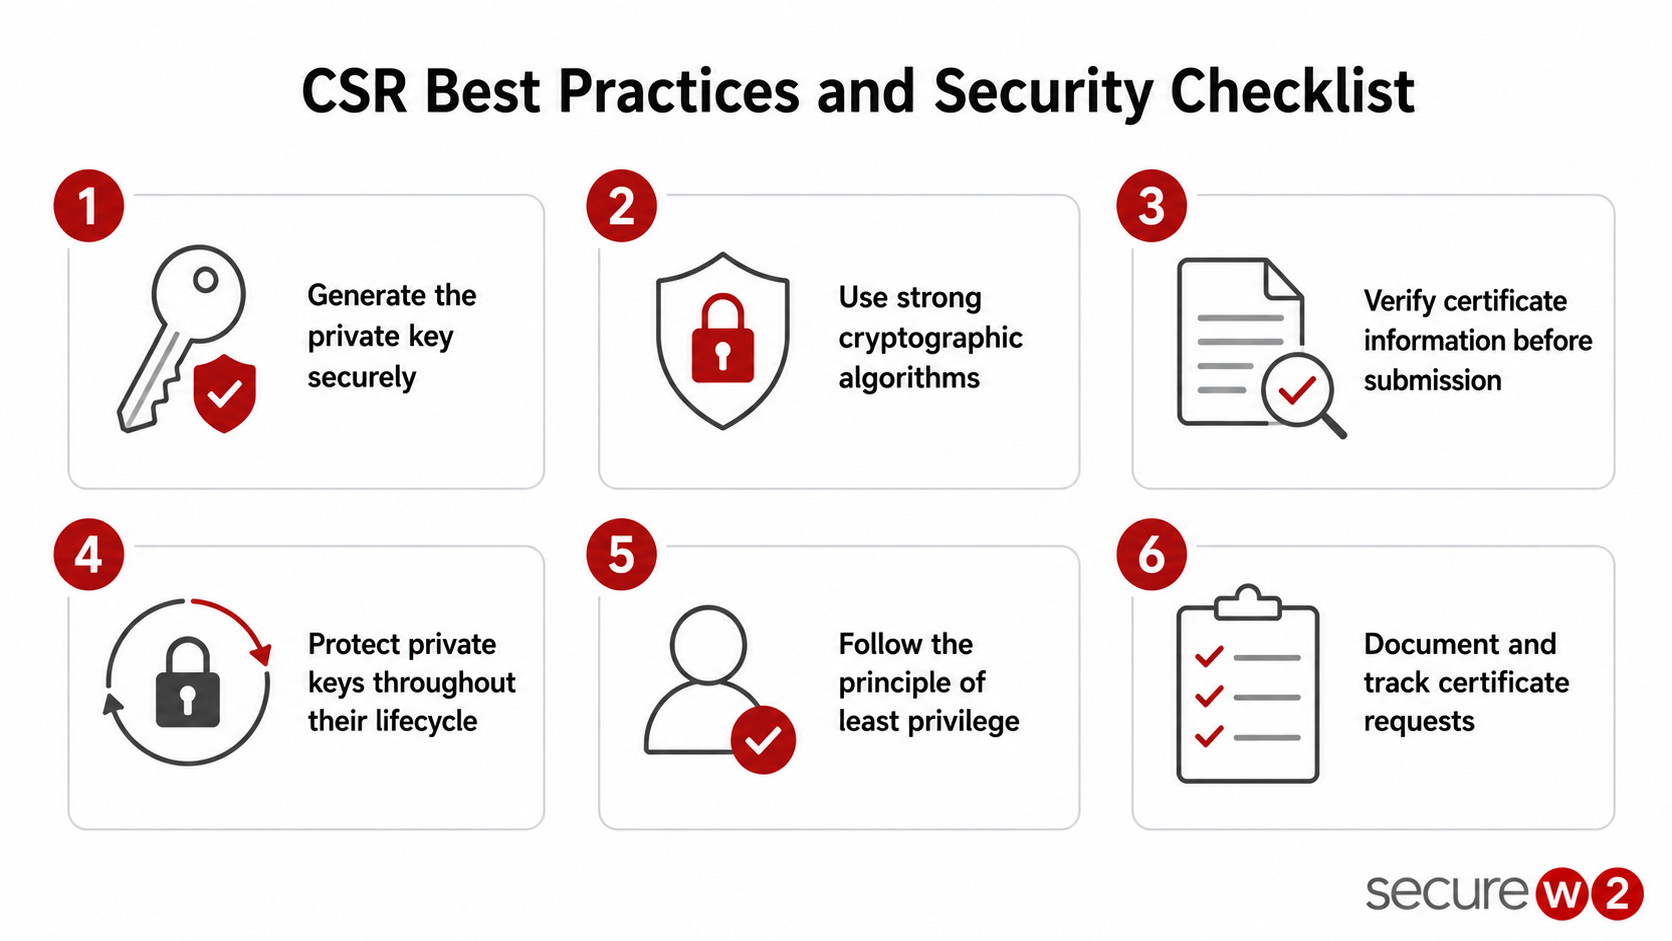
The table below provides a quick-reference checklist of the most important CSR security best practices.
| Best Practice | Why It Matters |
| Generate the private key securely | Protects private keys from theft and misuse. |
| Use strong cryptographic algorithms | Meets modern security standards and CA requirements. |
| Verify certificate information | Prevents issuance delays and deployment failures. |
| Protect private keys throughout their lifecycle | Reduces the risk of key compromise after issuance. |
| Follow the principle of least privilege | Limits exposure to sensitive certificate operations. |
| Document and track certificate requests | Simplifies renewals and prevents certificate-related outages. |
The sections below explain each best practice in more detail.
Generate the Private Key Securely
Whenever possible, the private key associated with a CSR should always be generated on the system where it will be used. Private keys should never be shared through email, messaging platforms or unsecured file transfers. If an attacker gains access to the private key, they can impersonate the certificate holder and compromise encrypted communications.
Use Strong Cryptographic Algorithms
When generating a CSR, use modern cryptographic standards such as RSA 2048-bit or higher, or elliptic curve cryptography (ECC) using approved curves. Avoid legacy key sizes and outdated algorithms that may no longer provide adequate protection against modern attacks.
Verify Certificate Information Before Submission
Carefully review all information included in the CSR, including the Common Name, Subject Alternative Names, organization details and domain names. Errors can result in certificate issuance delays or certificates that fail validation during deployment.
Protect Private Keys Throughout Their Lifecycle
Generating a secure CSR is only one part of certificate security. Organizations should implement controls to protect private keys during storage, backup, rotation and retirement. Hardware security modules (HSMs), Trusted Platform Modules (TPMs), and secure key management systems can help reduce the risk of key compromise.
Follow the Principle of Least Privilege
Limit access to systems, administrators and applications involved in certificate management. Restricting who can generate CSRs, request certificates and access private keys helps reduce the organization’s attack surface.
Document and Track Certificate Requests
Maintain an inventory of issued certificates, associated CSRs, expiration dates and responsible owners. Proper certificate lifecycle management helps organizations avoid unexpected outages caused by expired certificates and simplifies certificate renewal processes.
Certificate security doesn’t stop when the CSR is generated. Organizations must manage and protect certificates throughout their entire lifecycle, from issuance and deployment to renewal and revocation.
As certificate lifecycles continue to shorten and organizations increasingly rely on certificates instead of passwords, the volume of certificates that must be tracked and renewed continues to grow. This makes manual certificate management difficult to scale.
Automating CSR Certificate Generation With SCEP and ACME
Manual CSR generation works well for a handful of web server certificates, but it does not scale when an organization manages thousands of device certificates for Wi-Fi, VPN, and network access.
Two protocols address this problem by automating the CSR lifecycle end to end:
- SCEP
- ACME
SCEP: Simple Certificate Enrollment Protocol
The Simple Certificate Enrollment Protocol (SCEP) was designed for network device enrollment. It wraps the CSR in PKCS #7 and PKCS #10 messages and handles the exchange between the device and the CA automatically.
Mobile device management (MDM) platforms like Microsoft Intune, Jamf, and Google Workspace use SCEP profiles to push certificate configurations to managed devices. The device generates the key pair, builds the CSR, submits it to the SCEP endpoint and installs the returned certificate without user intervention.
Prefer a visual explanation? Watch the video below for a quick overview of how SCEP works and why organizations use it to automate certificate enrollment.
ACME: Automated Certificate Management Environment
The Automated Certificate Management Environment (ACME) protocol, originally developed by the Internet Security Research Group for Let’s Encrypt, automates domain validation and CSR certificate issuance for TLS certificates.
The ACME client generates a key pair, creates the CSR, submits it to the ACME server, completes a domain control challenge (HTTP-01 or DNS-01) and retrieves the signed certificate. Renewal happens on a schedule with no manual steps.
ACME Device Attestation (ACME DA) extends the protocol to enterprise device certificates by binding the CSR to hardware-level attestation, proving the private key was generated inside a Trusted Platform Module (TPM) or secure enclave. This prevents key export and strengthens device identity assurance beyond what a standard CSR alone provides.
The video below walks through how ACME Device Attestation works, including hardware-backed device verification, CSR validation and automated certificate issuance.
Why Automation Matters for Enterprise PKI
When CSR generation is manual, IT teams face certificate sprawl, expired certificates causing outages and inconsistent key management. The average enterprise already manages over 50,000 certificates, and that number grows each year as new devices and users are added.
Automated enrollment through SCEP and ACME reduces human error, enforces consistent key strength and certificate policies, and handles renewal before expiration. Organizations running certificate-based authentication for 802.1X Wi-Fi or VPN access need this level of automation to keep thousands of certificates current without helpdesk overhead.
Common CSR Certificate Mistakes and How to Fix Them
Understanding CSR mistakes makes it easier to troubleshoot and remediate the problem. Here are a few of the most common errors and what you can do to correct them.
Common Name and SAN Mismatches
If the Common Name (CN) or SANs in the CSR do not match the hostname clients use to connect, browsers and supplicants return certificate mismatch errors. A CSR for `samplename.com` will not cover `www.samplename.com` unless that hostname is listed as a SAN.
Modern best practices are almost always to use SANs over CN. Using SANs allows a single certificate to secure multiple domain names, subdomains, or IP addresses under one certificate. For example, using a SAN, you could secure samplename.com, www.samplename.com, and mysamplename.com with a single certificate.
Wildcard certificates (`*.samplename.com`) cover single-level subdomains like `app.samplename.com` but not the bare domain `samplename.com` or multi-level subdomains like `app.eu.samplename.com`.
Fix: List every hostname and subdomain before generating the CSR. Verify the CN and all SANs match your production URLs..
Private Key and Certificate Mismatch
A certificate can only function with the private key that signed its CSR certificate. Mismatches happen when:
- Multiple CSRs are generated on the same machine, and the wrong key gets associated
- Keys are moved, overwritten or deleted during server migration
- The certificate is installed on a different server from the one that generated the CSR
Fix: Compare the modulus of the private key and the certificate. In OpenSSL:
“`bash openssl rsa -in server.key -modulus -noout
openssl x509 -in server.crt -modulus -noout “`
If the output differs, generate a new key pair, create a new CSR and resubmit.
Weak Key Sizes and Deprecated Algorithms
CAs and browsers reject CSRs that use key sizes below 2048-bit RSA or deprecated signature algorithms like SHA-1. Some older server configurations still default to 1024-bit keys.
Fix: Regenerate the key pair with `rsa:2048` or stronger (4096-bit RSA or P-256 ECC). Confirm the signature algorithm is SHA-256 or SHA-384. Retire and securely destroy the old key.
How the Certificate Trust Chain Works
A CSR certificate is the starting point, but the issued certificate only works if clients can validate it through the full certificate trust chain. Here’s what that looks like.
- Root CA certificates: The root CA sits at the top of the chain. Root certificates are self-signed and distributed inside trust stores that ship with operating systems and browsers. Because the root key must be protected, CAs do not use it to sign end-entity certificates directly.
- Intermediate CA certificates: Intermediate CAs are signed by the root CA and handle day-to-day certificate issuance. This separation protects the root key. If an intermediate CA is compromised, the root CA can revoke it without invalidating the entire trust store.
- End-entity certificates: The certificate issued by your CSR is the end-entity certificate. It sits at the bottom of the chain. During a TLS handshake, the server presents its end-entity certificate along with the intermediate certificates. The client walks the chain from end-entity to intermediate to root, verifying each signature, checking expiration dates and consulting revocation sources (CRL or OCSP).
The following illustration provides an overview of the certificate validation process.

How Attested CSRs Add Device Trust to Certificate Enrollment
While the certificate trust chain establishes trust in an issued certificate, a CSR has traditionally been a simple request for that certificate. A device generates a public-private key pair, packages the public key and identifying information into a CSR, and sends it to a CA for validation.
While the CA can verify the identity associated with the request, it has historically had very little visibility into how the private key was generated, where it is stored, or whether the device submitting the request is actually the hardware it claims to be.
That limitation is now being addressed through ongoing standards work at the Internet Engineering Task Force (IETF). The LAMPS working group is developing the draft-ietf-lamps-csr-attestation, which extends the traditional CSR process by allowing devices to include remote attestation evidence directly within a certificate request.
This additional information enables a CA to evaluate not only the requester’s identity but also the security properties of the device and the private key being certified.
For example, attestation evidence can indicate whether the private key was generated and stored within a:
- Trusted Platform Module (TPM)
- Hardware security module (HSM)
- Secure Enclave
- Or another hardware-backed security component
It can also provide details about the device’s firmware version, hardware protections and overall security posture. By including this information in the CSR, the CA gains stronger assurance about both the device and the key material it is certifying.
This represents a significant change from traditional certificate enrollment. Under conventional PKI models, a certificate authority typically cannot distinguish between a private key generated in software on an unmanaged personal device and one generated inside a tamper-resistant hardware module on a managed enterprise endpoint.
Attested CSRs address this problem by allowing devices to cryptographically prove key protection and device integrity as part of the certificate request process.
The practical implications for enterprise PKI environments are substantial. An organization issuing certificates for Wi-Fi authentication, VPN access or device identity could require all certificate requests to include TPM or hardware attestation evidence.
Devices that fail to meet security requirements, such as those lacking hardware-backed key storage or running unapproved firmware, could be automatically denied certificates, even if they possess otherwise valid enrollment credentials.
This approach complements existing device management and zero-trust frameworks by moving trust decisions directly into the certificate issuance process itself.
Apple has already implemented an early version of this concept through Managed Device Attestation in iOS 16 and later, in which device identity is verified by the Secure Enclave before operational certificates are issued.
The IETF’s work aims to standardize these capabilities so they can be implemented across different certificate authorities, operating systems, and hardware platforms.
How SecureW2 Automates CSR Generation and Certificate Enrollment
Manual CSR workflows create friction for IT teams managing large device fleets. SecureW2 JoinNow Dynamic PKI eliminates that friction by automating the full certificate lifecycle, from CSR generation through issuance, renewal and revocation.
For managed devices, SecureW2 integrates with MDM platforms (Intune, Jamf, Google Workspace, Kandji) through SCEP and ACME gateways. The MDM pushes a certificate profile to the device, the device generates the key pair and CSR locally, and the SecureW2 CA issues the certificate, all without IT touching a CSR file.

For BYOD and unmanaged devices, JoinNow MultiOS provides a self-service onboarding flow. End users connect to a portal, authenticate against their identity provider (Entra ID, Okta, Google Workspace), and receive a certificate configured for 802.1X Wi-Fi or VPN access. The CSR, key pair generation and certificate installation happen behind the scenes in seconds.
ACME device attestation adds hardware-bound assurance by verifying the private key was generated inside the device’s TPM or secure enclave before the CA signs the certificate. This closes the gap that standard CSRs leave open: a traditional CSR cannot prove where the private key lives.
Combined with JoinNow Cloud RADIUS for real-time identity lookup and certificate validation at every authentication event, the result is a certificate-based network access architecture that scales without manual CSR management.
Schedule your free demo to learn how SecureW2 automates certificate enrollment for your network.
Frequently Asked Questions
What is the difference between a CSR certificate and an SSL certificate?
A CSR is the request you submit to a CA. It contains your public key and identity information. The SSL/TLS certificate is what the CA returns after validating the CSR. The certificate binds your public key to your verified identity and is signed by the CA’s private key so clients can trust it.
Can I reuse a CSR for multiple certificates?
Technically, yes, but it is not recommended. Reusing a CSR means reusing the same key pair, which increases exposure if the private key is compromised. Best practice is to generate a new key pair and CSR for each certificate renewal or replacement.
How long does a CSR take to process?
Processing time depends on the validation level. Domain Validation (DV) certificates can be issued in minutes through automated checks. Organization Validation (OV) and Extended Validation (EV) certificates require manual verification and can take one to five business days.
Do I need a CSR certificate for every device on my network?
If you are issuing individual device certificates for Wi-Fi (802.1X) or VPN authentication, each device needs its own key pair and CSR. Enrollment protocols like SCEP and ACME automate this process so that devices generate and submit CSRs without manual intervention. Managed PKI platforms like SecureW2 handle this at scale across thousands of endpoints.
What happens if my CSR contains incorrect information?
The CA may reject the request, or worse, issue a certificate with incorrect details that cause connection failures. Because CAs cannot edit core fields like the Common Name after submission, the only fix is to generate a new key pair, create a corrected CSR, and resubmit.
Who issues CSR certificates?
A digital certificate (such as an SSL/TLS certificate) is issued by a certificate authority in response to a certificate signing request.
Certificates can be issued by:
- Public CAs such as Let’s Encrypt or Comodo
- Private CAs such as internal enterprise CAs or SecureW2
- Self-signed (no CA, the certificate is signed with its own private key)
- Specialized CAs (government, military, or industry-specific CAs)
Do I need a CSR to renew a certificate?
To renew an SSL/TLS certificate, you will almost always need to generate and submit a new CSR. The CSR contains your public key and domain/identity information that the CA uses to issue the new certificate.
Generating a fresh CSR allows you to use a new private key (called key rotation), which is a security best practice. Most public CAs expect or strongly recommend a new CSR during renewal.