With a focus on centralized control of Apple devices, Kandji stands out as an innovative leader in modern enterprise management. IT managers can easily automate device deployment, enforce security policies, and guarantee compliance using Kandji’s feature-rich device management interface for Macs, iPhones, and iPads for their organization. Of all its features, setting up Wi-Fi profiles is one of the most important ways to ensure that Apple devices connected to the corporate network are safe and dependable.
The foundation of device connectivity is Wi-Fi profiles, which maintain strict wireless network security guidelines and provide easy access to business networks. Kandji enterprise Wi-Fi profile management is crucial in an era where organizations depend increasingly on Apple products to foster cooperation and productivity. This guide explores the complex process of setting up Kandji enterprise Wi-Fi profiles specifically designed for business networks. We offer a thorough guide to help you manage the challenges of setting up a Wi-Fi profile, guaranteeing good connectivity, and strengthening your company’s digital infrastructure from conception to execution.
Understanding Kandji Enterprise Wi-Fi Profile
Fundamentally, Wi-Fi profiles specify how a device joins a Wi-Fi network. These configurations include the network name, security protocols, and authentication methods. These profiles are essential to device management since they allow for smooth connectivity and guarantee that organizational security standards are followed. IT managers may create and implement Wi-Fi profiles designed just for Apple devices in their corporate network thanks to Kandji’s extensive feature set. Beyond only connecting, this feature allows administrators to optimize network performance, enforce security policies, and simplify device maintenance procedures.
Because of the size and complexity of network settings, setting up Wi-Fi profiles takes on greater significance in the context of enterprise networks. With an emphasis on enterprise-grade solutions, Kandji recognizes the difficulties of helping businesses manage sizable fleets of Apple devices inside their infrastructure. Administrators may set up Wi-Fi profiles that strengthen wireless network security defenses against possible threats and provide easy access to network resources by utilizing Kandji’s features. Kandji enables businesses to build a solid network infrastructure that can handle the demands of contemporary corporate operations, whether it means integrating sophisticated authentication systems or putting strong encryption standards into practice.
How 802.1X Wi-Fi Authentication Works
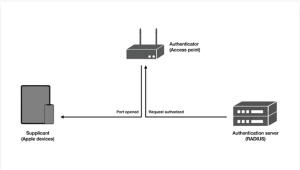
802.1X Wi-Fi authentication is the mainstay of business wireless network security. Extensible Authentication Protocol (EAP) is used by WPA (Wi-Fi Protected Access) Enterprise, WPA2 Enterprise, and WPA3 Enterprise, among other implementations, to achieve user authentication. Mutual trust between the access point, the authentication server, and the device requesting is the fundamental component of 802.1X authentication. In this threefold secure connection, the device has to prove to the network that it is trustworthy, and the unsecured network has to verify that the device or person trying to join is legitimate.
The device, access point, and authentication server (often RADIUS) are all involved in the authentication process. The authenticator serves as a gatekeeper, asking the device for proof of authorization, which is subsequently validated by the authentication server. Network access is controlled by EAP authentication methods such as certificates and usernames/passwords.
To learn more, click here.
How Users Get 802.1X Authentication Credentials
Within the domain of 802.1X authentication, users obtain credentials via various procedures customized to meet their authentication requirements. Companies usually issue usernames to users for username-based authentication. The users then utilize the organization’s directory service, which can be hosted locally or in the cloud, to establish passwords. However, acquiring a certificate is a more involved process that is frequently made possible via services such as Active Directory Certificate Services (AD CS) or protocols such as Simple Certificate Enrollment Protocol (SCEP). Mobile Device Management (MDM) systems, such as Kandji, ensure scalability in the assignment of unique digital certificates to authenticate users or devices by instructing devices to get identity certificates instead of supplying them directly, often with the use of SCEP.
For example, Kandji may send a SCEP payload instructing the device to create a key pair and request a certificate signing to the assigned SCEP server.
Steps to Configure EAP (Extensible Authentication Protocol) Types for Wi-Fi
There are a lot of alternatives available when it comes to authentication for Wi-Fi networks, particularly if your infrastructure can support several authentication types. You must adjust the specific parameters for each option. The most popular configuration options are covered in this article.
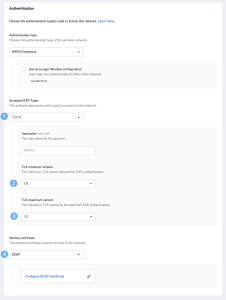
Configure EAP-TLS
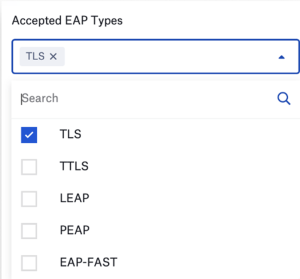
- Choose EAP-TLS from the list of approved EAP types to enable it.
- To avoid using older, less reliable versions, select the bare minimum of TLS.
- If your infrastructure does not support the newest versions of TLS, provide the maximum version.
- Configure the identity certificate provisioning mechanism and make the necessary adjustments.
See the “Configure the Wi-Fi Library Item” guide to learn how to configure the Wi-Fi Library item in detail.
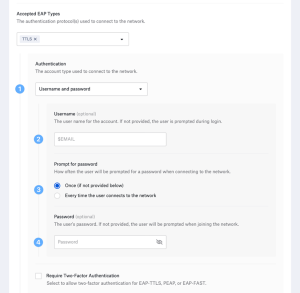
Configure EAP-TTLS
- To enable tunneled Transport Layer Security encryption, enable EAP-TTLS.
- Select between device-based directory credentials or username and password authentication.
For the authentication of a password and username:
- You can utilize Kandji’s global variables or provide the username.
- Decide how frequently the password should be requested.
- If you’re using a shared login and password, enter the password.
- For authentication in device-based directories:
- Choose between the Computer OD and Computer AD authentication systems.
Set up additional TTLS settings:
- If an identity certificate is required, decide if two-factor authentication should be required.
- Select the protocol for internal authentication.
- Indicate the outside identity, if you choose.
- For security purposes, specify the minimum and maximum TLS versions.
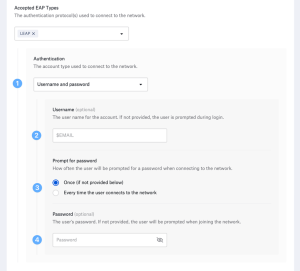
Configure EAP-LEAP
- Enable EAP-LEAP authentication, an older approach that relies on MS-CHAP and Dynamic WEP (Wired Equivalent Privacy).
- Select between device-based directory credentials or username and password authentication.
For the authentication of a password and username:
- Use the global variables provided by Kandji or specify the username.
- Choose how frequently you want to request the password.
- If you’re using a shared login and password, enter the password.
- For authentication in device-based directories:
- Choose between the Computer OD and Computer AD authentication systems.
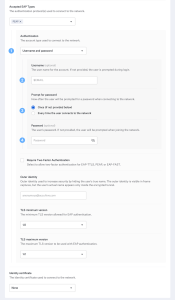
Configure EAP-PEAP
- Enable EAP-PEAP, a protocol that addresses limitations in prior EAP protocols such as LEAP.
- Select between device-based directory credentials or username and password authentication.
For the authentication of a password and username:
- Use Kandji’s global variables or static values to specify the username.
- Decide how frequently the password should be requested.
- If you’re using a shared login and password, enter the password.
- For authentication in device-based directories:
- Choose between the Computer OD and Computer AD authentication systems.
Set up extra PEAP parameters:
- Consider whether an identity certificate is required to mandate two-factor authentication.
- For security purposes, specify the minimum and maximum TLS versions.
- To keep the inner identity hidden, you can optionally indicate the outer identity.
How to Configure an Identity Certificate
When configuring an identity certificate for network authentication, be sure that the certificate’s Extended Key Usage (EKU) has the Client Authentication entitlement. Work with your network administrator to confirm that certificate services and templates customized for your network’s specifications are configured correctly. When the Kandji Automatic Profile Redistribution option is on, the platform keeps track of the expiration date of issued certificates. It reinstalls the profile automatically when it’s time to renew the certificate. Furthermore, this option will expedite the certificate renewal process by automatically adding the $PROFILE_UUID to the request’s subject.
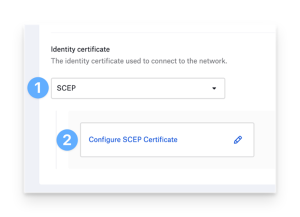
Obtain an Identity using SCEP
- Use the Simple Certificate Enrollment Protocol (SCEP) to get identity certificates.
- Select the “SCEP” option for identity certificates to obtain them from a SCEP service.
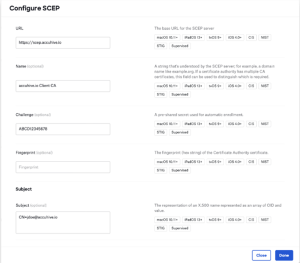
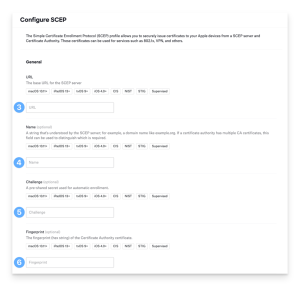
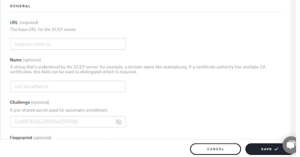
- Select “Configure SCEP Certificate” and provide the required information:
- Input the SCEP server’s URL.
- Give the SCEP server a name if you’d like.
- Enter the pre-shared key that the SCEP server expects, if applicable.
- Provide the anticipated fingerprint from the certificate authority’s certificate, if desired.
- Choose between utilizing Kandji’s global variables or static values to specify the certificate identity’s subject.
- If you want to provide SANs for the certificate identity, choose “Specify Subject Alternative Names (SAN)”.
- Make sure that the key size you select complies with the specifications of your network.
- Define key usage by required permissions.
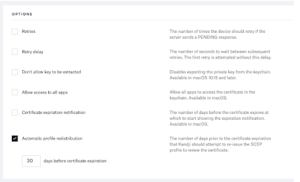
- Configure retries and retry delays for the acquisition of certificates, if desired.
- Choose security measures like gaining access to all apps and blocking key extraction.
- Indicate the settings for automated profile redistribution and certificate expiration notice.
- Finalize the setup by clicking “Done.”
Integrating Kandji with EAP-TLS for Certificate Auto-Enrollment
One of the best mobile device management (MDM) systems for Apple devices available right now is Kandji. As one of their partners, we have developed this tutorial to assist Kandji users in setting up SecureW2’s SCEP Gateway API to register your managed devices automatically for certificates and setup them for certificate-based Wi-Fi authentication at the same time.
Two deployment options will be available to Kandji admins:
Custom .mobileconfig created by SecureW2 for SCEP and Wi Fi configuration: Using the supplied SCEP certificate, SecureW2 will generate a custom .mobileconfig to push to your devices, configuring them for SCEP certificates and certificate-based Wi-Fi.
Custom Wi-Fi .mobileconfig and native Kandji SCEP configuration: Using the Kandji Library, create a SCEP configuration. Then, push out a .mobileconfig to set up devices for certificate-based Wi-Fi with the SCEP certificate.
Prerequisites
To use any of the following two options, you must have the following subscriptions:
- Active SecureW2 Cloud Connector License
- Active SecureW2 Managed Device Gateway License
- Active Kandji License
- Enterprise-grade Access Points (They Support WPA2-Enterprise)
- iOS or macOS Devices Actively Managed in Kandji
SecureW2 Custom .mobileconfig for SCEP and Wi-Fi configuration
Send the following details to the support team at SecureW2 to configure a custom .mobileconfig file that you can upload to Kandji.
- SSID device names that need to be authenticated
- RADIUS server Root CA
- Require cert attributes like Subject field, Alternative name type, RFC 822 name, Key size, and key usage.
Once you receive the .mobileconfig file, you can use the SCEP URL and the challenge key from the JoinNow portal.
Generate a SCEP URL and Challenge from the JoinNow Management Portal
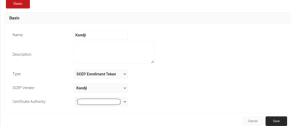
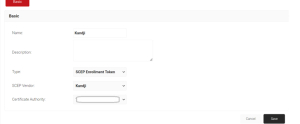
- Navigate to Identity Management > API Tokens
- Enter a Name for your Api token.
- Select Type as SCEP Enrollment Token from the Type drop-down.
- Select SCEP Vendor as Kandji.
- Select a Certificate Authority created in JoinNow.
- Click Save
- A .csv file with your SCEP URL and secret key will be downloaded to your device.
- Paste the URL into the URL field in Kandji.
- Paste the secret key into the challenge field in Kandji.
Create a new BluePrint by navigating to Library > Add Custom Profile and upload the shared profile. This should configure the device to get a certificate from the JoinNow Management portal and connect it to the secured SSID.
Native Kandji SCEP Configuration + Custom Wi-Fi .mobileconfig
The second option is that you can create a SCEP configuration using the Kandji Library. However, this will still require a custom .mobileconfig to be uploaded for the Wi-Fi configuration.
- Create a new Blueprint or use an existing Blueprint.
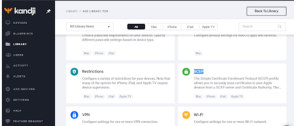
- Library > Add a New Library
- Click on SCEP > Add & Configure
Here, you could add the SCEP URL and the shared key that you have received from the JoinNow Management portal and assign it to the blueprint that was created from the previous step.
- First, we need to generate a SCEP URL and Challenge from JoinNow Portal.
- Navigate to Identity Management > API Tokens.
- Enter a Name for your Api token.
- Select Type as SCEP Enrollment Token from Type drop-down.
- Select SCEP Vendor as Kandji.
- Select a Certificate Authority created in JoinNow.
- Click Save.
- A .csv file with your SCEP URL and Secret Key is downloaded.
- Paste the URL into Kandji.
- Paste the secret key in the Challenge field in Kandji.
Now, revisit the Kandji portal and populate the remaining settings for a SCEP profile.
- Subject Field: Typically, we enter an email ID in this field.
- Subject Alternative Name Type: enter RFC 822 Name. This field is mandatory.
- RFC 822 Name: enter $SERIAL_NUMBER.
Note: The $SERIAL_NUMBER will be used to encode the certificate and will create an entry in the JoinNow Management Portal for a device. You can enter multiple values sent using RFC 822. A semicolon separates the names. NT Principal Name: Optional field and can be left blank.
RFC 822 Name is a mandatory field that needs to be sent from Kandji to encode the SAN values in a certificate.
- Key Size: 2048 (mandatory field).
- Key Usage: Both Signing & Encryption.
NOTE: We set Key Usage to both Signing & Encryption, but in our test lab, we found that it works without selecting any option.
Scroll down to the Options section. Enable “Automatic profile redistribution.” This field is mandatory. Set the redistribution 30 days before the certificate expiration.
Elevating Network Security with Kandji and SecureW2
To sum up, this thorough guide is an essential tool for IT administrators who use Kandji to set up Wi-Fi profiles for Apple devices in their businesses. It provides comprehensive instructions on a range of authentication techniques, including EAP-TLS, EAP-TTLS, EAP-LEAP, and EAP-PEAP, as well as identity certificate setup via AD CS and SCEP, equipping users with the know-how and resources required for safe and smooth network access.
Enterprise Wi-Fi authentication may be improved even further by integrating with SecureW2, as we provide a managed PKI solution that integrates seamlessly with Kandji for certificate management. SecureW2’s seamless integration allows users to automate certificate enrollment via the SCEP protocol, guaranteeing strong network security without sacrificing user experience.
Contact us today to elevate your device management capabilities with Kandji and SecureW2.
