Nowadays, network admins have started to come around to the benefits of digital certificates, which is a justified response given the superior cryptographic protection compared to traditional passwords and usernames. Still, one major obstacle that most organizations face in deploying certificates is the smooth issuance of these certificates, especially when there are many devices to account for.
As most of these organizations rely on MDMs like Intune or Jamf, it is imperative to configure the integration between these MDMs and the Certificate Authority (CA) correctly for the successful issuance of both user and device certificates. SCEP (Simple Certificate Enrollment Protocol) is a protocol that facilitates this process by automatically enrolling managed devices with digital certificates without any end-user interaction.
In this article, we will explain simple procedures to configure the SCEP profile with Intune for your organization.
Prerequisites for Configuring a MEM Intune SCEP Profile
Since we are dealing with SCEP Intune profile, we assume you have an active Microsoft Online Services account with an Intune (Microsoft Endpoint Manager) subscription, Azure Portal, and access to a sufficient PKI service such as Securew2 JoinNow Connector PKI
The primary thing to keep in mind while configuring an Intune SCEP profile is that you must create a Trusted Certificate Profile for the devices you intend to use for the SCEP configuration. This trusted certificate profile helps in the deployment of the root CA or intermediate CA on the device. Furthermore, it also helps in establishing trust between the device and the issuing CA.
To create a Trusted Certificate Profile, you need to configure your PKI with MEM Intune. For that, you can either use any of the following methods:
- Intune Third-party CA Partner
- Intune SCEP API token
We recommend using the Intune Third-party CA method because it checks the device’s authorization in Intune before distributing scep certificates, while the API token method does not.
Also, API Token SCEP Integration is relatively vulnerable because it works on a shared secret and an SCEP URL. The shared secret is essentially a preshared key that is visible within the URL, which makes this method riskier than necessary.
Attributes in SCEP (Simple Certificate Enrollment Protocol) Certificates
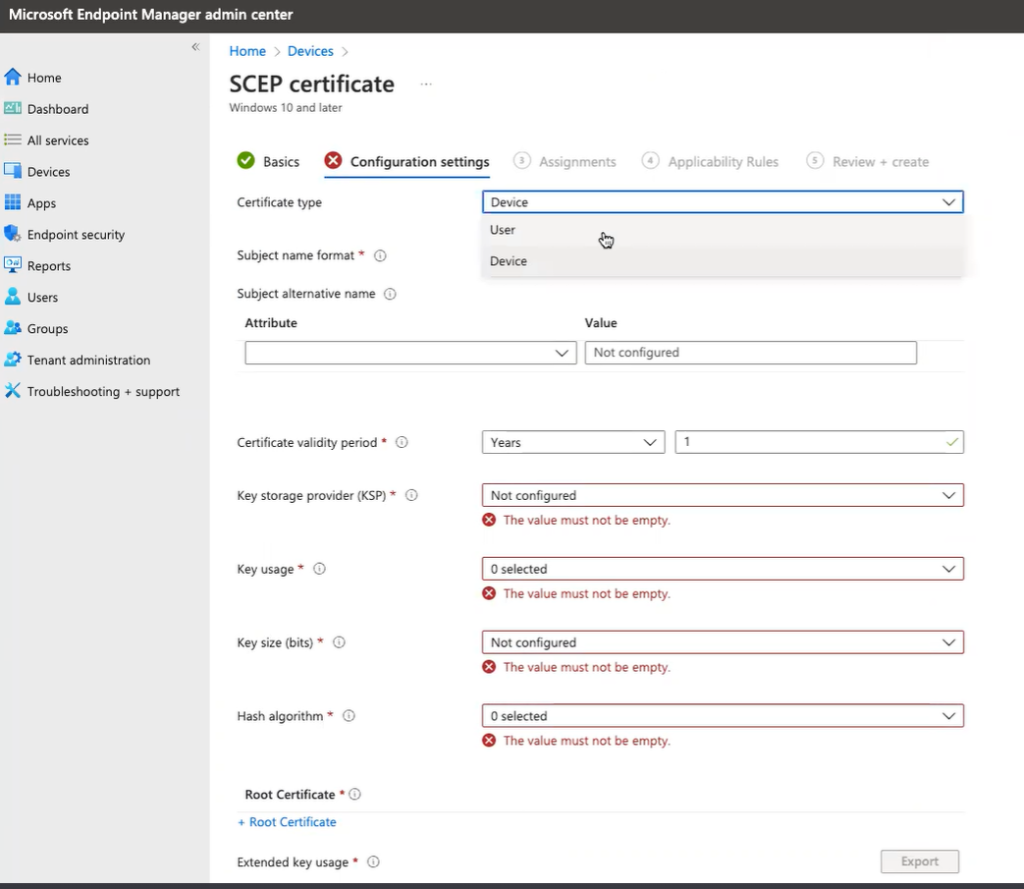
SCEP protocol in Intune enables you to customize your CA certificate using various attributes that suit your organization’s needs. Let’s discuss these attributes in the certificate template and how to utilize them for a healthy practice before configuring the Intune SCEP profile.
- Certificate type
- Subject name format
- Subject alternative name
- Certificate validity period
- Key storage provider
- Key usage
- Key size(bits)
- Hash algorithm
- Root Certificate
- Extended Key usage
Certificate Type:
In Certificate Type, you can decide where you want to store the certificates, whether the device store or the user store. Likewise, the attributes mapped by selecting users/devices also vary accordingly in the subsequent steps.
Subject name format:
In this section, you can choose how Intune creates the subject alternative name (SAN) in the certificate request. You can select any attributes to use one of the following attributes in the given format.
- Email address : {{User Name}}
- Email address : {{UserPrincipalName}}
- Email address : {{AAD_Device_ID}}
Subject alternative name

Certificate validity period
As an admin, you must have predefined the validity of your certificate so that value will be automatically used by Intune while issuing the certificate.
Key storage provider

Key usage

- Key encipherment: It allows key exchange only when the key is encrypted.
- Digital signature: It allows key exchange only when a digital signature protects the key.
Key size(bits)

Hash algorithm

Root Certificate
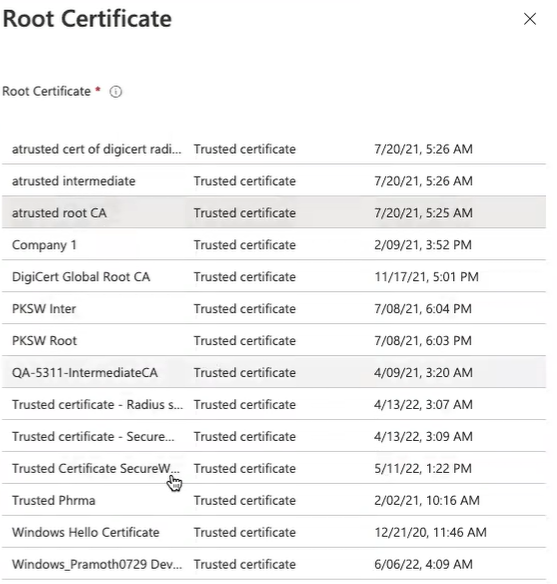
In this section, you can put the Intermediate and Root certificates of the issuing CA. For example, if the certificates are issued to the client by the SecureW2 Intermediate, then you need to choose the SecureW2 Root and Intermediate CA option.
Extended key usage
In this section, you can decide the purpose of your certificate based on your organization’s needs. This section gives you the leverage to choose various purposes for your certificate like client authentication, server certificate, and so on.
 Object Identifier:
The Object Identifier (OID) indicates the purpose of your certificate. There are different OID values for different purposes, which are static across the entire cycle of certificate configuration.
For example, client and server authentication will have a different OID, enabling the RADIUS server to distinguish the certificates based on their unique IDs as their unique purposes are defined.
SCEP Profile for PKI Certificate Requests
The SCEP Profile is vital for communication with the PKI, like SecureW2 Issuing CA certificates to enroll end-user certificates. Once the end-user certificate is enrolled successfully, the certificate is used to connect to the Wi-Fi network.
Note: You must create a separate profile for each OS platform. The steps to create trusted certificates are similar for each device platform.
Creating a SCEP Certificate Profile
- Sign in to the Microsoft Endpoint Manager portal.
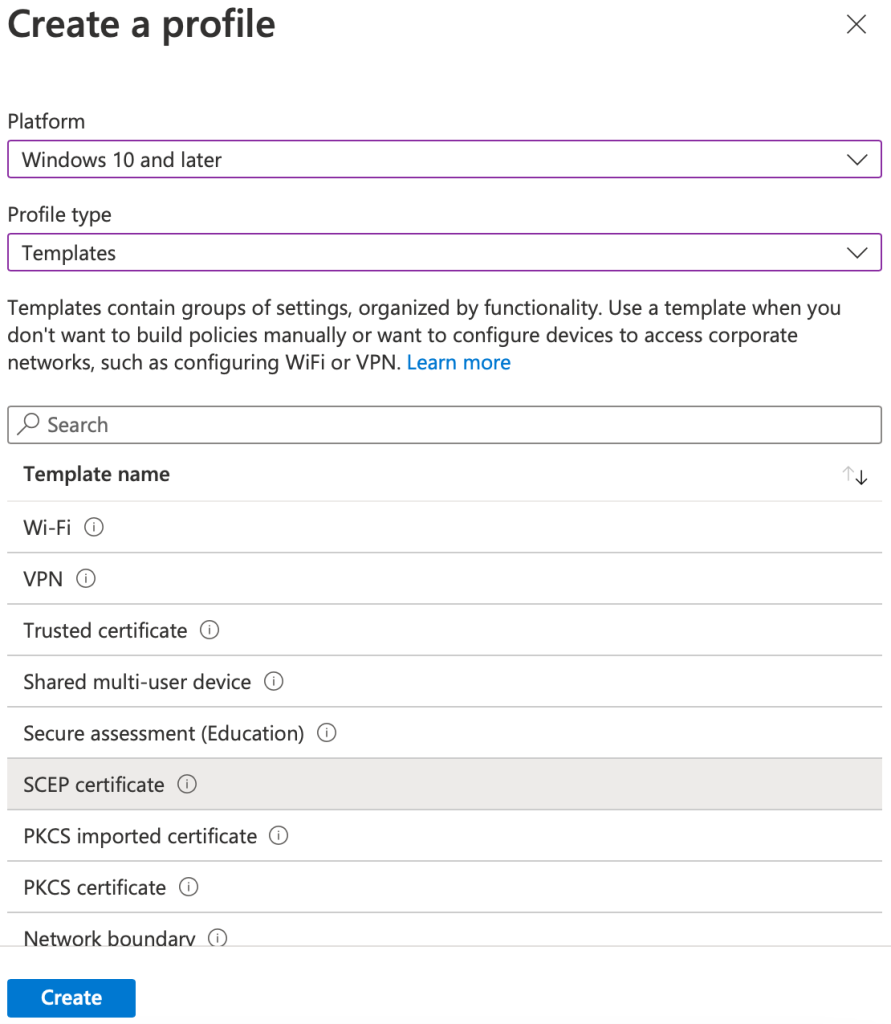
- Select Devices > Configuration profiles > Create profile.
- From the Platform drop-down list, select the device platform for this SCEP certificate. You can choose one of the following platforms for device restriction settings:
- Android
- iOS
- macOS
- Windows 10 and later
- From the Profile Type drop-down list, select Templates and then choose SCEP certificate. Click Create.
Note: You must create a separate profile for each Operating System platform. The steps to create trusted certificates are similar for each device platform.
- On the SCEP certificate page, type a name and description for the SCEP Certificate profile and click Next.
- For Certificate Type – User, use the following settings:
- Certificate type: Select User for user certificates.
- Subject name format: Choose how Microsoft Intune creates the subject name in the certificate request. Select one of the following options:
- CN={{UserName}}
- CN={{EmailAddress}}
- CN={{UserPrincipalName}}
-
- Subject alternative name: Choose how Microsoft Intune creates the subject alternative name (SAN) in the certificate request. We advise customers to use one of the following attributes in the given format:
- Email address : {{User Name}}
- Email address : {{UserPrincipalName}}
- Email address: {{AAD_Device_ID}}
- Note: To test if attributes are configured correctly, check the General Events section in the SecureW2 Management Portal for any event messages, such as Device Creation Failed, which indicates that the attributes are not correctly mapped.
- Subject alternative name: Choose how Microsoft Intune creates the subject alternative name (SAN) in the certificate request. We advise customers to use one of the following attributes in the given format:
-
- Key storage provider (KSP) (Windows Phone 8.1, Windows 8.1, and later): Select where the certificate’s key is to be stored. Choose the following value:
- Enroll in Trusted Platform Module (TPM) KSP if present; otherwise, Software KSP
- Key storage provider (KSP) (Windows Phone 8.1, Windows 8.1, and later): Select where the certificate’s key is to be stored. Choose the following value:
-
- Key usage: Enter the key usage options for the certificate. Select both options:
- Key encipherment: Allow key exchange only when the key is encrypted.
- Digital signature: Allow key exchange only when a digital signature protects the key.
- Key size (bits): Select the number of bits in the key. Select the largest bit size.
- Hash algorithm (Android, Windows Phone 8.1, Windows 8.1, and later): Select SHA-2, the strongest level of security that the connecting devices support.
- Note: Certificate type is not a setting on Android SCEP Profiles. You must create a separate profile for each OS platform. The steps to create trusted certificates are similar for each device platform.
- Key usage: Enter the key usage options for the certificate. Select both options:
- Root Certificate: Click the + sign and choose the profile created earlier (Trusted Certificate Profile for SecureW2 Issuing CA).
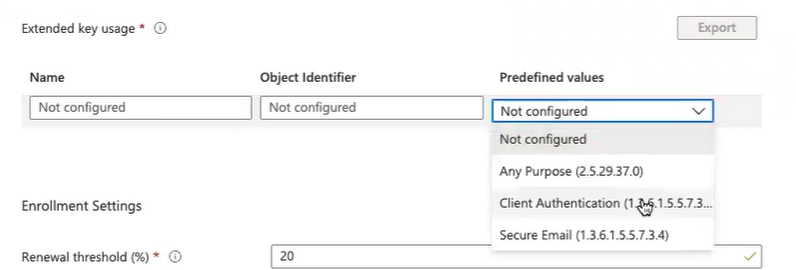
- Extended key usage: Add values for the certificate’s intended purpose. In most cases, the certificate requires Client Authentication so that the user or device can authenticate to a server. From the Predefined values drop-down list, select Client Authentication.
- Enrollment Settings
- Renewal threshold (%): Enter the percentage of the certificate lifetime that remains before the device requests renewal of the certificate. The default value is 20%.
- SCEP Server URLs: Enter the Endpoint URI available in the MEM Intune CA IdP.
- Select Next and assign the profile to appropriate Groups and Rules, review it, and click Create.
- For Certificate Type – Device, use the following settings:
- Certificate type: Select Device certificate for scenarios such as user-less devices, for example, kiosks, or for Windows devices, placing the certificate in the Local Computer certificate store.
- Subject name format: Choose how Microsoft Intune creates the subject name in the certificate request. Select one of the following options:
-
-
- CN={{DeviceName}}
- CN={{AAD_Device_ID}}
- Subject alternative name: Choose how Microsoft Intune creates the subject alternative name (SAN) in the certificate request. We advise customers to use one of the following attributes in the given format:
-
-
-
- Email address: {{DeviceName}}
- Email address: {{AAD_Device_ID}}
- Note: To test if the attributes are configured correctly, check the General Events section in the JoinNow Management Portal for any event messages, such as Device Creation Failed, which indicates that the attributes are not correctly mapped.
-
-
- Key storage provider (KSP) (Windows Phone 8.1, Windows 8.1, and later): Select where the key to the certificate is stored. Choose the following value:
- Enroll in Trusted Platform Module (TPM) KSP if present otherwise, Software KSP
- Key storage provider (KSP) (Windows Phone 8.1, Windows 8.1, and later): Select where the key to the certificate is stored. Choose the following value:
-
- Key usage: Select the key usage options for the certificate. Select both the options:
- Key encipherment: This allows key exchange only when the key is encrypted.
- Digital signature: Allows key exchange only when a digital signature helps protect the key.
- Key usage: Select the key usage options for the certificate. Select both the options:
-
- Key size (bits): Select the number of bits contained in the key. Select the largest bit size.
- Hash algorithm (Android, Windows Phone 8.1, Windows 8.1, and later): Select SHA-2, the strongest level of security that the connecting devices support.
- Root Certificate: Click the + sign and choose the profile created earlier.
- Extended key usage: Add values for the certificate’s intended purpose. In most cases, the certificate requires Client Authentication so the user can authenticate to a server. From the Predefined values drop-down list, select Client Authentication.
-
- Enrollment Settings
- Renewal threshold (%): Enter the percentage of the certificate lifetime that remains before the device requests renewal of the certificate.
- SCEP Server URLs: Enter the SCEP URL generated from the SecureW2 Management Portal.
- Enrollment Settings
- Select Next and assign the profile to appropriate Groups under Assignments.
- Select Next apply Rules under Applicability Rules.
- Review it and click Create.
After configuring SCEP integration for Intune, you can use Intune’s built-in Wi-Fi settings to deploy to users and devices. For that, you must configure the appropriate Wi-Fi settings so the certificate can connect to the desired server automatically.
You can use the SCEP-enrolled certificate to configure the desired devices for EAP-TLS authentication by adding the SCEP URL to the Intune devices so that the SCEP gateway can deploy the necessary configurations.
Top Managed PKI (MPKI) Solution for Intune
To successfully manage the entire certificate lifecycle, you must back your MDM with a robust PKI for certificate enrollment (and future management). Otherwise, you will end up manually deploying each certificate, which can cause a substantial financial burden, not to mention a high risk of misconfiguration.
Well, the good news is that Securew2, with its Cloud Managed PKI, is compatible with all major vendors like Intune and Jamf. It’s also built to integrate into your existing architecture, eliminating the need for costly infrastructure overhauls.
Our PKI auto-enrolls managed devices for passwordless certificate-based authentication and can deploy certificates through any MDM via our powerful API Gateways. Also, our user-friendly management portal allows you to address the entire lifecycle of certificates by offering numerous certificate management features, such as certificate revocation. You can even customize your certificates with dozens of policies in our management portal, creating just the authentication solution to suit your specific needs.
The list does not end here; as for Intune and Jamf, we also provide a unique feature that enables auto-revocation certificates on expiry. We believe in constantly upgrading ourselves to keep our ever-expanding customer base intact. If you’re keen to expand your cybersecurity horizons, here’s our pricing to learn more.



 Object Identifier:
 Note: You must create a separate profile for each Operating System platform. The steps to create trusted certificates are similar for each device platform.


