The transition from on-premise Active Directory (AD) to cloud-based Azure AD (Microsoft Entra ID) can be tricky, leaving Azure admins searching for an easy way to migrate. Unlike AD, there isn’t a straightforward solution for deploying 802.1x authentication on Azure AD.
Configure your Azure cloud with SecureW2’s cloud to easily enroll all network devices with certificates and enable 802.1x security settings.
Luckily, there are several low-cost passwordless solutions to smooth the migration. One such solution is leveraging digital x.509 certificates. All you need is an Azure Cloud setup along with a PKI and RADIUS with native cloud integration. SecureW2’s certificate solutions allow admins to automatically onboard all devices with a certificate. Just check out what one of our customers has today transitioning to the cloud.
Certificates provide a seamless and secure way for admins to transfer their networks to the cloud. Certificates provide the most secure way to use 802.1x because they eliminate over-the-air credential theft. With SecureW2, Windows environments can ditch credential-based authentication for a passwordless Azure solution. Certificates are easier to deploy on a cloud-based PKI, which is a fraction of the cost of an on-prem PKI like AD CS.
How to Deploy Certificates in Azure AD
The best way for Azure customers to deploy certificates is with onboarding software for BYODs and Gateway APIs, such as SCEP, for managed devices. Many admins have turned away from using certificates because they seemed too difficult to program and issue to every device. That’s only the case if you manually configure devices for certificates. Gateway APIs and onboarding software provide automatic certificate enrollment, lightening the load for IT admins.
In order to deploy certificates, admins need a Public Key Infrastructure (PKI). Microsoft’s AD CS allows admins to build an on-premise PKI, and it may seem like a no-brainer for Azure customers. However, on-prem PKIs are incredibly expensive, labor-intensive, and take months to set up. Azure enterprises have to pay for hardware and software implementation, licensing fees, infrastructure, eventual replacement and much more. Plus, on-prem AD CS PKIs require a team of professionals to manage, meaning Azure enterprises have to dedicate time and resources to either train their IT department or find new employees.
None of this is necessary with a managed PKI service, which has no infrastructure costs because it’s all on the cloud, can be set up in a few hours, and costs a fraction of the price of on-prem PKIs. Enterprises only need one part-time PKI manager, no expensive team of experts required. SecureW2’s cloud PKI is the actual no-brainer because it’s a turn-key PKI solution that requires no forklift upgrades.

Issuing Certificates for Azure Users with SecureW2
Below we’ve provided a step-by-step guide for Azure clients to configure their IDPs with SecureW2 and start issuing certificates.

Below we’ve provided a step-by-step guide in both video and screenshot format for Azure clients to configure their IDPs with SecureW2 and start issuing certificates.
Use SecureW2’s Getting Started Wizard to integrate Azure AD. The Getting Started Wizard provides Azure admins with everything they need and set up can be completed in less than an hour.
Create a SAML Application in Azure
The SAML application allows an Azure end user to input their credentials in SecureW2’s software. The credentials are sent over the network IDP, verifying the end user’s identity. Once the end user is identified, the IDP sends attributes back to the SAML application. The attributes are then sent to SecureW2 so the device can be configured for secure network access and certificate enrollment.
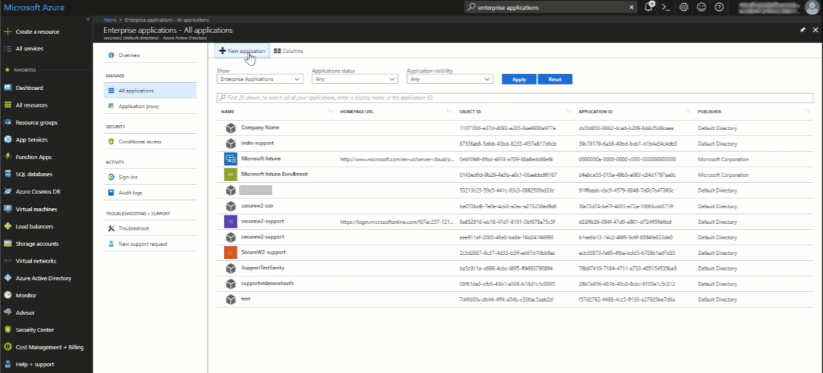
- Log in to Azure and select Enterprise Applications.
- Select New Application.
- Search for SecureW2 in the Add from the Gallery field.
- Add the SecureW2 JoinNow Connector.
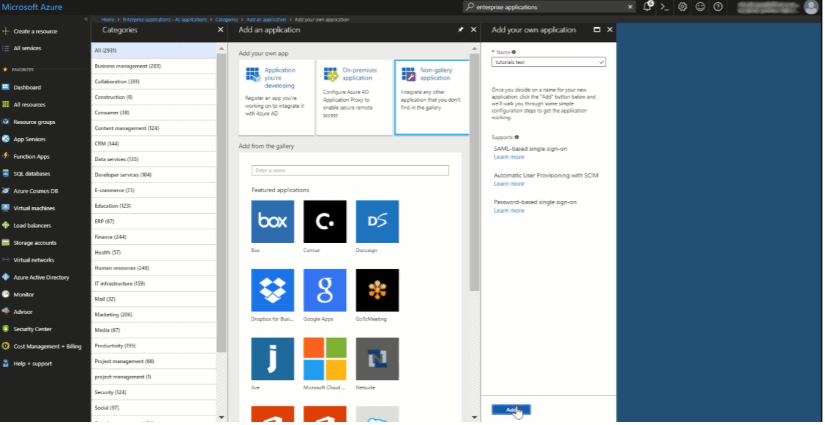
Add a SAML IDP in SecureW2
Single sign-on (SSO) enables secure authentication for applications using SAML. To set up SSO, the Azure IDP and SecureW2 need to be configured to establish trust. This can be done by having both entities exchange metadata.
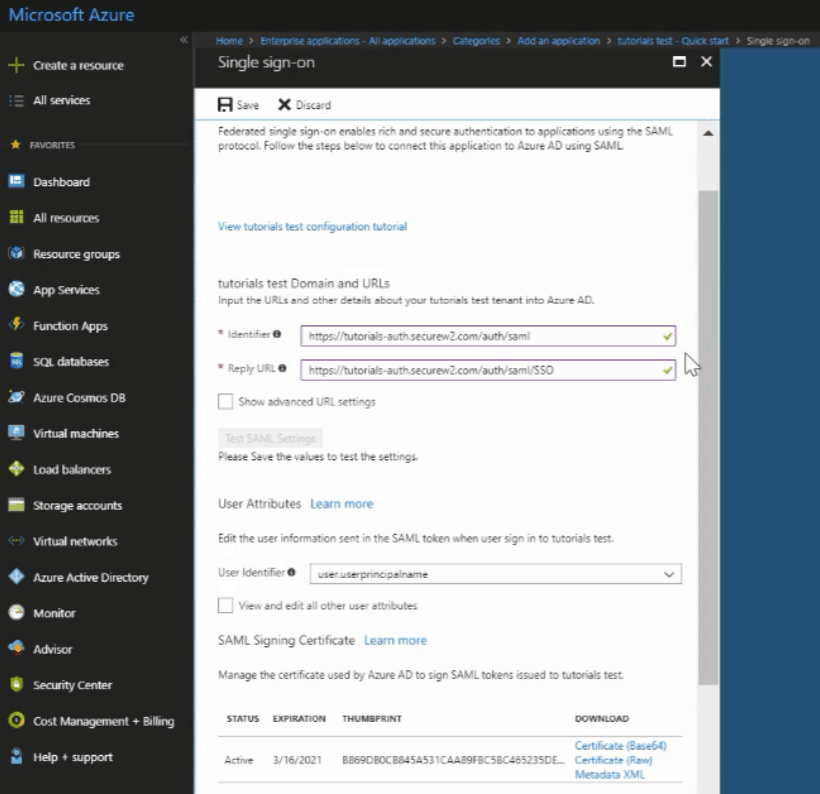
- Select Configure single sign-on.
- Select SAML-based sign-on in the single sign-in drop down menu.
- Get the Identifier and Reply URL from SecureW2 Management Portal.
- Go to Identity Management > Identity Providers.
- Click Add Identity Provider.
- Enter name and description under Basic tab.
- Select SAML in the Type option.
- Save.
- Under Configuration, copy the EntityID and ACS URL.
- Paste it in both Azure’s Identifier and Reply URL fields.
- In Azure, download the Metadata XML file.
- In SecureW2 Management Portal, upload the XML file under Configuration.
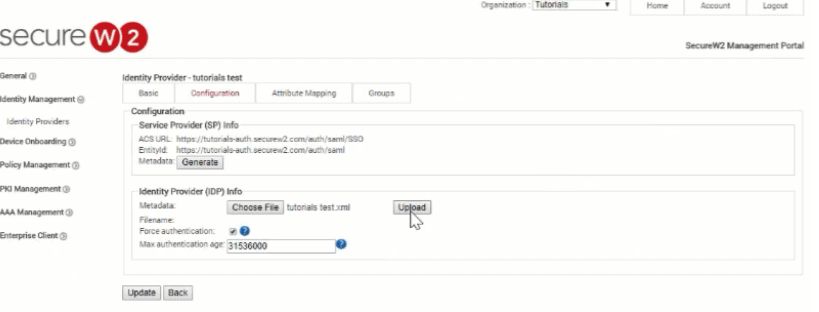
Once this is set up, you will be able to configure as many identity policies as you want. If you’d like to learn more about group policy management, please contact us and we can show you a demo of our solution.
Add Users to SAML
Not all Azure end users should be granted the same amount of network access because it creates a security risk. You will need to configure Azure to create groups to categorize each network user based on what they’re allowed to access.
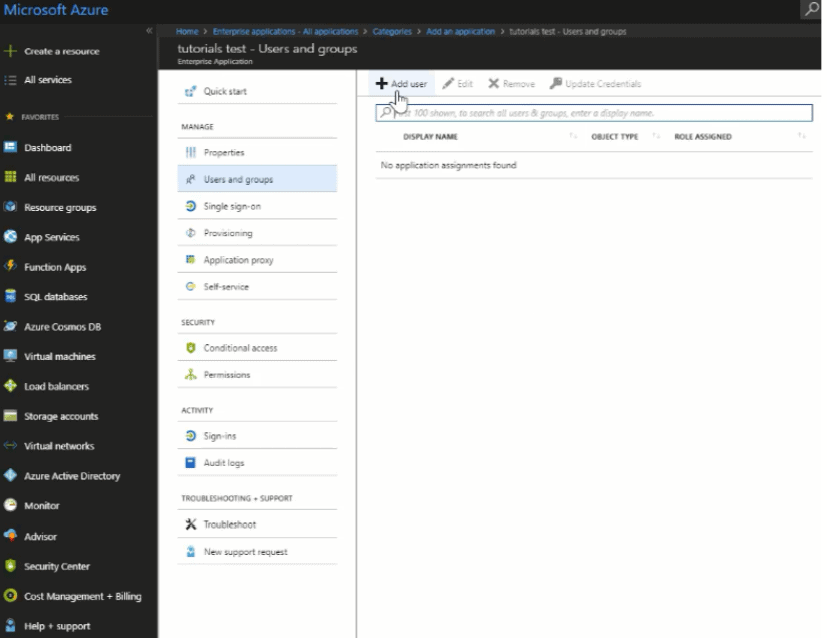
- Go to Azure and navigate to your application.
- Navigate to Manage > Users and groups, and click Add User.
- In the Select field, enter the name of the user. If the user exists, the Email appears.
- Click the Email ID to select the correct user, and click the Select button to complete the selection process.
- Click Assign.
- On the SecureW2 portal, navigate to Device Onboarding > Network Profiles, and click View against your network profile. The client window appears.
- Click JoinNow to start the onboarding process. A new .EXE file for the application is downloaded.
- Sign-in to your SAML application with your credentials and you will be granted network access.
Allow App to Access Active Directory
Active Directory serves as the database for network user credentials. The SAML application needs a directory in order to determine who is allowed to access the network. Here, we cover how to configure Azure AD to connect and serve as the directory that SAML can compare credentials against.
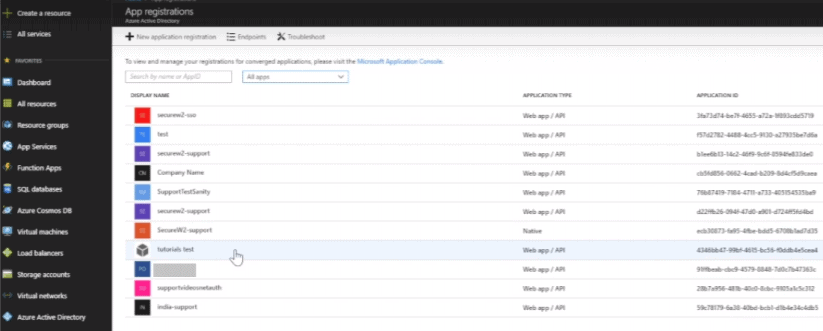
- Navigate to your Azure dashboard, search for registration, and select App registrations.
- Select All apps from the drop down. The list of all the applications including your application appears.
- Click on your application.
- Click Settings.
- Click Required Permissions, and click Add.
- Click Select an API, select Windows Azure Active Directory, and click Select.
- Click Select permissions, select the following permissions, and click Select.
- Read directory data.
- Read all groups.
- Read all users’ full profiles.
- Click Done.
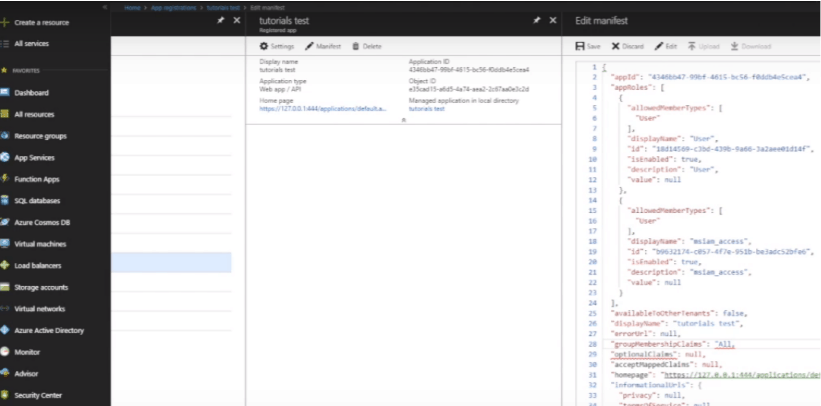
- Click Manifest > Edit.
- Change the value of the groupMembershipClaims variable to “All” in the source code,
and click Save.
Configure Attribute Mapping
Attribute mapping provides the attributes that are returned by the Azure IDP and used to grant network access to end users. Once the Azure IDP identifies an end user, it will send the attributes to SAML, which then relays the attributes over to SecureW2. SecureW2 can then encode the attributes onto the certificate that will be issued to the end user. You will need to configure attribute mapping in both SecureW2 Management Portal and Azure to set up SAML authentication.
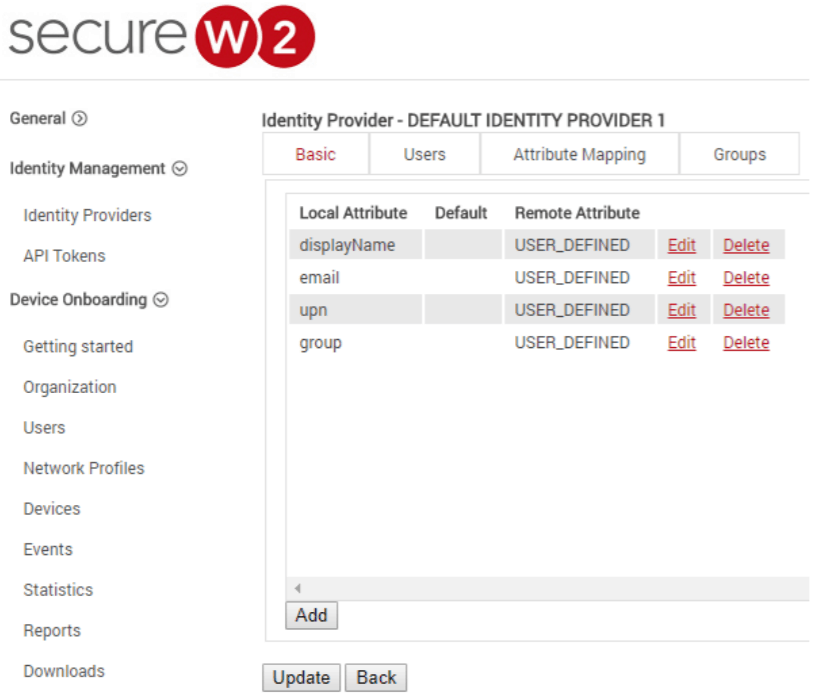
- Log-in to the SecureW2 management portal.
- Navigate to Identity Management > Identity Providers.
- Click Edit against your Identity Provider.
- Under the Attribute Mapping tab, click Add.
- In the Local Attribute field, enter upn.
NOTE: The local attribute is the name of the variable you create on the SecureW2 portal.
- From the Remote Attribute drop-down, select USER_DEFINED, and enter the URL in the next field.
NOTE: The URL contains information that Microsoft sends in the SAML token.
- Click Next.
- Repeat the steps to create the following local attributes:
- displayName
- group
- Click Update.
- Navigate to Policy Management > User Roles.
- Click Add Role. You can add roles such as an employee, admin, etc.
- In the Name field, enter the role name and provide a description.
- Click Save.
- Under the Conditions tab, select the Identity Provider.
- Select the Attribute from the drop-down list.
- Select the operator as Equals.
- Go to Azure > Azure Active Directory > Groups > click on the group, and copy the Object ID.
- In the value field, paste the Object ID that you copied from Azure Active Directory.
- Click Update.

Managing Certificates on Azure AD
Below, we’ve listed a few features of certificate-based networks and how they simplify network management.
Certificate Templates for Azure AD
Certificate templates are easier to configure and manage with SecureW2 because our GUI interface is more simplified than AD CS. There’s no need to duplicate default certificates and less steps are involved. Admins can increase security measures by creating network groups based on network accessibility and security permissions and configure a template for each respective group.
Azure AD CRL
RADIUS servers can view all the revoked certificates with a certificate revocation list (CRL) so it knows which certificates are allowed network access. This list can be downloaded periodically so the RADIUS server stays updated and SecureW2 gives admins the ability to adjust download intervals. Even if a device is stolen and the certificate is compromised, admins can easily revoke the certificate and it’s info will be placed on the list and denied network access. SecureW2 uses Industry-first technology to allow our Dynamic RADIUS to talk to your IDP and change policies for your users depending on your needs without having to revoke or reissue certificates, increasing overall security for your network.
Managed Device Gateways
SecureW2 gives Azure AD admins the ability to build a SCEP gateway for certificate enrollment and policy configurations. Instead of wasting time manually configuring every single device or leaving it up to the end user, admins can configure a SCEP gateway to push out payloads that enable managed devices to configure themselves for certificate enrollment.
If your Azure environment contains Microsoft Intune, check out our guide on integrating SCEP to enroll certificates on Intune.
Does Azure AD Support Identity Lookup?
Azure AD is the “Connector” that connects your on-premise Active Directory (which uses LDAP) with Azure. It allows you to continue to support LDAP authentication with your existing applications (such as Wi-Fi and VPN) because you don’t have to get rid of your Active Directory. Many RADIUS on-premise RADIUS servers support Identity Lookup if you are using LDAP to communicate with AD.
However, a common desire we’ve seen in the field is support for real-time policy enforcement (like Identity Lookup) but with an all-cloud infrastructure. Historically there was no method of implementing Identity Lookup with CloudRADIUS servers, but today things are much better. With SecureW2, you get all the benefits of the LDAP protocol (real-time policy enforcement, support for Wi-Fi and VPN authentication) with our CloudRADIUS, and only need an Azure directory, enabling you to cut costs and get rid of your on-premise servers.
Integrating Azure AD with CloudRADIUS and SecureW2’s Onboarding Software
Instead of wasting your time trying to figure out how to deploy an on-prem PKI, go with SecureW2’s CloudRADIUS because it already comes with a managed cloud PKI and authenticates with EAP-TLS. Click here to see our guide on integrating Azure AD with CloudRADIUS.
Manually configuring every device is tedious for the IT department and incredibly risky when left to the end user. Instead, use SecureW2’s software to simplify device onboarding for both BYODs and managed devices by setting up auto-enrollment.
There’s no need to spend hundreds of thousands of dollars on an on-premise PKI when you can integrate SecureW2 managed Cloud PKI and CloudRADIUS at a much more affordable price.


