With the recent Microsoft, Uber, and Cisco breaches coming from MFA Fatigue attacks, it’s becoming apparent to many organizations that a password + MFA authentication policy isn’t enough. The inherent vulnerability of passwords is precisely why many tech titans like Microsoft recommend moving away from them and using more secure alternatives like certificate-based authentication (CBA).
Microsoft has taken its own steps towards eliminating password use, introducing Azure AD CBA to smooth the transition to certificates. Making the jump to CBA with Azure AD can be surprisingly easy when you have the right tools like a managed PKI.
In this blog, we’ll explain what Azure AD CBA is, show you how to configure it, and answer FAQs using our own internal research.
What is Azure AD CBA?
Put simply, Azure AD CBA is Microsoft’s tool to enable your users to authenticate to any Azure AD (Microsoft Entra ID) application using an X.509 digital certificate instead of a username and password. Digital certificates are comprised of a template containing information on a device or user – sort of like a virtual photo ID. Thanks to asymmetric encryption, certificates can’t be stolen by hackers, making them much more secure than farmable passwords.
Once it’s properly configured, users will be able to choose to sign into Azure AD apps using their certificate going forward, which means no more having to remember complex passwords or type them in repeatedly, no password resetting every 60 days, no inevitable fountain of IT support tickets every 60 days, and most importantly, no sharing passwords.
There are tons of things employees in your organization have to sign into, whether it’s Wi-Fi, VPN, or workplace applications. In the past, this typically meant that users would need to have a whole cornucopia of credentials, each set with (ideally) a different password. It’s obvious why this is a hassle to maintain.
How to Configure Azure AD CBA with SecureW2
Getting Azure AD CBA set up is fairly simple, and really only takes a few steps – especially if you’re using an MPKI like JoinNow Connector PKI and already have an application established for it in Azure AD.
Prerequisites:
- Have a client certificate enrolled on your device that contains the attribute User Principal Name
- A Root CA and Intermediate CA (we create ours in SecureW2)
- An active Azure environment and Azure AD Subscription
- Ideally as a Global Administrator
Overview of the Configuration:
- Exporting and/or Creating a SecureW2 Certificate Authority
- Uploading your CAs and CRL to Azure
- Creating a CBA Authentication Policy in Azure
- Issuing Client Certificates to Users & Devices
- Test
Exporting and/or Creating a SecureW2 Certificate Authority
To set up Azure AD CBA, you’re going to need a Certificate Authority (CA) to link to your Azure. Our management portal automatically generates a root CA that you can use, other wise you are free to create your own in our portal.
Exporting an Existing Certificate Authority
If you already have a Root and Intermediate CA in SecureW2, here’s how you can export them:
- Log in to the JoinNow Management Portal.
- Go to PKI Management > Certificate Authorities.
- In the Certificate Authorities section:
- Download the Root CA you’d like to use for Azure AD CBA
- Download the respective Intermediate CA
- Click View on each CA, to find the respective CRL URLs. Save each Base and Delta CRL for each CA.
Creating a New Certificate Authority
If you’d like to create a new Certificate Authority to use for Azure AD CBA, here’s how to do it:

- Go to PKI Management > Certificate Authorities.
- In the Certificate Authorities section, click Add Certificate Authority
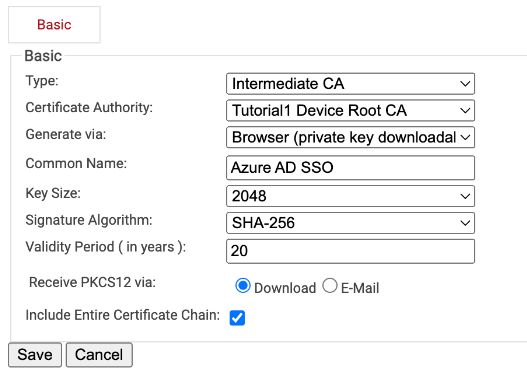
- Create a Root and/Or Intermediate CA, configure settings as desired, and click Save.
- Once it’s been created, navigate back to Certificate Authorities, and click View on your newly created CA. Save the Base and Delta CRL.
Importing the Certificate Authorities to Azure
Now that we have our Certificate Authorities handy, we can import them into Azure.

- Login to Azure
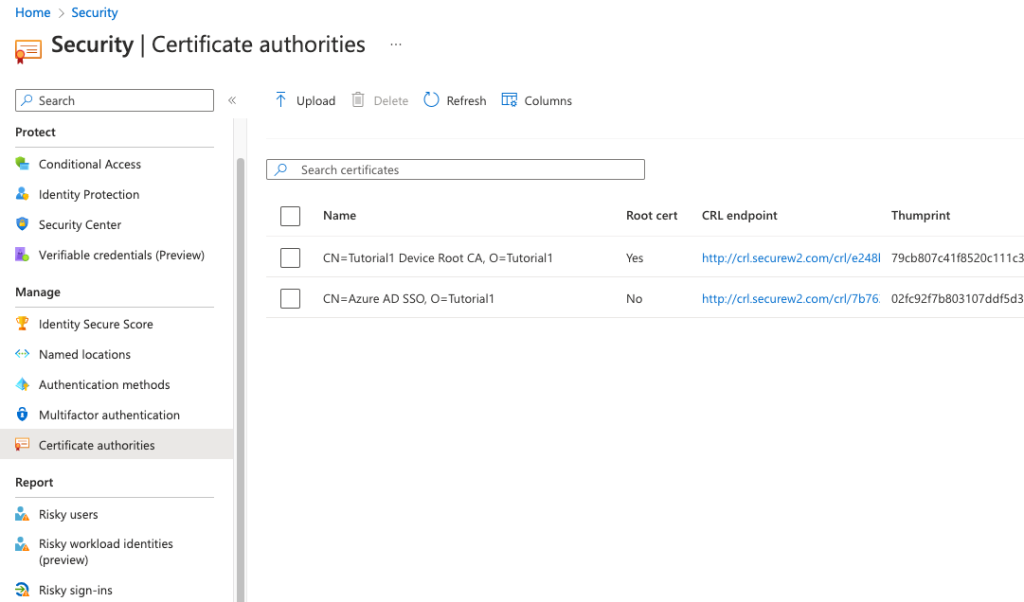
- Navigate to Security > Manage > Certificate authorities
- Click Upload
- Upload your CA
- Check Yes if it’s a Root CA
- Paste your Base and Delta CRL URLs
- Click Add
Note: Certificate Revocation List URL is where you upload your Base CRL.
Creating a CBA Authentication Policy in Azure

At this point, you need to indicate in Azure itself that you are going to be using certificates. You can do this in your Azure portal, pictured above.
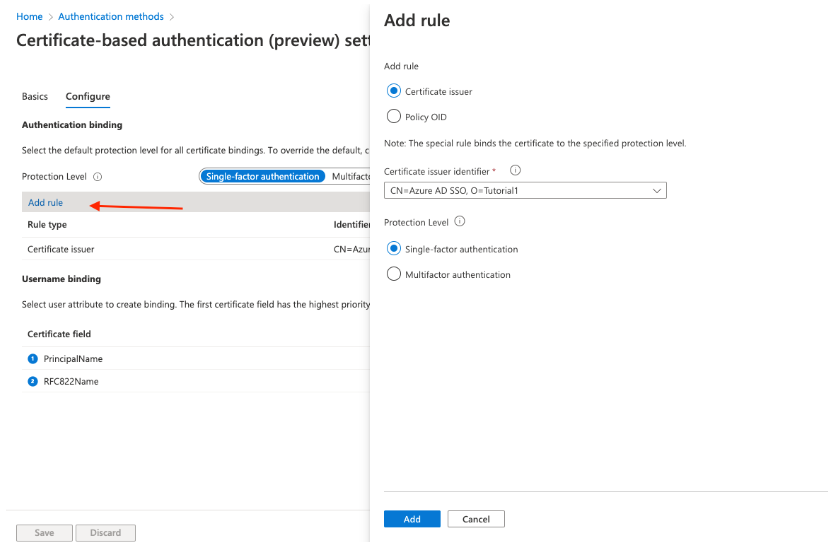
Through the Policies section, you can go into Certificate-Based Authentication, add a rule, and choose where the certificates will be coming from.
Authentication Binding and MFA
The authentication binding policy helps to determine the strength of authentication to either a single factor or multi-factor. An admin can change the default value from single-factor to multifactor and configure custom policy rules by mapping to issuer Subject or policy OID fields in the certificate.
- Click Configure to set up Authentication Binding
- The protection level attribute has a default value of Single-factor authentication. Select Multi-factor authentication to change the default value to MFA.
- Click on Add rule
- You can create a rule using Certificate Issuer, or Policy OID.
- Click Single-factor, or Multi-factor authentication.
- Click Ok to save the custom rule
Username Binding
After creating the authentication binding policy we need to create a username binding policy to verify the user in the tenant during the authentication. Basically, you are telling Azure which certificate field contains identifying information, which it will look up during the authentication phase.
- Create the username binding by selecting one of the X.509 certificate fields to bind with one of the user attributes.
- The username binding order represents the priority level of the binding. The first one has the highest priority and so on.
- If the specified X.509 certificate field is found on the certificate, but Azure AD doesn’t find a user object using that value, the authentication fails. Azure AD doesn’t try the next binding in the list.
- The next priority is attempted only if the X.509 certificate field is not in the certificate.
- Choose RFC822Name and select userPrincipalName under User Attributes
- Choose PrincipalName and again select userPrincipalName under User Attributes
- Click Save to save the changes
Issuing Certificates to Users
If your organization uses an MDM such as MEM Intune, we can integrate with your infrastructure to automatically enroll end-users for certificates through our gateway APIs. This ensures that the managed devices on your certificates can self-enroll for certificates without any input from the end-users themselves, avoiding any potential misconfigurations.
Even if your network is comprised of unmanaged devices, issuing certificates doesn’t need to be complicated, thanks to our onboarding software, JoinNow MultiOS. With JoinNow MultiOS, enrolling for certificates is as simple as end-users navigating to your customized onboarding portal, entering their existing credentials, and letting our dissolvable client handle the rest. You can read more about this process in our guide.
Frequently Asked Questions:
Can CBA be used as a second factor of Authentication?
No, Azure AD CBA is only usable as the first factor of authentication. However, because of the inherent strength of certificates, they allow you to bypass multi-factor authentication which is required with password-based authentication.
Can I turn off passwords, and only use CBA?
No. However, there have been several organizations that have enforced a CBA-only policy by replacing all passwords with very long and complex passwords that are only known by systems administrators.
Can CBA be used for Conditional Access Policies?
We have been getting this question a lot. In theory, it seems possible, but no one in our research department has been able to figure it out. We will keep you updated!
Does Azure AD CBA require Active Directory Federated Services (AD FS)?
No, it does not. Microsoft even mentioned how AD FS environments can adopt Azure AD CBA in their introductory video.
Can Azure AD Issue Certificates?
Azure AD CBA makes it easier for administrators to implement CBA, but can Azure AD create and issue certificates? Unfortunately, the answer is no, Azure AD cannot generate or distribute certificates.
Azure AD is a directory service. Although it contains much of the information you would use in a certificate template, it does not itself generate certificates. Creating, issuing, and eventually revoking certificates requires a Public Key Infrastructure (PKI).
Microsoft does offer its own free tool for this: Active Directory Certificate Services (AD CS). However, creating a PKI from scratch using AD CS can be challenging. It requires a high level of expertise and experience with PKIs, in addition to being time-consuming. What’s more, AD CS is an on-prem utility from the Active Directory days. It has limited capabilities when connected to a cloud platform like Azure, and still requires on-prem components. Building an on-premise PKI is quite an expensive and involved process, and it negates many of the benefits of cloud computing like enhanced security, speed, and accessibility.
The alternative is a managed PKI like SecureW2’s JoinNow Connector. Managed PKIs are configured for you and integrated into your existing architecture, then maintained by the vendor on your behalf. Because they are cloud-based, you also don’t need to worry about unexpected power outages or local severe weather impacting their function. And, in the case of JoinNow Connector, you have a whole team of PKI experts to rely on when you run into issues.
The final step varies depending on whether you are issuing certificates to managed or unmanaged devices/BYODs. Fortunately, SecureW2 has the solutions you need to issue certificates to either type of device.
For devices managed by an MDM such as Microsoft Endpoint Manager/Intune, you can use WSTEP gateway APIs to auto-enroll devices for certificates. On the other hand, for unmanaged devices and BYODs, we created JoinNow MultiOS, a dissolvable client that gives users the ability to self-configure their own devices with no risk of misconfiguration.
Deploy Azure AD CBA with SecureW2
The greatest challenge to widespread implementation of digital certificates has been the difficulty associated with managing them. Building a PKI to create, issue, and revoke certificates used to require an enormous amount of expertise that few network administrators had.
Now, however, infrastructure like Azure AD provides a clear path to CBA, and managed PKIs like JoinNow Connector further pave the way to the destination of secure, passwordless authentication. There’s no need to build your own PKI from scratch, pouring time, money, and expertise into the endeavor when you can utilize an already existing MPKI that was created to integrate with your existing infrastructure.
If you’d like to see exactly how your network would look with SecureW2, we’d be happy to demonstrate. Set up a free demo with our team to see firsthand how easy going passwordless can be.
